Welcome back to Tutorial Tuesday!
It’s kinda ironic to me that I am teaching ANYTHING. I mean…I’m a homeschooler…who went to college to be a teacher…realized VERY quickly that I am not cut out for it and will praise the fine educators of the world till kingdom come…took up a camera less than five years ago and photoshop after that….to be here, attempting to teach you little tricks with no real training myself except a whole lot of trial and error (emphasis on the error!). That’s irony people. At least I think it is…I was homeschooled afterall 🙂
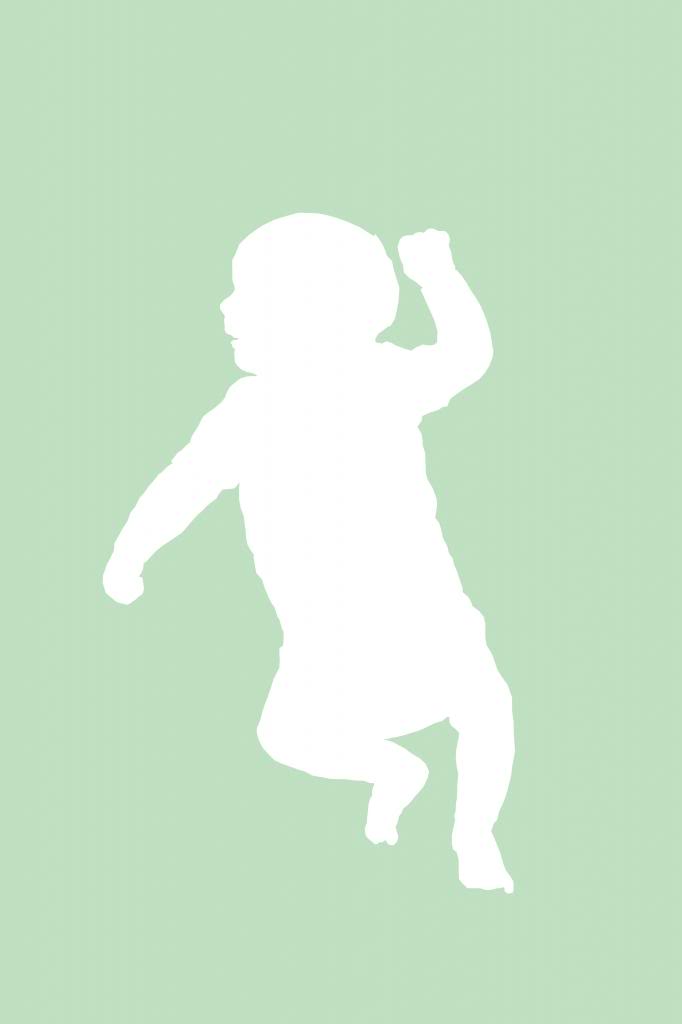
So today I am going to show ya a VERY easy method to make a silhouette in photoshop. Basically you can take any photo and make it into one of those cool personalized gifts or artwork. I love the idea of doing it for newlyweds or as a baby shower gift. But first, the things to note….I use Photoshop CS4…not all photoshop is created equal. This method works but there are several ways to skin a cat…not that I condone skinning anything. That’s like Silence of the Lambs creepy. It rubs the lotion on its skin. Let’s get started.
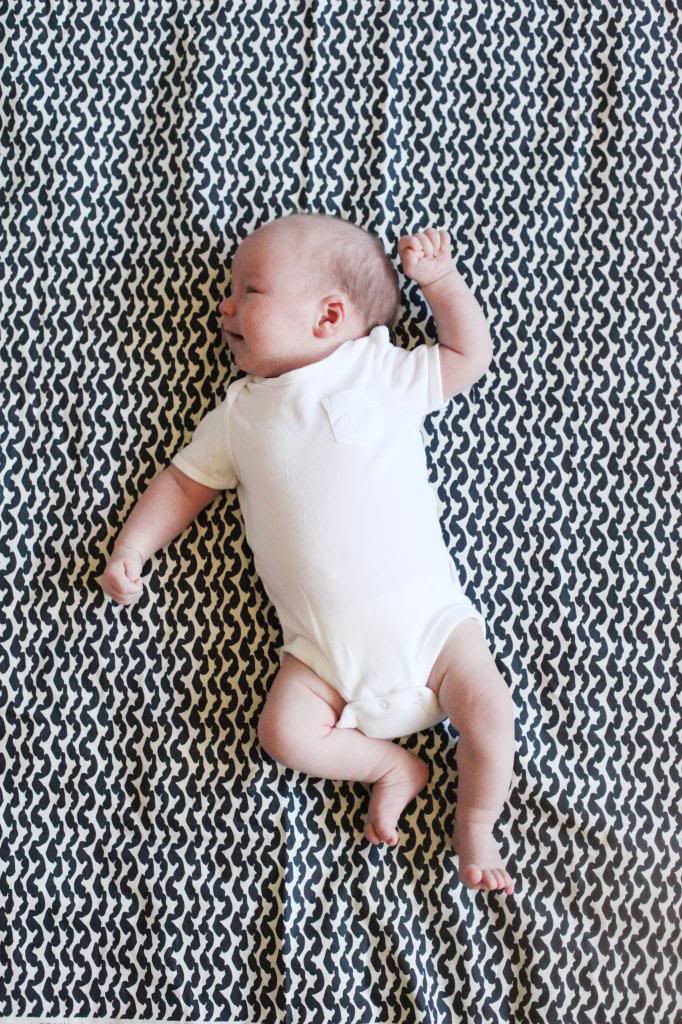
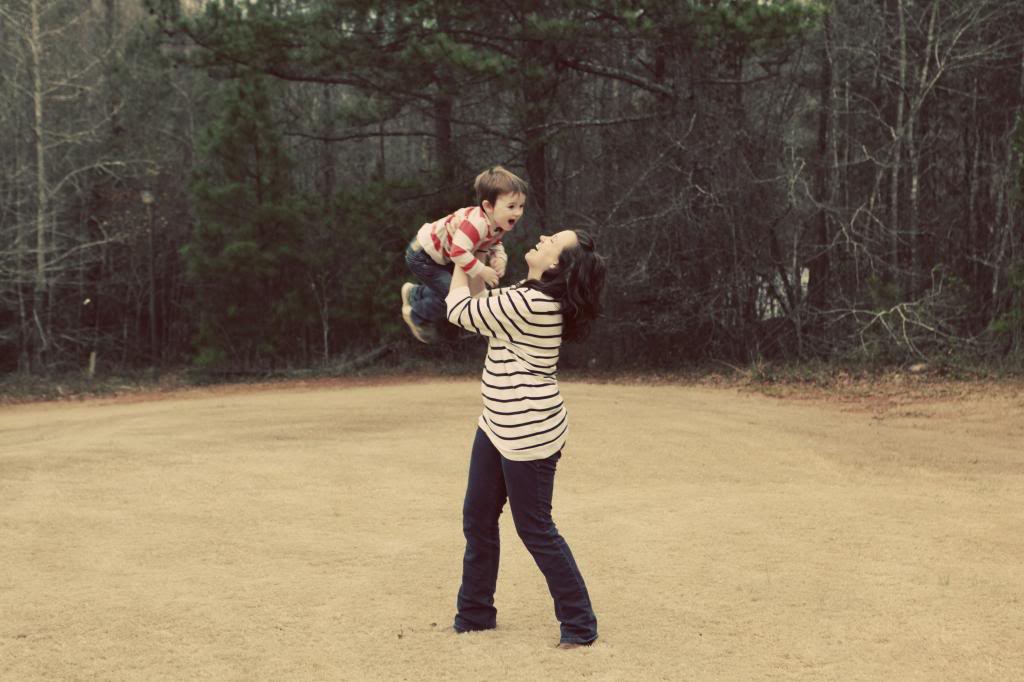
This time around I am gonna make a silhouette out of a picture of me holding Will. Jeremy took this photo and it was late in the evening and we were moving a bunch so the original was blurry…but that’s okay!!! This is a silhouette! It can be done with a blurry photo! That’s one of the best parts 🙂 I did edit it so that it was artsy fartsy because I loved our expressions…so that is what we are working with.
And we are making this…

First things first, you wanna open your file in photoshop. I like to look for profile shots – they show the face so much better. Also I like it when the legs are separated a little…and when there is little overlap of limbs. It just produces a better image.
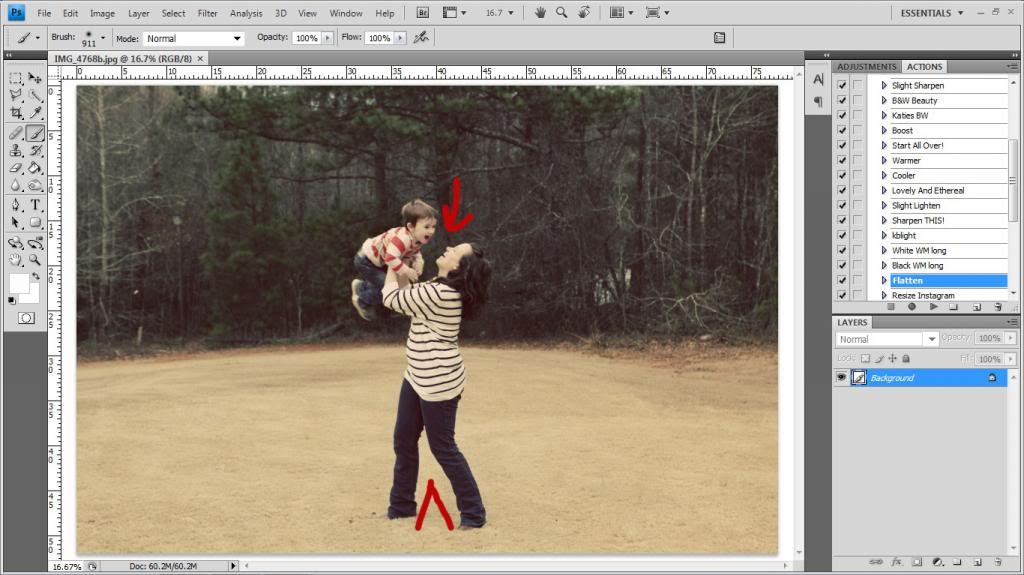
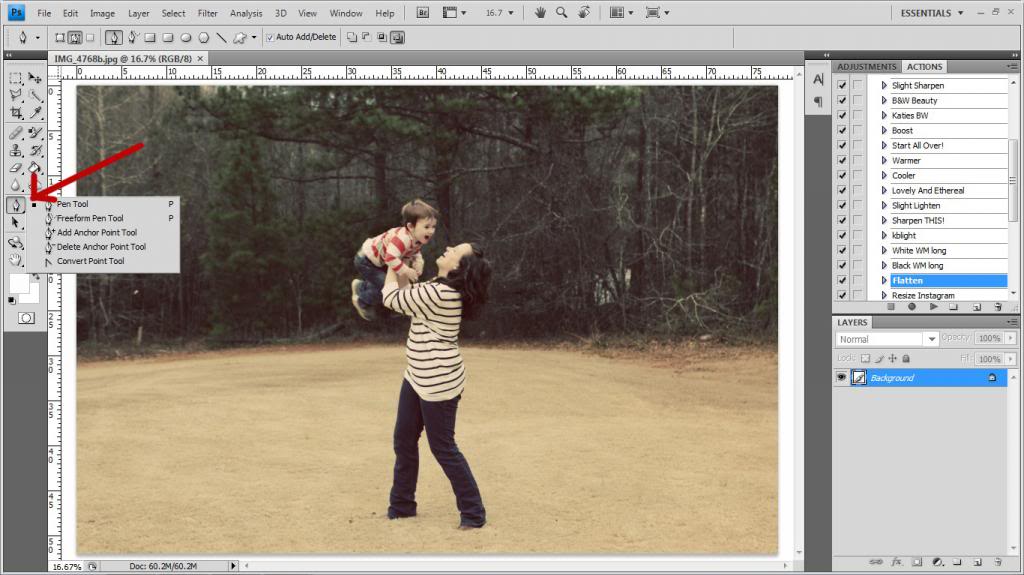
Now you want to select your pen tool. (shift and P are the shortcut)
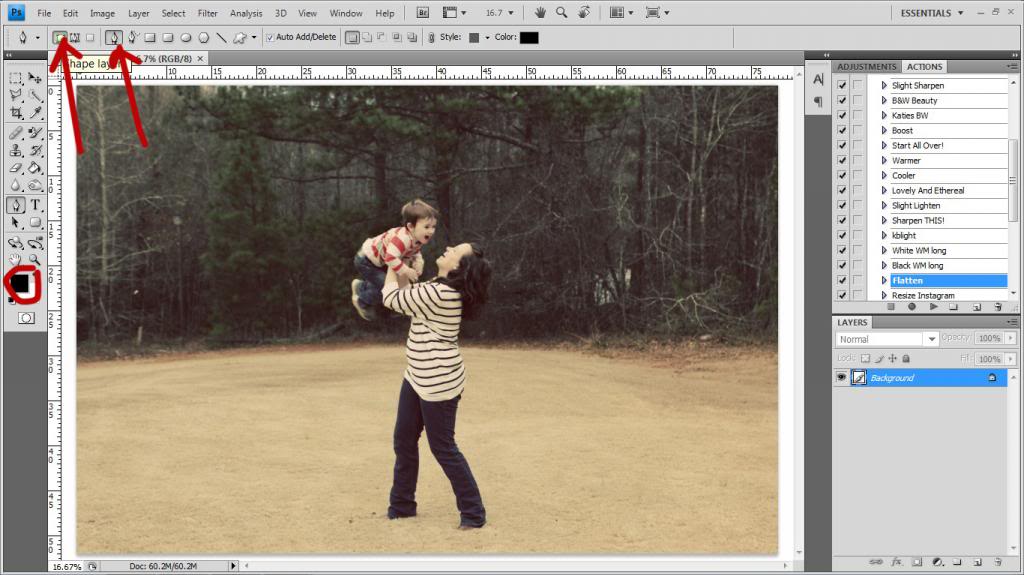
Make sure your color is on black and the shape layers box is selected (indicated by red arrows below).
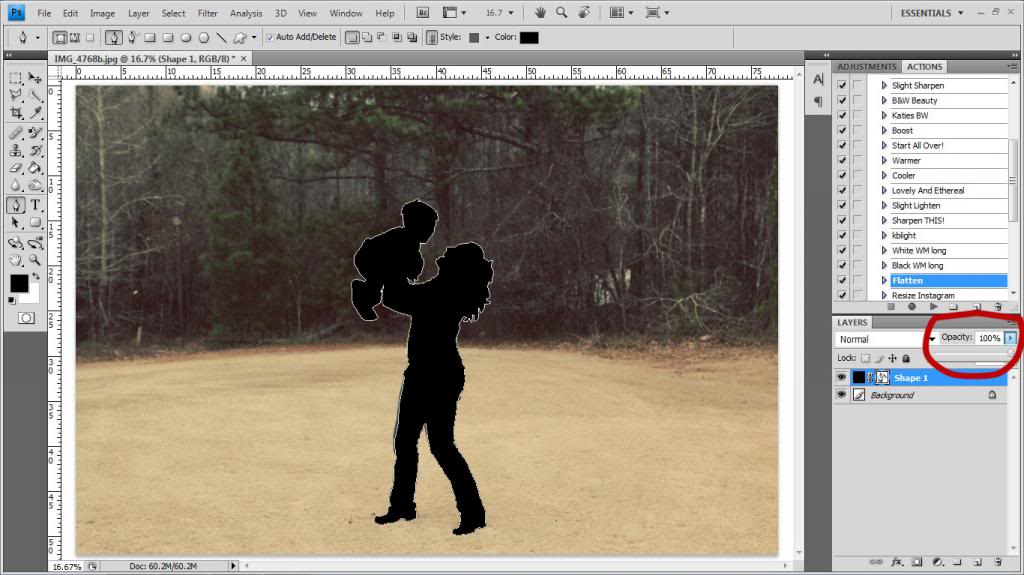
Next thing you want to do is start your dots. Basically we are outlining the entire picture with little dots….it’s like connect the lines. Also, you may want to adjust your opacity till it’s down near 50% (I circled it in red)…that way you can see what you are outlining.
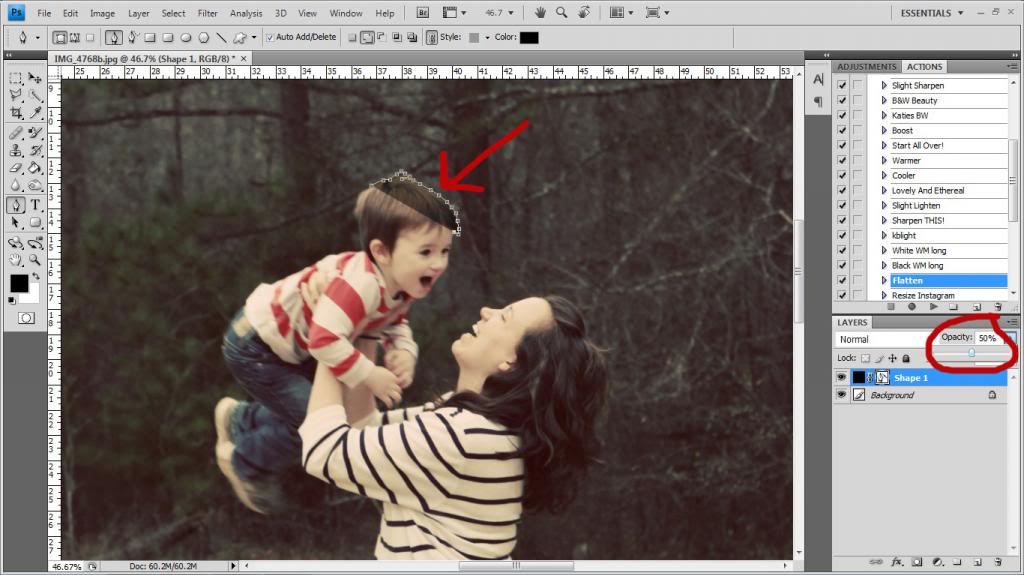
Make sure you give hair and faces a little more life by using closer dots and showing the separation.
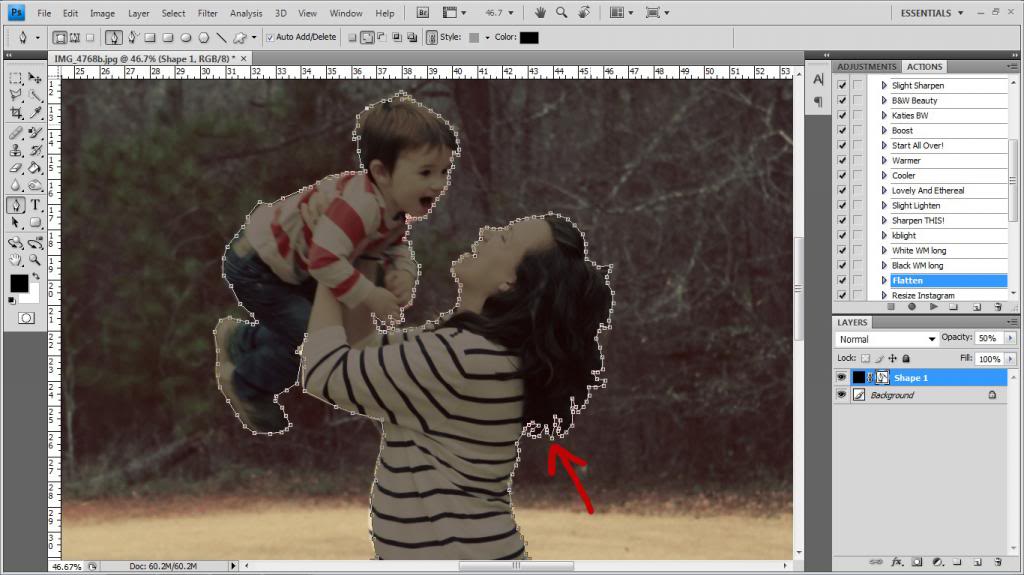
Once you connect all the way back to the beginning – the dots should disappear and you are left with a solid line around your image.
(Oh and yes, my shoes were disappearing into the grass so I created some – remember that if your original photo doesn’t show it, you have to remember to create it!).
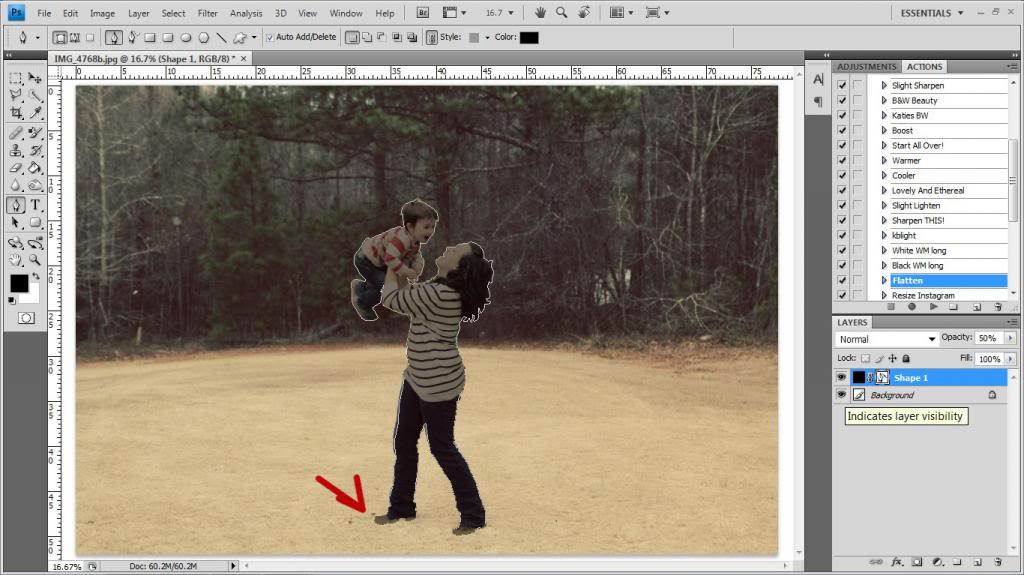
Now adjust your opacity back to 100% to see your silhouetted image.
Now we are gonna open a new layer. (shortcut is Shift + Control + N). Make each window smaller so that you can see them both. Remember that you are gonna see the different layers of your window in the sidebar but only for the selected window….so click on the top bar of the window to make sure you are on the right one.
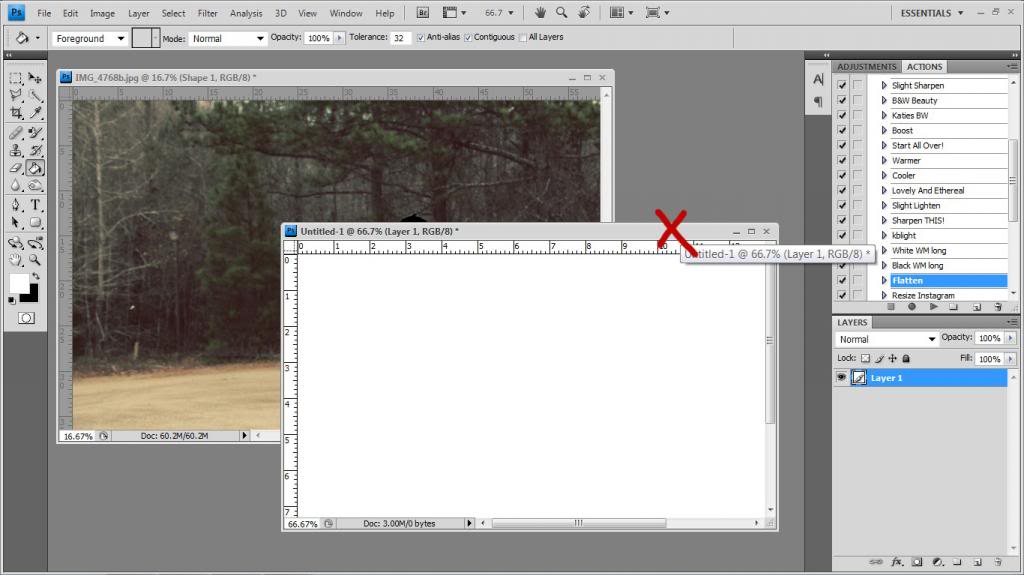
So what we are gonna do is click on the top of the original image and select our shape layer. Then you are gonna hold a left mouse button it (this grabs that layer) and drag it onto the other open layer (our window that is untitled!)….this copies the layer onto the new window that has a white blank background.
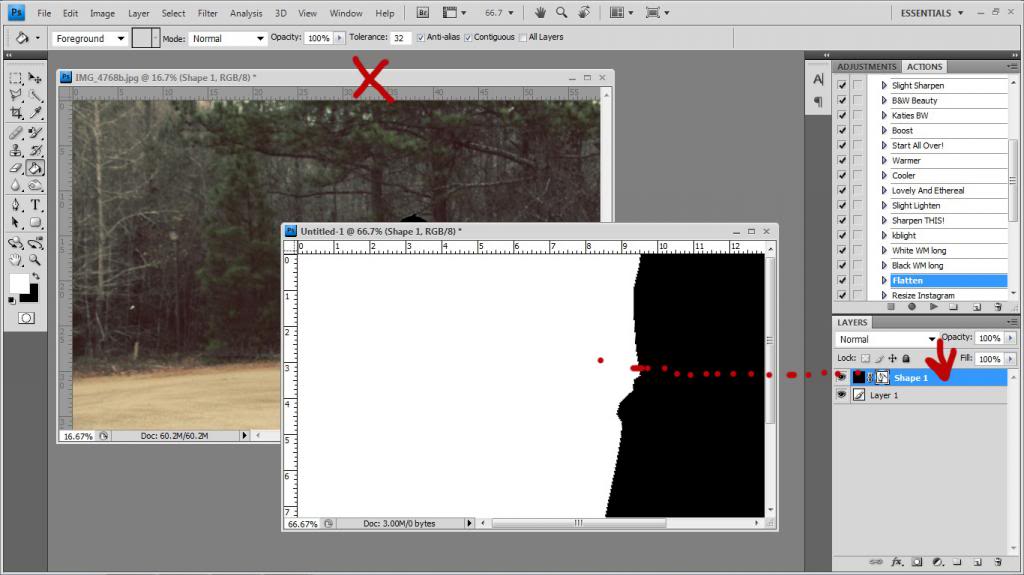
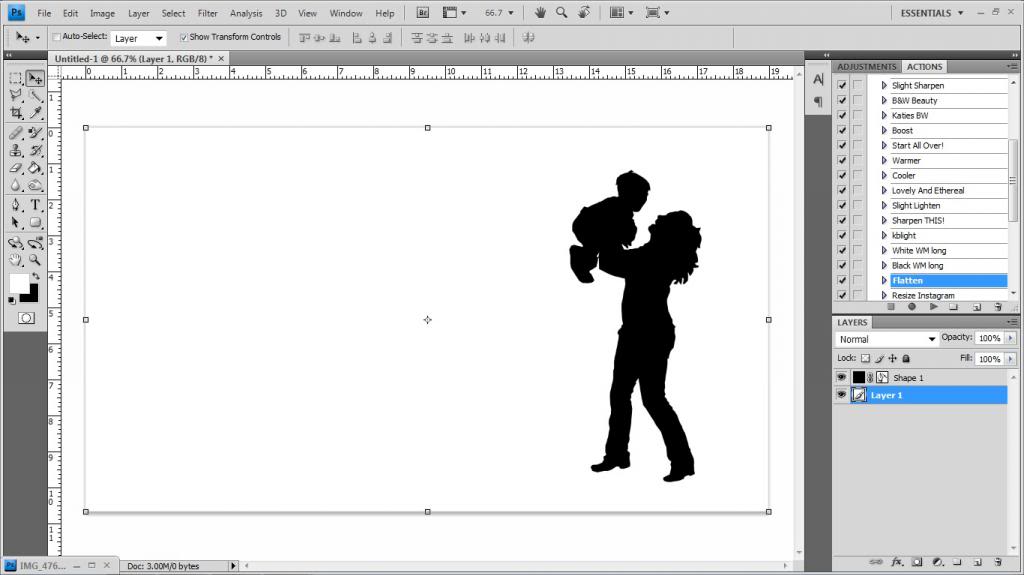
After you resize the silhouette to fit the background (just grab the little boxes on the corners to stretch it bigger or smaller), you can move it around to your hearts content.
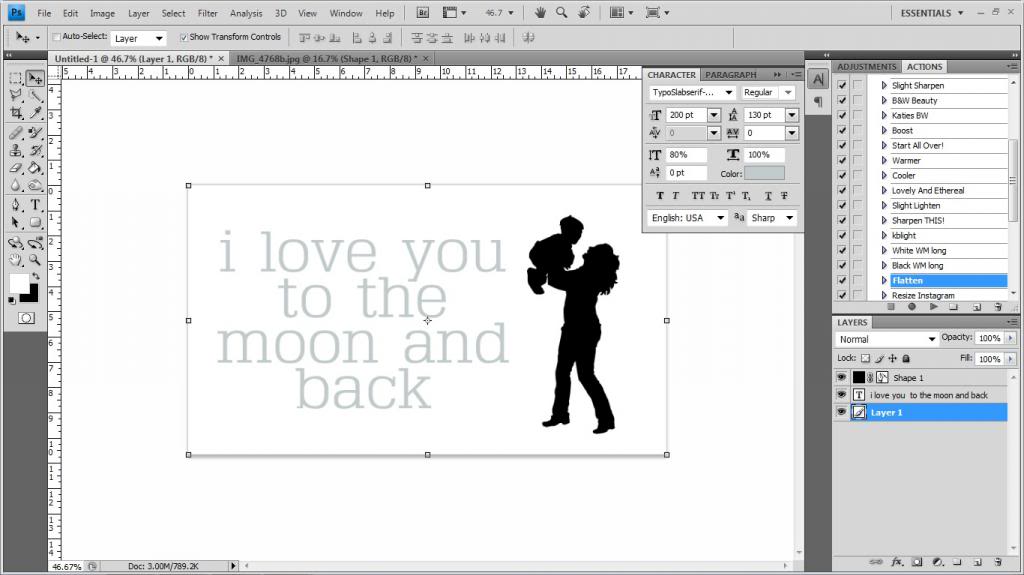
If you are trying to make artwork, you can add words…
It ends up looking like this…
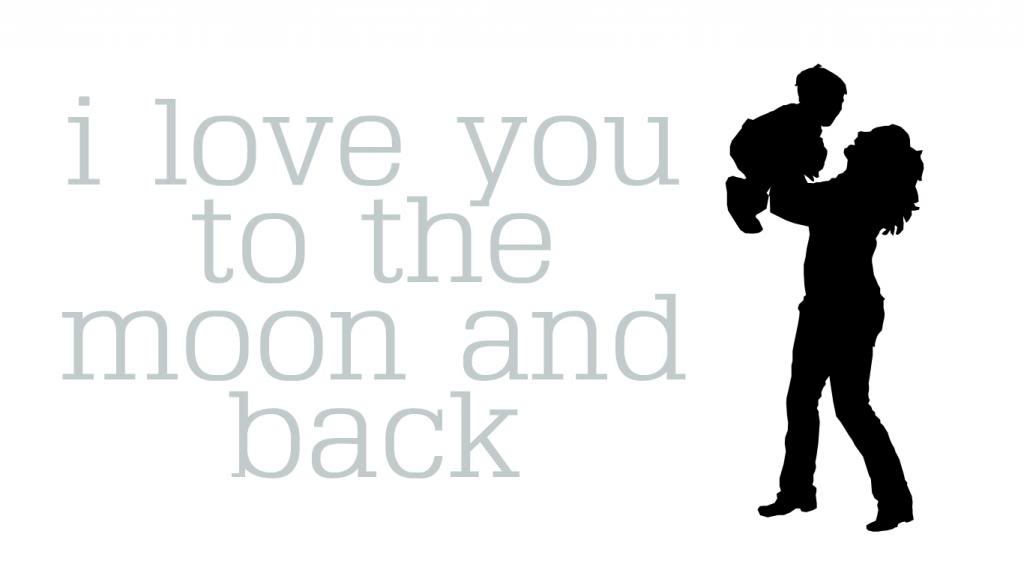
Or you can change the background with another layer to make the silhouette over words. Wouldn’t this be a cute project for a childs birthday or for fathers day? Or for a thank you note to someone that helped watch your kids or a friend that that needs some cheap personalized art on their walls?

Happy photoshopping!
p.s. We only have two more photoshop sessions left!
I too went to college to be a teacher (elementary education) and quickly realized when I walked into that first class and saw the other students getting excited over things that I had almost no interest in that it was NOT for me. I switched to business (accounting to be exact) and I was much happier.
And thanks for the tutorial! I’ve been wanting to do this for like forever!
Thank you! I love this! Great idea for special gifts 🙂
I love these Photoshop Tutorials! You rOck Katie B!
I love these! Why are there only two left?? 🙁
Will you continue with some photography tips or something??
These are wonderful! Thank you for taking the time to share what you have learned and save all of us from lots of trial and error (emphasis on the error!)! 🙂
Is that last one John and Clara?
Katie! Cannot wait for birth story part 3…Dont make us wait here..who wants photoshop now..!! Just kidding.. 😉 when r u planning to post it ?
If you click and drag with the pen tool, you can make curved lines! Just an FYI for next time.
So cute 🙂 Its super fun that you are doing these – and I love how simple you keep them.
PS – is that last photo Jeremy & Will….or John & Clara? 😉 Shhhh, if it’s a surprise, I wont tell!
It’s John & Clara…I snapped it when they were here 🙂
xo – kb
YES! I am horrible with my mouse…so if you got mad curved lined skills, I definitely encourage this!
xo – kb
Hopefully this week!
xo – kb
yes 🙂 They are so cute together 🙂
xo – kb
I got it! Thanks so much!
That picture of you and Will is so so so lovely!! Love the silhouettes too! Great tutorial 🙂
I’ve just covered a lot of basics and would love to continue doing photography related tutorials but I wanna make sure to mix it up too! I figure I’ll do 12 photoshop tutorials a year…so six now and six in the fall 🙂
xo – kb
I love this! I’m definitely doing one like you did for Jeremy for Father’s Day (or maybe sooner since I don’t think I can be patient enough to wait until June). Question though, I made it all the way around my image and closed the selection. Then I noticed things looked a little wonky around my husband’s nose once I turned the opacity up. Is there a way to adjust the selection at that point?
Or, I guess I mean like the one of John and Clara, haha! Either way, I love it!
Katie,
I am loving these photoshop posts! You are an excellent teacher. I have been a photoshopper for several years but I really enjoy seeing how someone else does it! I always learn something new and love to see all the different kinds of art that can come from Photoshop!
they have the same walk! so cute 🙂 thanks for the photoshop tutorials – now all i need is photoshop, but i have pinned them all so here’s hoping!!!
Just wondering if you have looked into the picture problem. I really wish I could see the pictures….boo sad me. I thought it was just me but see now that I am not the only one who all of the sudden can’t view any of them. Thanks so much!
Sure! Remember it’s just like a pen – so you can take your eraser and fix it if it’s looking a little too hawky or take the pen and redraw if you need it to be a little less squished.
xo – kb
They do! I think it’s because she is built like her daddy – long and lean!
xo – kb
Is it in your reader? I have heard that sometimes adding the s at the end of the http makes it show them. Maybe try that and see?
xo – kb
OK, I’ll give it a try. Thanks Katie!
Your pics work on a laptop but not on mobile or my google reader app. Just an fyi. Its been that way since your ombre hombre post.
Thank you! Thank you! Thank you! I just got photoshop and am stumbling around. I find anything helpful and this looks like an amazing tool! Thanks for your easy to use tutorials 🙂
How cool, Katie! Thanks for sharing. P.S. I think the boob job tutorial still takes the cake for me 😉 he he.
Love the tutorials. One small piece of criticism if I may? You really go out of your way to imply that home schoolers are less educated and somehow incompetent when it comes to anything beyond a limited skill set. It is kind of offensive. There are a lot of home schooled kids that get into great colleges and have great successful careers and are very smart. Maybe your experience was less than stellar (although you seem very smart and able) but home school kids have a hard enough time getting “credit” without the comments like yours. I feel like you are wording things in a way that throws ALL home schooled kids under the bus, and it’s unfair.
Ohhhhh I love love love it!!! Only two left? That makes me sooo sad!
Can you tell me what phone and browser you use?
xo – kb
Dude Samantha…I’m not diggin’ other kids…just wanna rag on myself. Okay…and tease my mom a little 🙂 I actually got into great colleges and have a successful career…I think there are plenty of smart public, private, homeschooled and everything in between kids out there. I just like to be self-depricating because it is way cooler than being all ‘I’m smart…really really smart. my brain is so gigantic.”…oh and yeah…my parents (two former public school teachers) are probably rolling their eyes at all my homeschool jokes. If you want to read about my homeschool experience, here is a post I did all about it 🙂
xo – kb
I used to be a teacher as well. Wasn’t for me, though, and now I’m back at it for graphic design. And Photoshop is just my nemesis-I’m so intimidated by it!!! So much to know in there!
Can you do one teaching how to hide chords and gross background annoyances!
I have one coming where it should help with things like that. Stay tuned 🙂
xo – kb
Hey now, no homeschool bashing! 😉 I was homeschooled 3rd grade all the way til I graduated high school (bless my dear mother’s gray hairs). Ironically I’m an elementary school teacher now…I guess something worked, cause I love school!
These images are adorable. I wish I had the talent or patience to learn photography.
I’m terrible with the pen, lasso, etc. tools so I do something different to select (unless it’s an easy background). You make it look so easy and not pointy. I once sat for almost 2 hours redoing a silhouette because I couldn’t get the boob round looking! I don’t know about you but I prefer my boobs to be round and less pointy/Madonna like. Hahah
P.S. I’m loooooving the PS tutorials!
i love these!!! i need to get my photoshop on and get to it!
awesome job kb!
PUT THE LOTION IN THE BASKET…
See! Irony! And of course, no offense – just poking fun at myself 🙂
xo – kb
I wish I could use PS, but I find it extremely difficult….I take the lazy girl approach…blow it up, cut it out, trace it, & color it in. But your tutorials make me want to try again bc it seems so effortless!
Try one more time! Do it! Do it!
xo – kb
Hey can you suggest which version of P.shop we should be using?? I’m planning to get one soon.
Thanx for the lovely tutorial. xo
I am looking at buying a photo editing software, not something too basic but not as crazy expensive as some of the photoshop programs can get. Looking to spend maybe $200. Anyone have any suggestions of good programs around this price point?
Would LOVE to be able to create something like this 🙂 I used photoshop in making the yearbook back in high school (almost 10 years ago now!) and would really like to get back into applying effects etc to my own photos.
I always say use Elements first – just because it’s like training wheels for Photoshop. Some folks just aren’t meant for riding bikes…same applies here 🙂 No need in wasting the big bucks!
xo – kb
Photoshop Elements is great and it’s under $200. I would definitely suggest that.
xo – kb
OK, so I love the idea of this but I don’t have PhotoShop. Katie, are there any other programs I can use to do this? I made silhouettes of my boys the old fashioned way (black card stock and scissors), but I would love to be able to use the computer to capture images with more detail. Any suggestions or thoughts? Thank you!
Okay, so I have to admit that most of these tutorials are over my head. But, this? This I’m going to do. Today.
Thanks for sharing. You are a wealth of info for those of us who need the help. Seriously need the help.
Katie, thanks for the tutorials. I have actually learned some tips and tricks. When my boyfriend tries to teach me, I son’t understand a word he says but you make it easy!
You might wanna google…I have heard of free software online that does this but for the life of me I can’t remember the name. If you find something, let me know!
xo – kb
Wow! I haven’t read your blog in quite awhile, and I didn’t realize that you were pregnant and had another baby, and I was reading your blog and realized that we both have a Weston and William (Will)…that is SO crazy! 🙂
I have no patience for anything like this but would gladly pay….have you ever considered making these with photos sent via email to you?
We do?! CRAZY! They must be destined to be brothers 🙂
xo – kb
I’m sure that someone out there would do it…I just don’t know who? If someone wants to volunteer…they could leave you a comment!
xo – kb
Any advice on possible free sites or other ways to do this? I love it and want to try it, but I just bought a new lens, so there goes the software budget!
I’m not certain – I’ve heard of ones but now I can’t remember. Sorry!
xo – kb
I hope you keep the photoshop tutorials coming! I love them!
This turned out so cute!! It will be fun tracking the kiddos growth 🙂 Thanks for hosting another great Pinterest Challenge!
How would I do this in elements?
OMG I LOVE YOU. THANK YOU. BLESS YOU LADY.
Hmm…not sure?
xo – kb
Do you have the video version of this tutorial? That may be more helpful for us.
No I don’t. I’m sorry!
xo – kb
This was really helpful! Especially the tip about needing the shape layers box selected! Thanks!! I’ll be mentiong your site and tutorial in an upcoming DIY project I’ll be showing on my blog. Thanks again!
Thanks for the tutorial.. I will share it on my social accounts.
Awesome tutorial!! I didn’t know that It was so easy to do, I work over the tutorial and I am success. Thanks for sharing this.
my version of elements does not have a pen tool. can I use a different tool for this?
thanks
I bet it does! Sometimes you have to right click on the brush tool and it shows you other options – like the pencil!
xo – kb
Amazing round up of tips and tricks for background removal Chris! These aren’t the first time they’ve graced your site in one form or another but always SO helpful for a refresher and update when you pull them together into one article! Awesome!
Goes to show some great tips here, always learning
Great Photoshop tutorial and your writing articles are very easy and effective . I appreciate your amazing post .
I love these. It’s a too much helpful post for me. It”s a great photoshop tutorial.
Excellent Post. Thanks for Sharing your valuable information.
Excellent photoshop tutorial. Very valuable information share. I read this blog and a lot for learning this blog.