First off….dude THANKS. You guys have been really awesomely patient during this whole blog remodel and I ‘preciate-cha. Things are still getting sorted out and I am slowly tweaking the site and probably will continue to make small changes over the course of the next month (hello mobile device readers – I am working on your stuff next!) and ready to roll for a few more years….because that is how long I will need to recover from coding. But for now it is functional and I have a backlog of stuff I wanted to talk about (Nornie’s baby! LJ’s birthstory! The beach! crafts! remodeling!)
So first up…let’s recap some of those Bower Build-Off projects! Thank you to everyone that took the time to vote. I hate you all for making Jeremy win. His head is so big now. And then I have to hurl insults at him because I’m jealous. And then he cries himself to sleep on his huge pillow. (name that movie). No but seriously…I probably would have voted for his project too. It was a great great GREAT idea and it turned out better than we both expected 🙂
Today we talk about the big fat loser project – the bench. Yes, I made it and even though it wasn’t the winner – it is serving us well. Everyday we plop down right there and jam Weston’s fat feet into his shoes. As most toddler-mommy’s know, research shows that it takes about seven minutes to get one toddler foot into one shoe…so it’s a solid chunk of time we find ourselves on this bench.
Here’s how I made it…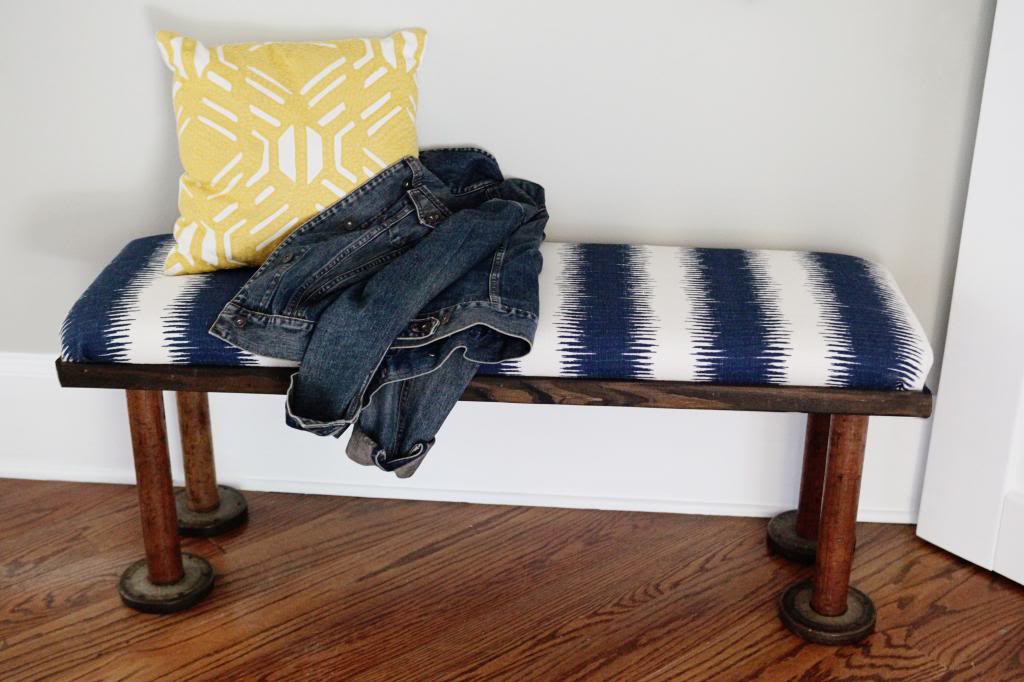
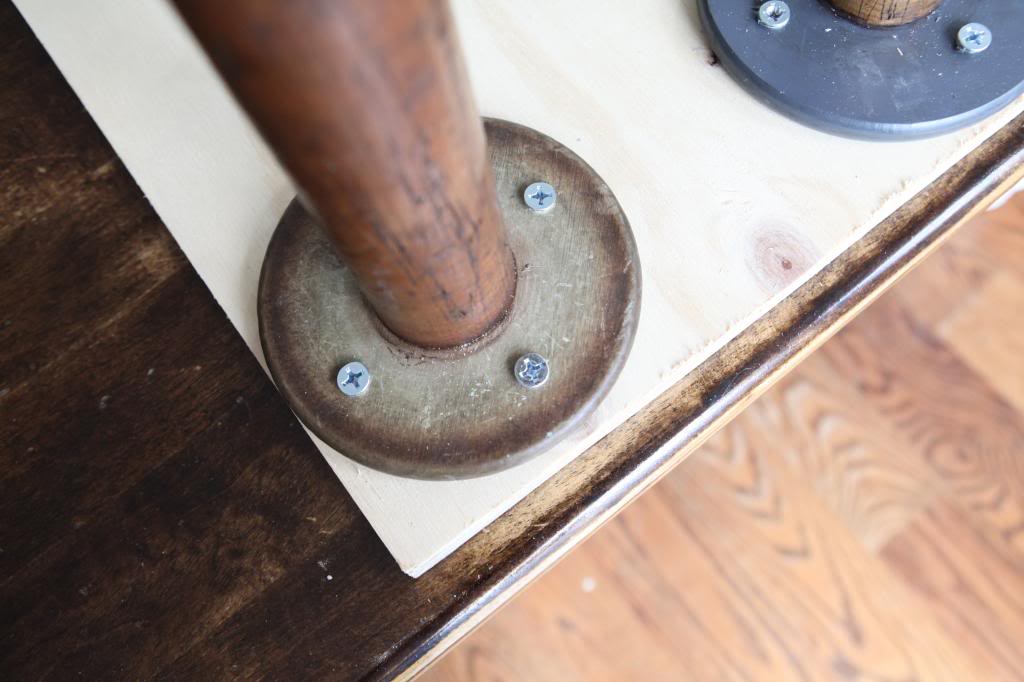
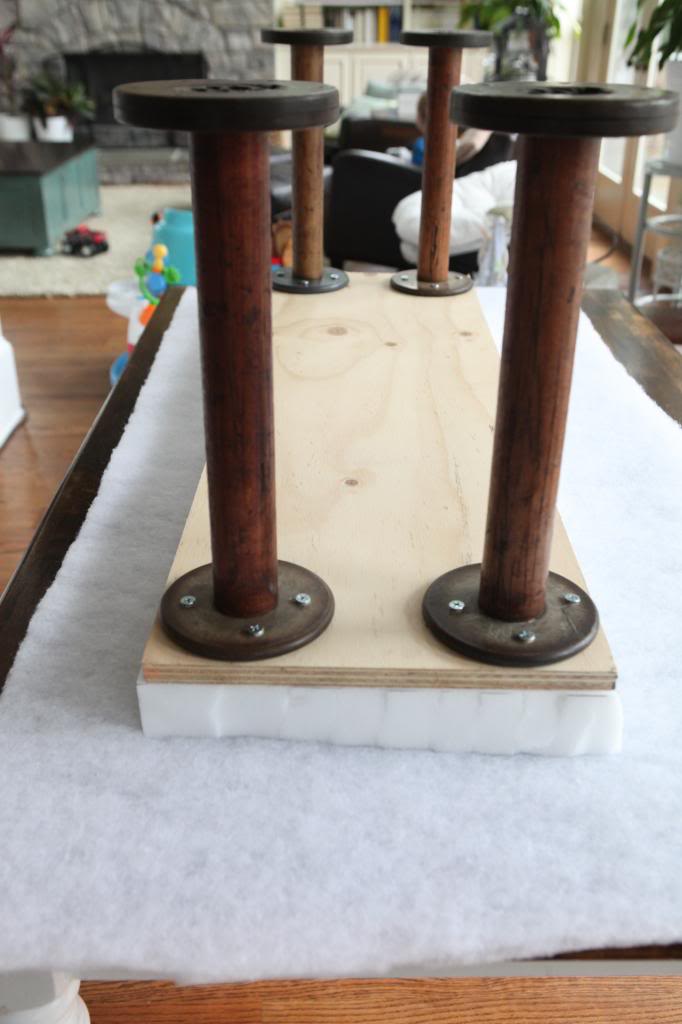
The first step was to attach the spools to the seat of the bench…a piece of 3/4″ plywood. Since the bottoms and the tops of the spools are a thick rubber type material, it means that predrilling is an absolute must.
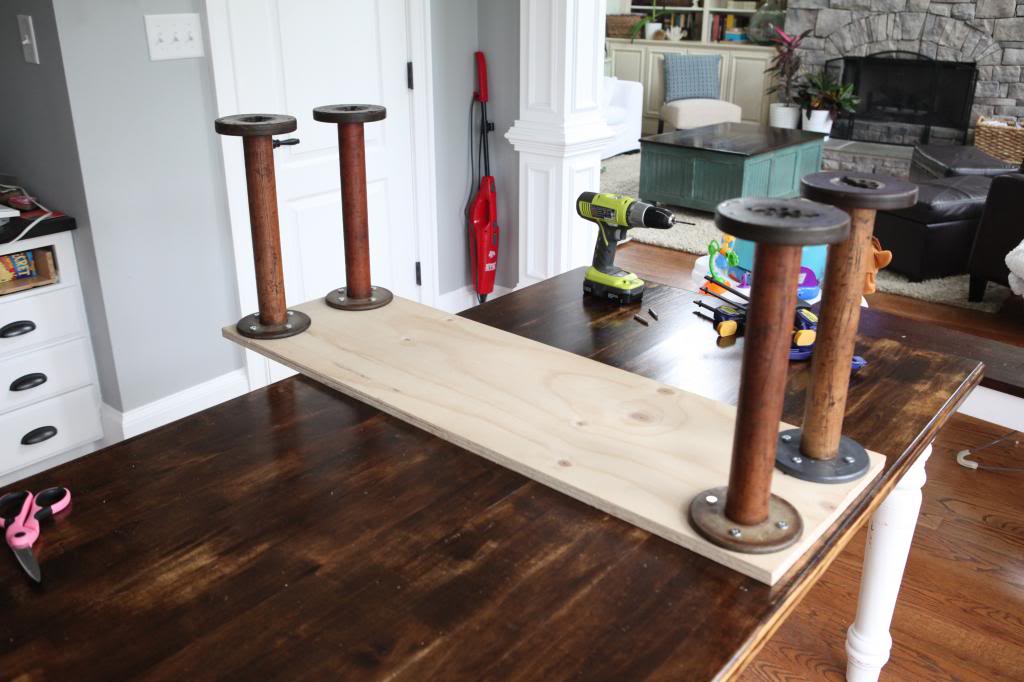
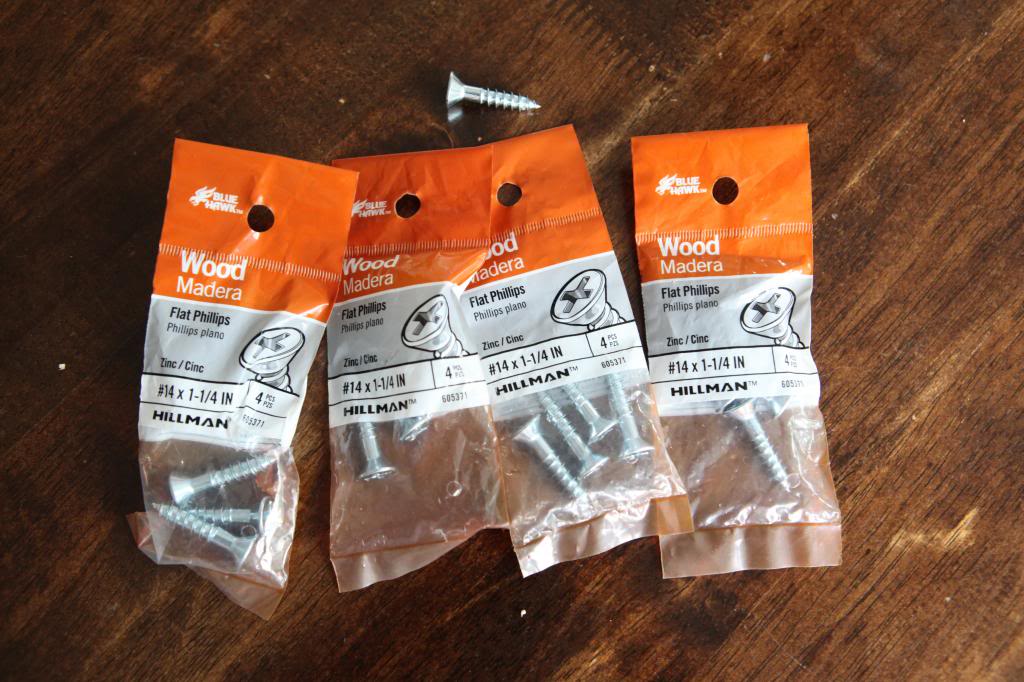
Then I used 1 1/4″ wood screws to hold each one in place.
See how the rubbery part of the one spool is a different color than the other? This is why I chose for the slender foot to be on the top – hidden under the bench and made our bench with the fat foot at the bottom (which is what people were saying makes the bench look a little foot-heavy.)
Just as long as nobody says that I look foot-heavy, I’m good though 🙂
After the structure was complete, it was time to attach the 2″ foam and the batting. I got a roll of this stuff at a local discount fabric store. You could also use one of those mattress pads that you can buy at Walmart or wherever.
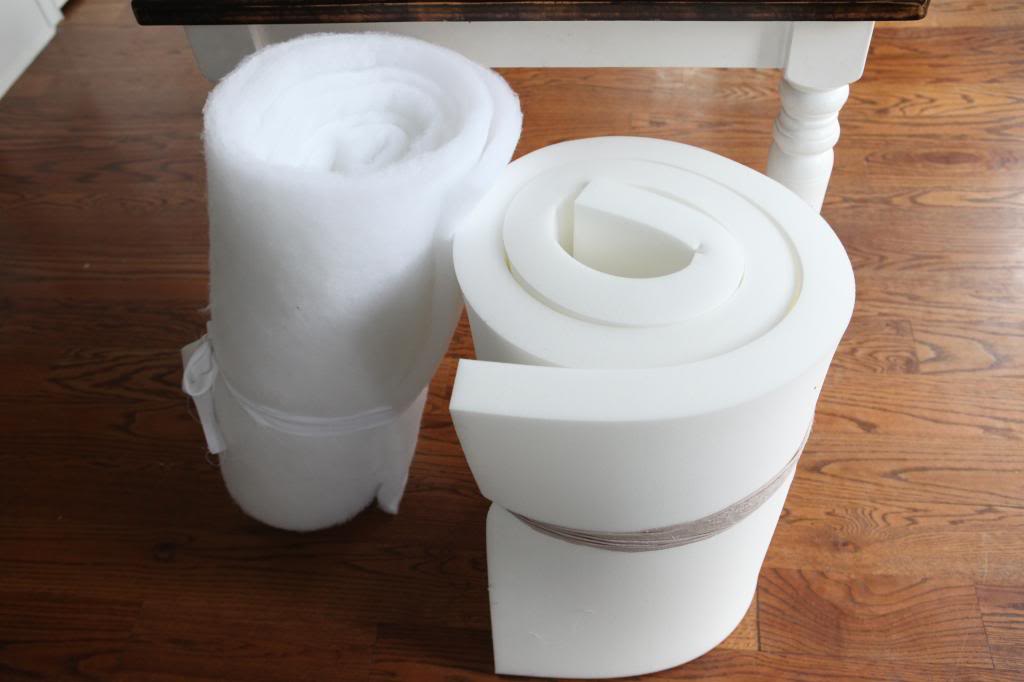
I simply laid the top down on the foam and marked it with a marker. Then I cut it out with scissors.

After that, I laid the bench foam side down onto a length of the batting. This will get wrapped around the bench on all four sides and stapled into place.
See how I say things and it magically appears?

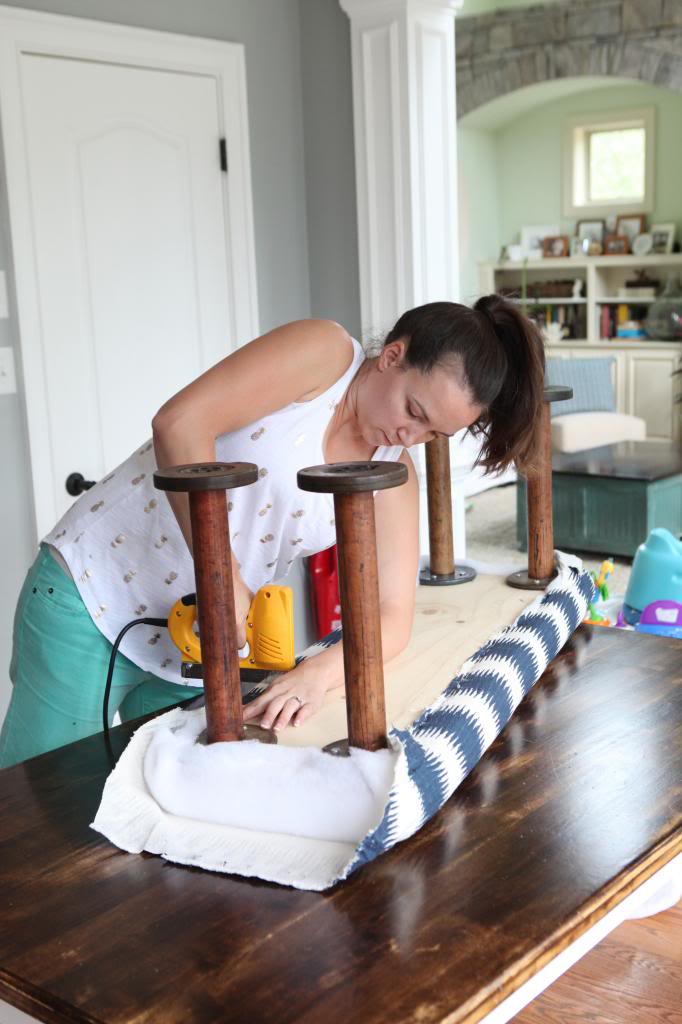
Then came fabric. This fabric is seriously my soulmate. I love it so much it hurts in my intestines.
That’s quite the lovely bald spot Katie.
And now for some high speed stapling….CAUTION: the following contains high speed video. Do not watch repeatedly or your brain may not process normal human speed again. If you do, you may experience anger at your spouse for not renovating fast enough or frustration at the fact that your kids can’t talk like chipmunks.
After I flipped the bench on it’s legs, I decided that it didn’t look finished enough so I took some scrap wood that we had cut off a past project (it was already stained so WHEW!) and cut it to length – mitering the corners. I attached it directly to the plywood by sandwiching the fabric inbetween and using a brad nailer to hold it in place.
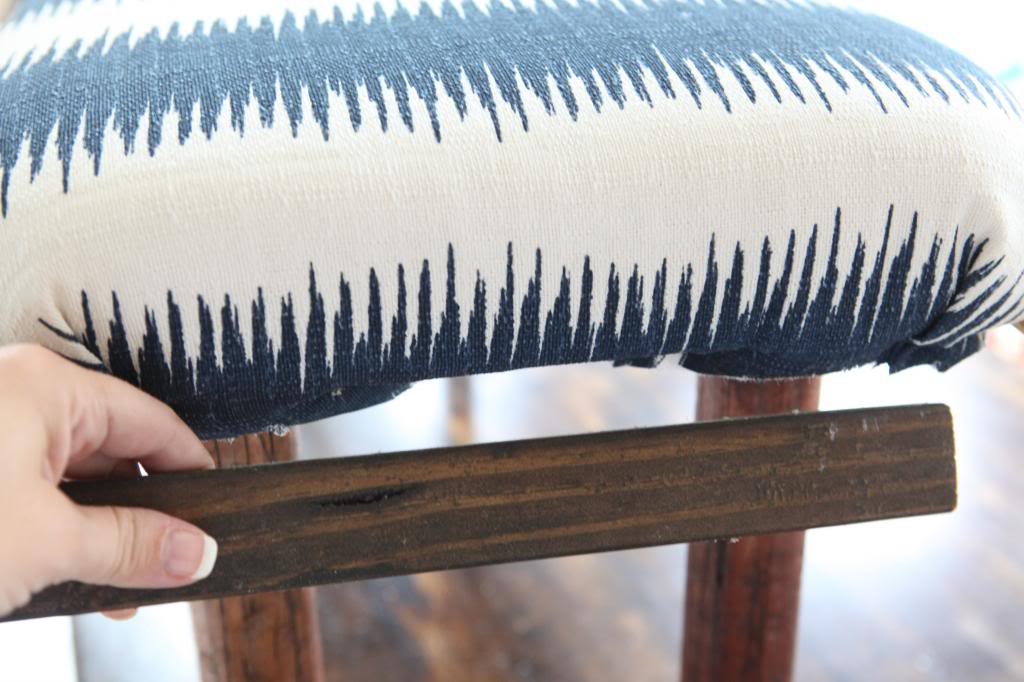
I honestly think that bit of trim really helps make it look way more finished.

So that is my bench tutorial! Hope the five of you that liked this project will get something out of it. The rest of you can wait till later for the lamp tutorial….because that is how it works for Toddlers and Tiaras. And also as punishment for not giving me and my loser bench a pity vote 🙂
“Hope the five of you that liked this project will get something out of it. ” hahahahhahahahah. I also voted for Jeremy’s, but I did love this too!
I think this bench is great and obviously functional! By itself I think everyone would have oohed and ahhed, just most of us liked the lamps better when compared.
What if you painted the rubber spools on the bottom or something like that so it does’t look so choppy and stumpy?
And wouldn’t it be great if we could really get stuff done that quickly!!!
I think this is awesome and it also looks like something I could actually complete! Great job, once again!
Loved the sped up video! Great job KB!
I LOVE the video. It was actually helpful to see the entire process done that way. It was also really cute. Great bench!
I cast my vote for your bench. I loved the lamps but personally, I would want to DIY a bench more. 🙂
Oh, also, what staple gun do you use?
The video was hilarious! (Yes, hilarious! I’m a SAHM, I’m easily entertained.) But in all seriousness Katie, it is like a sin that you look so good after just having your third little munchkin!!!
[So I Married an Axe Murderer – my fave of all time, just showed it to my kids and they are quoting it all of the time now too!]
I liked the bench, even voted for it. I wanted to make something of my own with upholstery so I am glad to have seen how easy it actually is to do… and FAST apparently!
Well thank goodness you’re back! After YHL’s announcement yesterday I was feeling like all my favorite bloggers were leaving me. I actually found your blog through YHL after you did a Pinterest Challenge with them. Let me just say, since I’m still feeling weepy over YHL, that I think I speak for all readers of Bower Power when I say that you are freakin’ amazing and I have no idea how you do it. I absolutely love reading your posts and they really and truly brighten up my day. Thank you so much for what you do and the time and effort that you put into this blog.
I voted for your bench! I love it!
So I Married an Axe Murderer!!!! “It’s like and orange on a toothpick!” 🙂
I loved the bench!
Love the tutorial as well but let’s be honest .. there isn’t a chance I’ll be making this myself! There’s not one ounce of craftiness in my body! So, if you’re ever willing to part with it you can totally send it my way!
Hey Katie, been following you for YEARS now…
Anyway, saw you were using scissors to cut the foam. Just a tip – it’s a lot easier (and keeps a smoother edge) to cut foam with an electric turkey carver. I grabbed a Black & Decker one really cheap (originally for Thanksgiving), but use it when I need to cut foam. Smooth as butta’. 🙂
LOVE the fast tutorial 🙂 It really was informational and I learned everything you did in a minute or so rather than 45 🙂 Cute project! ….and I can totally sympathize with the bald spot… why does our hair thin so much in those spots and not all over? Guess we should be thankful we get to keep some of it through the postpartum blues 🙂
HAHA!! I too voted for the lamps (sorry!). This is still a really cute bench though. I love how simple it is.
So I Married an Axe Murderer…love that movie!
I loved that video! You have a way of making these projects looks fun, do-able, and really appealing! (she says as she longs to see the lamp tutorial…)
“Hope the five of you that liked this project will get something out of it. ”
hahahaha! I voted for you because I was sitting next to a spool lamp at voting time. It didn’t feel that original to me (even though it is still a good idea). I think the trim really helps the finished look and feel more balanced. I loved the video and the sound of the staple gun.
I didn’t vote for the lamps…but I didn’t vote for the bench either. I just couldn’t decide so I didn’t vote at all! Lame, I know! So anyway…I love your bench!
I loved watching that in fast-mo. Now can we please see it in slow-mo? I seriously love watching things in slow motion, it’s a sickness!
For a cleaner look without the trim (though it looks lovely the way you did it), you could staple on the fabric and fold neat corners BEFORE attaching the legs. The screws can go right through the stapled fabric into the plywood. 🙂
I laughed my head off at that video! And that’s invaluable after a long tiring day at work, so…THANK YOU!!!!!! For that and so much more 😀 I love your blog!
Anais
So I Married an Axe Murderer!!!! This quote just confirms my love for you! Love the bench too. 🙂
So I Married an Axe Murderer
So I Married An Axe Murderer- best movie! Head! Pants! Now!
So I Married an Ax- Murdered!
“It’s like an orange on a toothpick!”
This turned out amazing! I’ve never seen such a simple DIY for a padded bench!
hahaha……..you are hilarious Katie! You are a master stapler too!!!
I voted for the bench! Do I get a prize?
Ha ha. Funny as always Katie. I loved the super stapler video. so cute! And side note, I love the mint pants and gold/white shirt combo! I also voted for Jeremy’s so you can blame me for his inflated head. But I liked both of them so glad to see this tutorial 🙂 Thanks!
I also really liked this bench but voted for the lamps just because I thought it was more unusual to think of than the bench. But the fabric on this really did make it stand out. Do you happen to know what the fabric is?
The sound of the staple gun is so funny! I love the way that this project turned out and totally would have voted for it, but the lamp idea was just so creative. I would have never thought of it! Good job to both of you!
Sarah
SO I MARRIED AN AXE MURDERER!!!!! Bahahahahaha I quote that movie all. the. time.
hehe!
So I Married an Axe Murderer!
It’s such a great DIY project and looks really impressive. I did vote for the lamps too (gasp!) BUT this is still a fantastic project, you should be calling it runner up, not loser bench, because it’s really awesome and clever! Good job Katie
Your bench, for me, was a really close second place. I probably voted more so for the lamps cause I have a spot for them in my house, and I thought the idea of DIYing a lamp sounded very complicated so they got my vote….but your bench didn’t get the credit it deserved because of the winner/loser situation!
Like I said in my previous comment, you are the true winner cause you got 2 awesome projects to display in your home, and only made one 😉
Katie, I love your bench. And voted for it. 😉 Both projects really are incredibly creative! Love the new look of the site!
I can’t find your blog archives – can you please point me in the right direction? Thanks : )
PS I love your bench project!
Ha! So fun to watch you in action! You need to add some great music to that video.
The site is looking great! Definitely headed in a good direction.
More videos!!
:o)
V
Life+1
I voted for the bench!!!! So functional and I can’t believe how QUICKLY you got it done! Thanks for sharing the video, I’ve always been nervous about ‘upholstering’ like this…but maybe I really can do it?!
Prize is ten thousand Bower Power points.
xo – kb
HAHAHA!
xo – kb
I’ve done that in the past but I didn’t have great success! Do you have a trick when handling it?
xo – kb
It’s a Black n Decker electric one.
xo – kb
I don’t. I got the piece as a remnant and it had no words on it telling the brand or anything!
xo – kb
Soooo… maybe it could be called the “second place bench” instead? I really like the bench! I just liked the lamps more… ;-p Also, cute outfit! Also, listening to the nailer on high speed was hilarious.
Wanna hear something funny? This was my second attempt at the bench and I couldn’t attach the legs over/after the fabric because the leg placement looked weird.
xo – kb
It was a sad day huh? I was majorly bummed too. I feel like I am going through YHL withdrawl 🙁
xo – kb
do you and yhl still talk to each other?
Best video ever!
Thanks for the reply! Well I also really love and will just have to search!
I voted for the bench! I love that video – it is hilarious. I have a soft spot for speeded up humans though – it is weird.
“Head! Paper! Now!”
Oh my word! How I adore your humour! The way you keep it real is adorable. I would truly thump my hubbie if he beat me at a home project!
Yup. I couldn’t live without that girl 🙂
xo – kb
“See how I say things and they magically appear?” Best. Blogger. Quote. Ever.
Love it, love you. 🙂
Super cute bench, love the colors. I would love to do something like this for my bedroom.
http://palsywalsyblog.blogspot.ca/
I love your bench and love your new blog design but can I suggest you remove the upper banner next to Bower Power. I think it takes a lot of focus from your blogs name.
Oh and I am also on YHL withdrawal.
xoxo
I love the bench and the lamps, so there! Plus, I don’t remember which one I voted for?? Middle age chick problems. I have a question about the new layout. I cannot figure out how to get to an older post when I have read the current one on the page. For instance, I’m at the end of the bench tutorial post, where is the link to get to the next post (older, of course)? Hope that makes sense, and I’m ready for my d’oh moment when you tell me the answer. 🙂
I usually abhor the “where did you get the so & so” questions, but I’ve been looking for a soft buttery yellow purse everywhere and no dice. Love the look of yours hanging from the hook! Does she have a name?
(Great. Now I’m THAT girl.)
LOVE the bench and the super speed tutorial is AWESOMESAUCE. Please do more of these!!! I’m a “see one, do one, teach one” type, and this totally fed my visual need! Thanks Katie!
I laughed watching the video also! I must be tired because I have the giggles thinking about it!
I voted for the bench… I love it!!
I recently tried that for the first time and I struggled, too!
so I married an axe murderer!!
love the fabric too!
Soooo, could you head on over to their place, take a few pics of what they’re doing and post them? JK #withdrawal
PS Your site looks GREAT. You are so talented and so funny!!!
PPSS Dad, how can you hate The Colonel? Because he puts an addictive chemical in his chicken that makes ya crave it fortnightly!
aww thats nice to hear!
Haha! I would totally do that #noiwouldntyesiwould
xo kb
I got it a awhile ago at Kohls.
xo – kb
HAHA! Oh and I added the links back in…hope it works!
xo – kb
Oh, strange! But the finished product came out great and looks grounded/more solid with the frame. Nice job.
I made some pretty awesome euro couch pillows with faux leather on one side and that fabric on the other. I also made my son a backpack with it. I couldn’t throw the scraps away because I love it so much. I’m sure I can find a use for them!
I love the colors!
http://www.mysimplesignificance.blogspot.com