Imagine me wiggling my nose, Samantha-style and getting my cabinets to grow a few inches.
I wish.
In fact, don’t we all kinda wish we could have magical powers when it comes to DIY? Well, in this case I do. I just wiggle my keister and bada boom, Jeremy does whatever I want. JOKE. Sort of 🙂
Seriously though…these cabinets needed to grow about ten more inches to cover up the exhaust pipe from our vent hood.
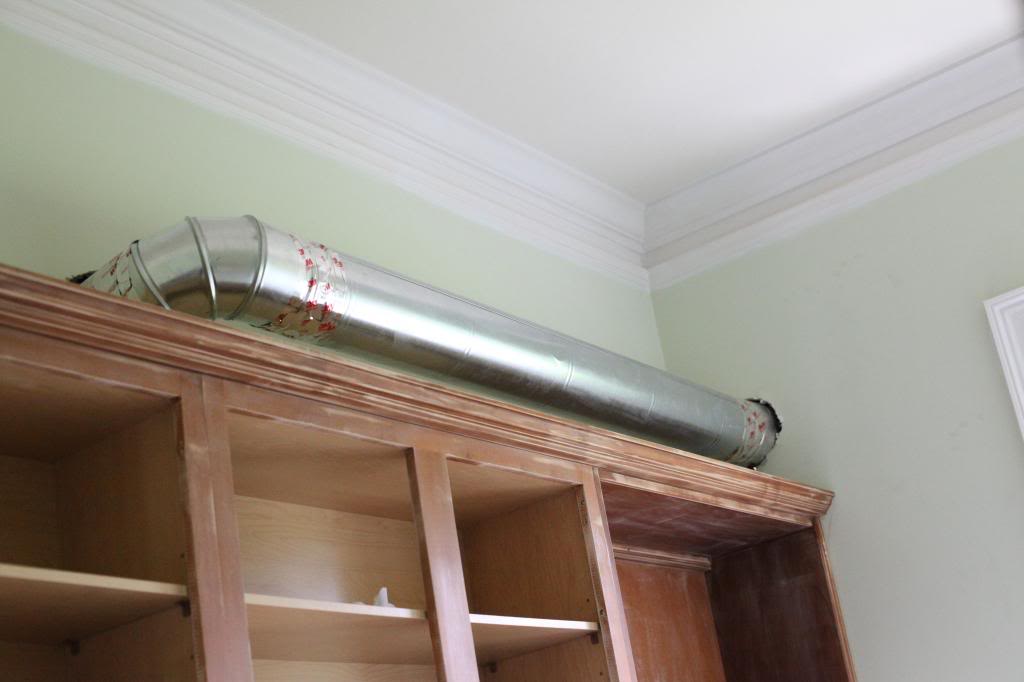
As you can see, the tops of the cabinets were capped with a piece of small crown molding. This is a really easy way to give stock cabinetry a finished and more traditional look. Basically you just take a piece of crown the length of your cabinetry and attach it with a nail gun.
But in our case, our cabinets were too short to be capped off. They were short and orange…like Oompa Loompas (seriously why do we still not have lickable wallpaper?!)…and needed to be taller stat.
After a short explanation of what I wanted (and a napkin drawing), Jeremy picked up the following lumber:
- 2 studs – 2″x4″ $3 each
- 1 screen bead – 1/4″x 3/4″ $3
- 1 poplar board – 1″x8″x10″ $30
I asked him to use a ton of Liquid Nails and screw only the non-visible parts together. I mean, what is the point of having to fill screw holes if you don’t need to?! This is what he did…

First removed the crown molding carefully to reuse later. And then removed the little pieces of trim that was between the cabinet sides and the wall (you can throw these in your scrap pile for recycling into another project because you don’t need them for this!).
Then cut your studs into four parts (half each one) and make L’s. Then glue the poplar board onto the tall part of the L. This is not the best description…so just look at the photos and you’ll see what I mean. Clamp those suckers till they dry.

Then going from behind the poplar board, you want to screw down through the studs into your existing cabinetry. Predrill to prevent any splitting. Then use a nail gun to re-secure the crown.

You’ll then want to measure the length of the cabinets and new header to cut your screen bead and attach that as well.
(can you see that black screw a few inches inside the side on the opening of the cabinet fronts? Yeah. Jeremy has a thing about making sure everything is super secure. That’s evidence. Because apparently screws from behind weren’t enough.)

After more sanding and cleaning, it was painting time. We went with the Kilz Clean Start primer this time around on the cabinetry. Just like on the trim…it worked awesome.

Post primer…

And here is with the first coat. After the first coat, you want to caulk any gaps and cracks and then let it dry before more paint.

We used the leftover kitchen cabinet paint. It’s Benjamin Moore’s Advance in Simply White. It’s pertier than the cast of Magic Mike.

Some folks were asking what I was doing about laundry while the room was out of commission. Well…hitting up family and friends…and I made my first trip to the laundromat. It. was. interesting.
First of all…who knew it was so freaking expensive?! Twenty six quarters for a mega load washer?! Holy clean panties batman.

And who knew that there was an actual science to drying!? The things I learn every single day.
The women I met in there were really really helpful and I feel like I’m a better laundry-washer now that I met them. And that is saying something because I felt really confident in my stain removal skills. I also really really want a huge hanging rack in my laundry room now.

Downside of Laundromats? It’s a long wait for two little guys. Upside? Everything is a button, a slot for coins, or a swirling show of tumbling towels…it’s basically like a carnival where you come out with loads of fresh smelling clothing instead of a stuffed monkey and cotton candy on your shirt.

Thankfully Jer moved the washer and dryer back into our laundry room (umm…no the floor isn’t done but I didn’t want to keep spending the moolah or torture the boys) and we are officially caught back up on clean clothes. So yes mom….if there is an emergency situation and I’m caught in my underwear…they will be clean. not flattering mind you…but clean.
Holy moly Katie I love that soft green paint color in your laundry room. Sorry if you have already said it, but what is that color? xox!
Looks really good, amazing how much of a difference a little height can make.
“Holy clean panties batman!” You always crack me up! Can’t wait to see the cabinets all finished.
You should totally enlarge/print/frame those two pictures of the boys in the hamper and put them up on your laundry room wall! So cute.
Funny post. Had to go back and re-read the additional necessary screw sentence.
Nah, she didn’t say that?!!!! Hilarious.
But loved the pictures of the boys. Your wee one looks so grown up. Like he is almost NOT a baby any longer. Time is flying! Will is a little man.
Such cute little laundry helpers. We didn’t have a washing machine for a couple of months, but we did have a dryer. So we had the genius idea of washing the clothes at the laundromat and then hauling them back to our place to dry. Anyone know how heavy wet clothing is? H-E-A-V-Y
Ohhhhh those photos of the boys in the basket just melt my heart!
And if you find that lickable wallpaper, please let me be the first to know 🙂
So tell us… what’s the science to drying?
And is there any reason why the cabinets didnt go all the way up to the ceiling? It seems like the top is just a place that will gather dust and will be hard to clean.
Umm those pictures are amazing. You should totally frame them in your laundry room. Kids in a laundry basket – who knew how cute it was!
Genius! And I’m all for covering up anything in oompa-loompa orange. Looking forward to the big reveal. 🙂
-andi
I can’t wait wait WAIT to see how this comes out!! We have those same awful orange cabinets in our kitchen and I am DYING to show my husband a before and after so that he feels guilted into painting ours too!!!
What a great solution! I love reading your posts and adding “that’s what she said” to the end of every break. Because DIY should be hilarious don’t you think? Oh and I totally want to steal your babies (in a totally non stalker way I swear!). Send some baby making love this way, the waiting is killing me!
I’ve had to use a laundry mat a few times. I’m always conflicted afterwards. On one hand, I’m back in my house and I can do laundry while doing productive things like sleeping at watching Duck Dynasty. But then, I’m suddenly struck with the realization that I have to one. load. at. a. time.
It’s hard.
What a difference! LOVE it!
Found my way here via Young House Love…great site…and the cabinets look fantastic!
I have been dying to know what you were going to do with that exhaust pipe! I had one that went through my shower when I bought my house. There was no way to cover it up, so we took it out. One of the first things I removed from this house! 🙂 I can’t wait to see the finished look!
Erica
A good hiding place for Christmas a birthday presents on the vacant side of the exhaust pipe.
I may just hit up a laundromat of my own…not to do laundry but to take some cute pictures of my kiddos of course. I love the ones you got of W&W. And if it is air conditioned then it may just be more pleasant than the park. 😉
Dang. Look at those cabinets. That is going to be one classy laundry room! 🙂 Can’t wait to see it all finished!
You can delete this Katie if you want. Just being silly…promise. Not trashy at all.
Hahaha… I’m pretty sure my car will be equally as bad when I go to clean it out this week. Only minus the kids stuff and substitute fur.
Oh gosh. Maybe I’ll do a similar post showing mine. Lol, if I do I’ll be sure to send you the link! we can co-miserate together.
Thanks for the laughs
//Justynn
Our phrase that pays around here always seems to be “That’s okay. We can fix it.” Well, that, and “Nothing can ever be easy!” Lol. Gotta love it. Can’t wait to see the finished product:)
Hmm what did you learn about laundry? Sounds interesting!
Love the white cabinets! I’m dying to get some cabinets or something up in my laundry room!
Katie, I’ve been reading your blog forever now and I don’t think I’ve ever commented but today I just had to.. that last photo of Weston in the wash basket is just ADORABLE! What a sweet and genuine smile! I have 2 boys too – a ‘Will’ even 🙂 Thanks for all the laughter and great DIY ideas! You make nap times more enjoyable 🙂
<Lauren
Wonderful did you really have to use simply white as your paint color ? Why do I feel another racial debate coming on?…….lol. just kidding…. can’t wait to see the finished room!
Just curious, why did you paint these cabinets with a brush instead of spraying them? Also, I don’t know how you managed to take good photos of a laudromat, but you did!
Can you share any of your laundry secrets from your new laundryat friends?!
I think those laundromat photos were the best so far. Graphic, fun, impromptu, and a fun reminder of a time that will only be a blink of an eye when you look back on it! Enjoy the carnival while it lasts!
I’m really following along with this laundry room reno and I didn’t know you were planning to cover the vent pipe! (I wouldn’t know how to and would of otherwise left it so I think this is really cool). Was your motivation for covering the vent pipe purely cosmetic? Are you going to get longer cabinet doors that sit over the extended part of the cabinets or will that added space remain intact?
Also – agree with everyone else that those photos are adorable and print worthy for sure. You’re freaking awesome.
What is the “science to drying” you speak of?
Looking good! I love how you covered the pipe, ingenious!
The ladies that I met taught me some tricks…like how you basically stalk the very end of the drying time…making sure not to overheat and to dry like materials together and how if you remove and hang fast enough, you will never need to iron. Amazelintballs.
xo – kb
The doors stay the same and the header will just be taller across the span of cabinets. It was totally cosmetic…nobody ever wants to see ductwork unless it’s vintage and industrial.
xo – kb
We did it because when we did the island, we really mastered the brush/roller techinique. On the doors, we did spray…just simply for a more flawless finish.
xo – kb
Tons of tricks. I will never have another excuse to smell unfresh 🙂
xo – kb
The main key is not to overdry and immediately hang and dry like things together. And the cabinets were installed like that probably because the ceilings are 12 foot…so the upper ones would be pretty useless.
xo – kb
I don’t know! It was here before!
xo – kb
I love the light green color though, even if it was the previous owner’s choice. It really works! I’ve been obsessing over paint colors lately to the point where the hubby asked me not to paint the office. (I reluctlantly had to make due to what I had on hand.) We’re taking a small sabbatical from major projects, and conserving energy for the fall. (Summer can be brutal in Sacramento) Question you’re in the south right, hot and humid?…Do you like to save certain projects for specific seasons as well? Super cute kiddos as well!
Oh you have to! It’s just too dang hot here!
xo – kb
“It’s pertier than the cast of Magic Mike.” – now that’s saying something!
I think it looks great! I remember going to the laundromat when my parents did a renovation. it wasn’t fun, but it was fast with all those washer/dryers running at once!
Is Weston ever unhappy? I swear, he smiles from ear to ear in every picture!
What a lot of work, but such a good job when finished . I would not have taken on such a big project.
Good for you
Thans for sharing
You are too funny!
Love the pics of your kids in the laundry baskets. 😉
http://happinessiscreating.com/
Love it so far! I just installed some orange cabinets (recycled) in our laundry room and they are in need of paint as well. Still have to finish a few projects in their before the paint though. I am just glad that they turn out great after painting.
Also love the pics of the boys at the laundry mat. So cute!!
such cuties at the laundry mat!
“screws from behind weren’t enough”
😉 haha. Nuf said.
Not really. He usually is a pretty happy kid…totally earned his nickname of Smiley 🙂
xo – kb
I second this. Those laundromat pictures are adorable!!!
So cute (is it a little strange that random strangers follow your remodeling!?!) I highly suggest a Kreg Jig for your husband, you will I’m sure find a million ways for him to use it.
We have one!
xo – kb
Wait. I think actually we have two 🙂
xo – kb
Did you have to sand your cabinets before you primed them? We are getting ready to paint our kitchen cabinets, and I’m looking for tips (and time savers). Also, what sheen do you use on your cabinets?
Also, I used your awesome Palladian Blue color on my daughter’s room and it looks FABULOUS. Thanks for sharing your awesome tips with us folks that you don’t even know! 🙂
Yes. We definitely sand first before priming. And I use semi-gloss but I’ve seen high gloss that are great too.
xo – kb