Remember way back when? Let’s think about that.
What comes to mind? Horse drawn carriages? churning butter? Marilyn Monroe?
Just wondering.
Well, way back when we moved into this house, we had this little kitchen desk.
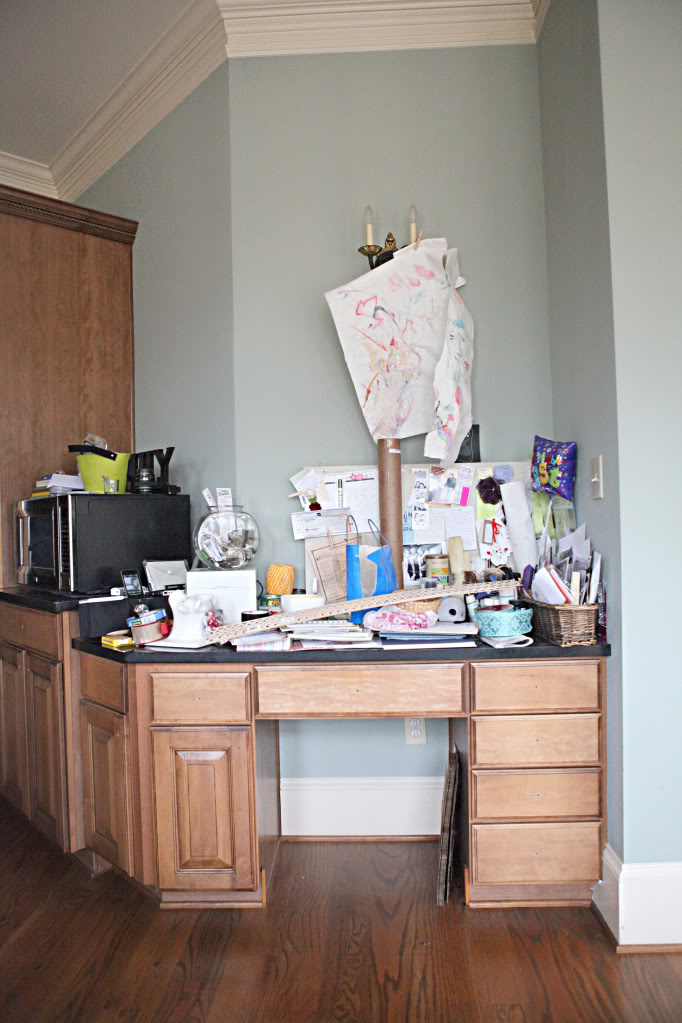
And then one day I turned it into a desk. You can read about that fun transformation here.
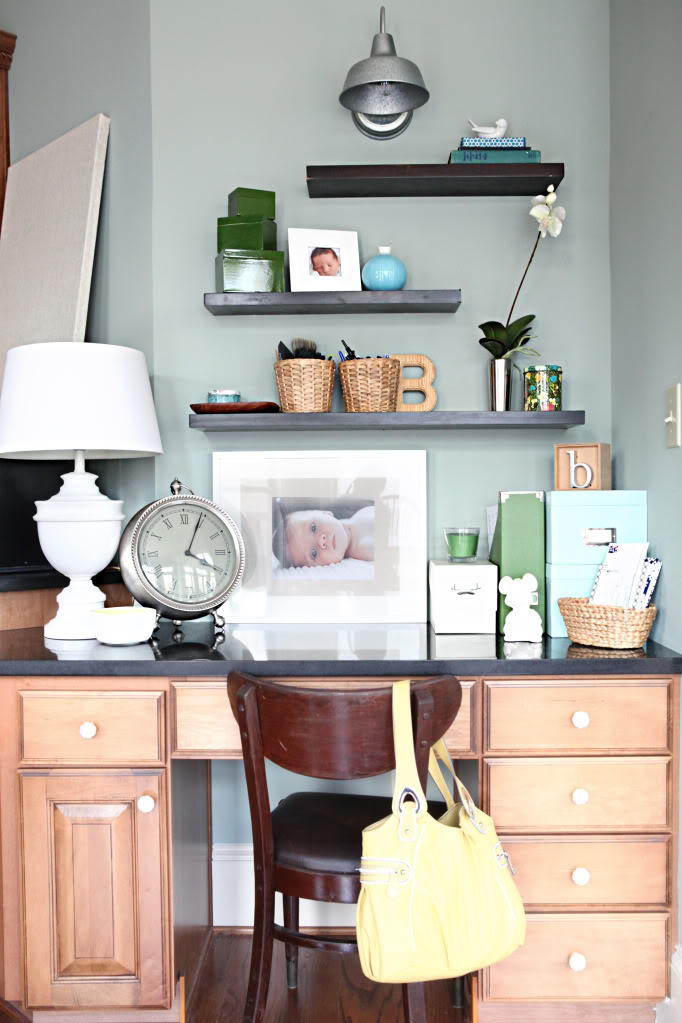
But life happened and it didn’t stay that way. When we painted the cabinets and the walls, it sort of got forgotten. Like a lip balm that is your favorite but then it falls to the bottom of your purse and then you rediscover it a month later and it kinda melted and got all disfigured. That was my desk.
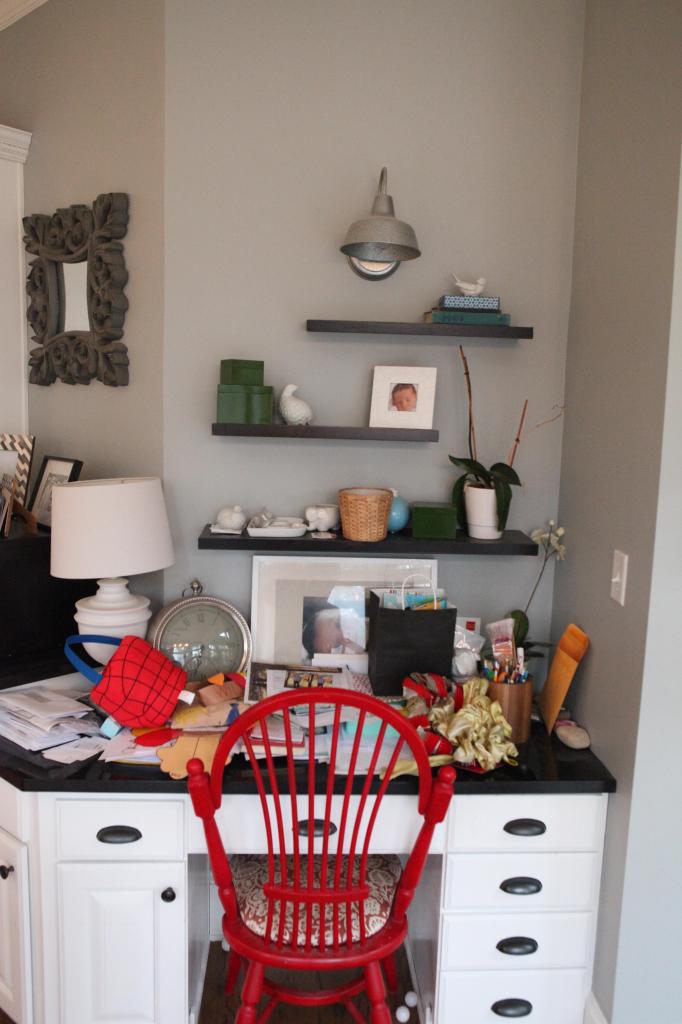
Part of the problem was organization. Obviously I am awesome at that.
But part of the problem too was that this area no longer had a purpose. I didn’t need it as a desk because I have a desk in the office. What I needed in this little space was two fold….a bowl or box for Will’s schoolwork (I save it everyday to make him a book at the end of the year) and a spot for my Keurig. The Keurig had been living under my kitchen cabinet on the counter next to the fridge but the issue I had was I couldn’t open it to get the K-cup in. The upper cabinet trim blocked it. So everyday, I would go to have my cup of tea or mocha latte or whatever and I had to slide the Keurig out (note…Keurigs do not slide well because of the little rubber feet) and then I would curse my first-world problem.
After seeing an episode of Fixer Upper, I loved how JoJo made a coffee bar in one of the houses and I had a little light bulb moment where I was like “Joanna Gaines, you are my hero.” And she was. And she still is.
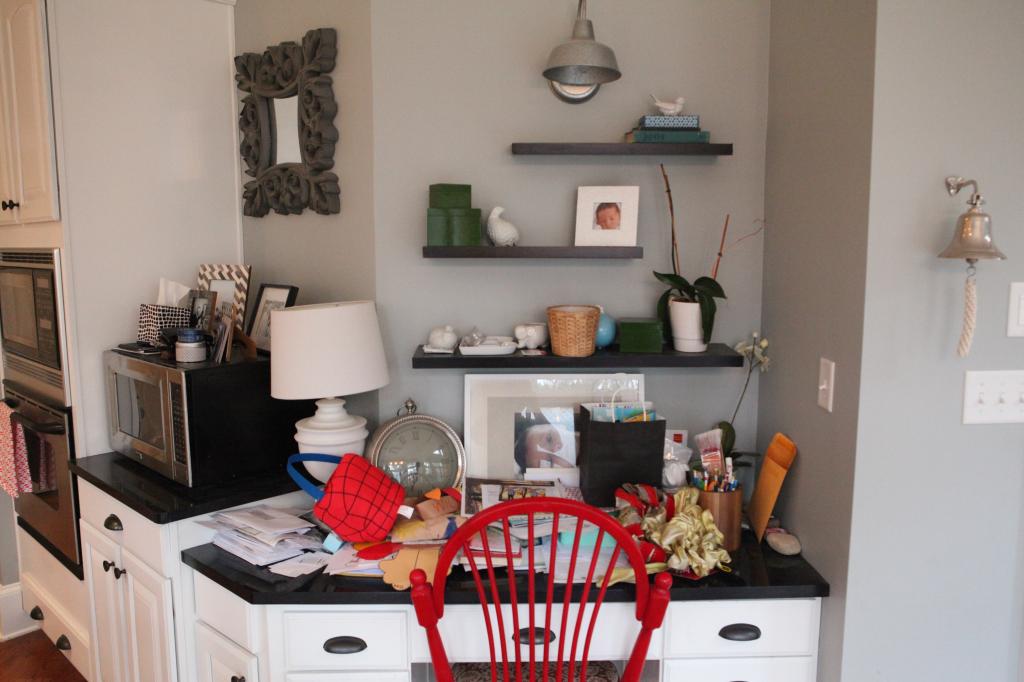
So that was the plan….remove all the crap. move the light higher because it is awkwardly low. chalkboard paint the wall and then add some shelving.
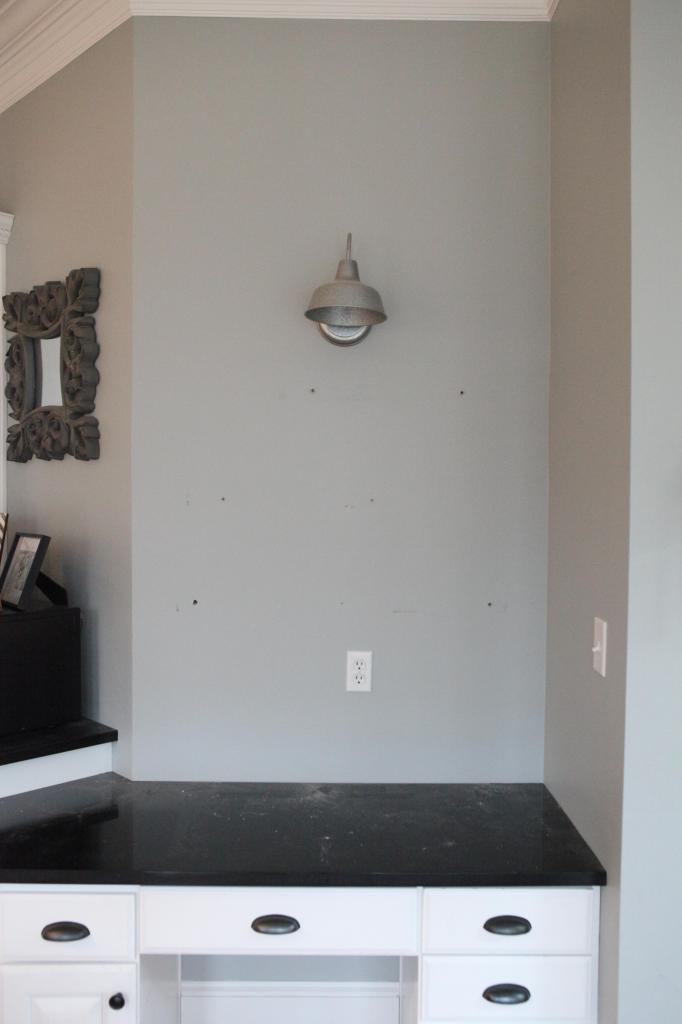
Once we moved everything and patched the holes, Jeremy was happy to tackle the lighting situation. You can see it was wired too low to be effective overhead lighting and too high to be true task lighting. It was just awkward.
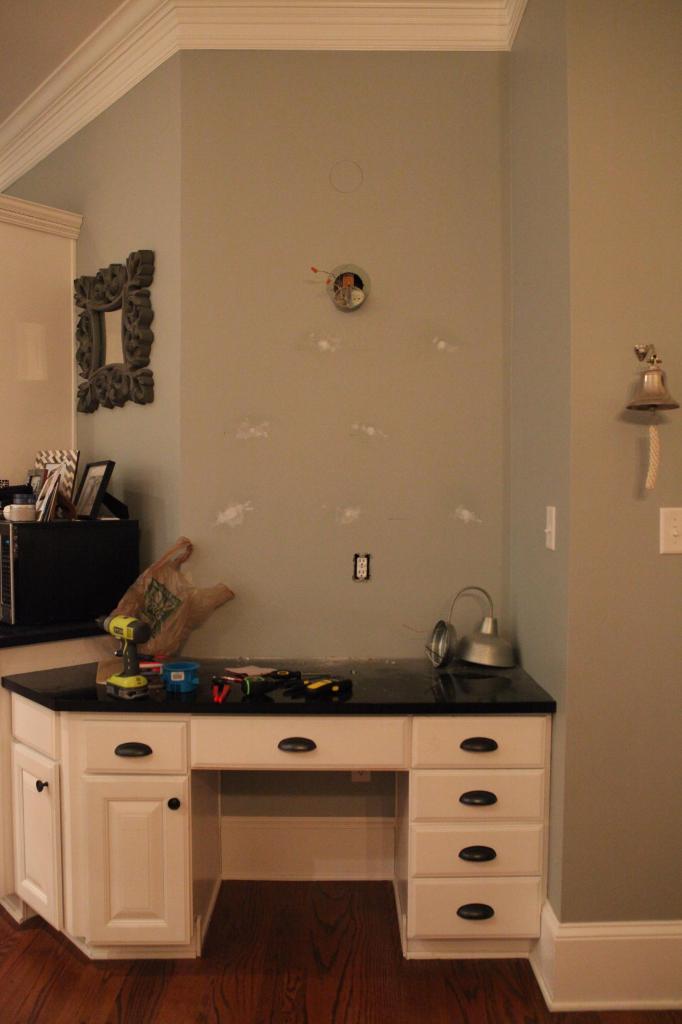
I wanted it about 18 inches higher (roughly even with the top of the cabinetry) and that’s when we hit our first snafu. The extra wire in the box was no where near long enough. And the old wire ran from the light box down to the plug and then over to the light switch. Basically it was stapled all the way down the stud and around a corner….meaning that if we wanted to remove the old box, we would have to redrywall EVERYTHING. Um no thank you. So I told Jeremy that I was totally cool with the old box still living there (with a plate of course) and that we could just have the new box up above.
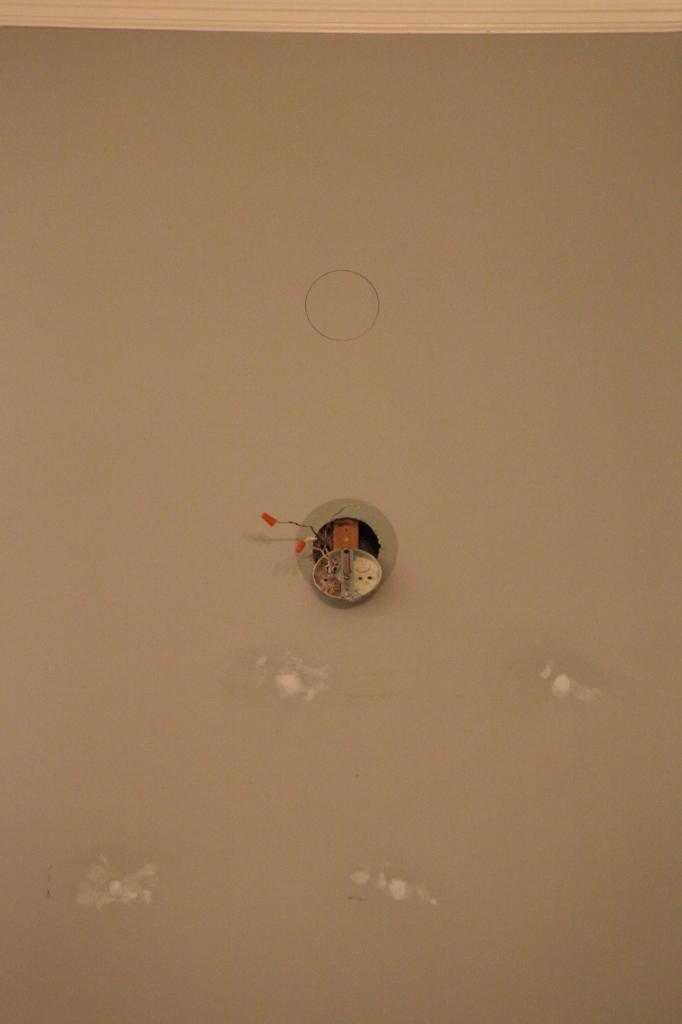
He cut the new hole and ran the new wires to connect the old box to the new one and then capped everything off.
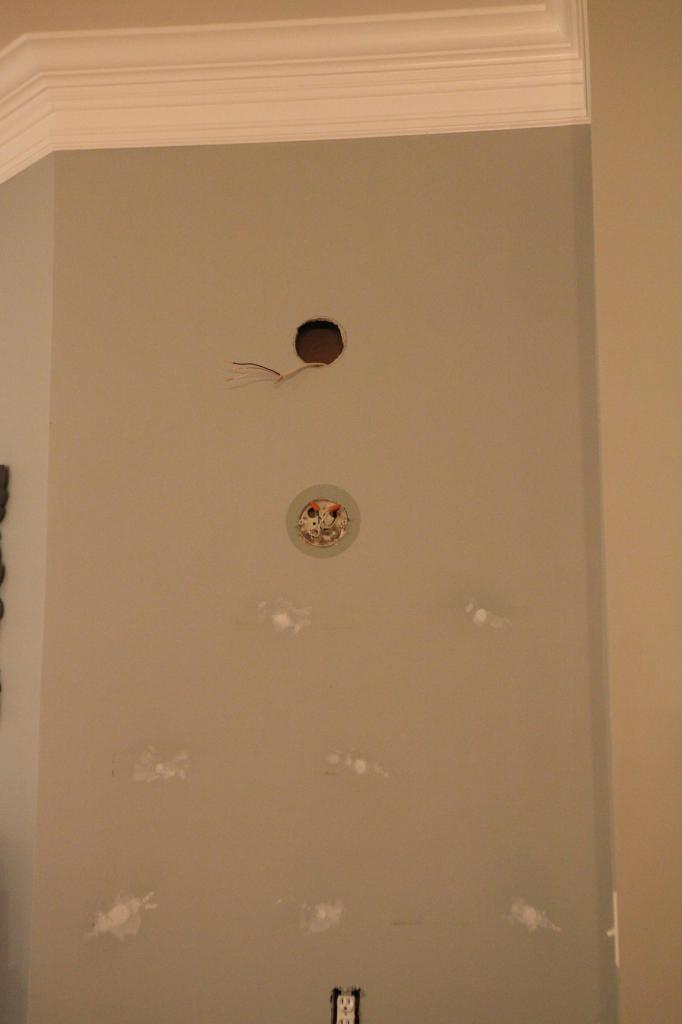
Next he installed the new box and the braces for the fixture…
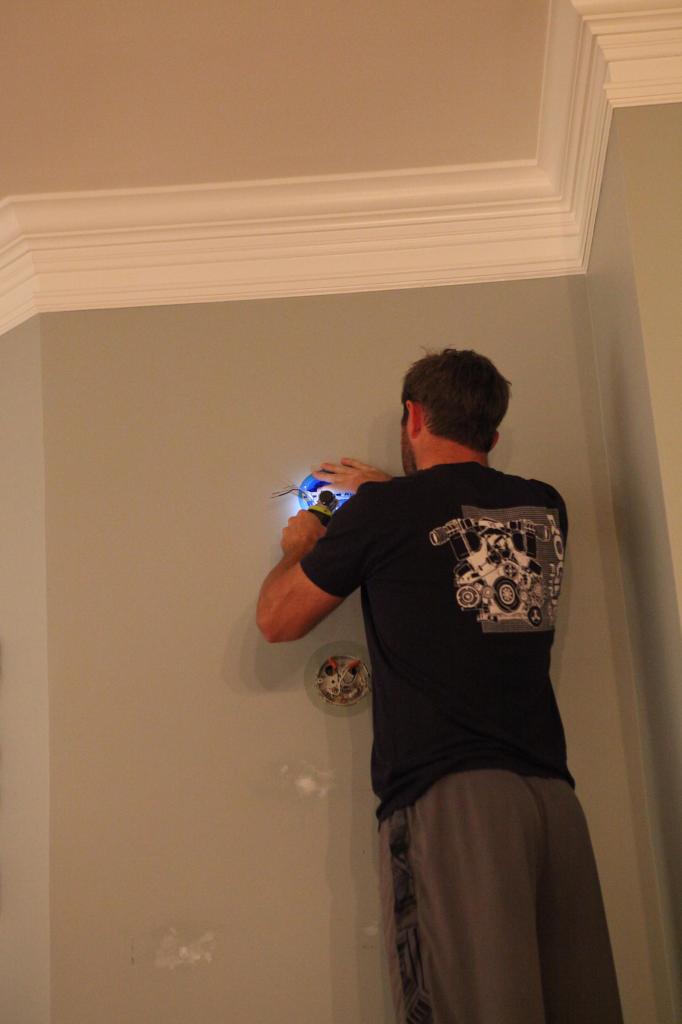
And we were ready for the light fixture and the plate. Some of you may be wondering why we didn’t just stuff the wires back into the wall and redrywall over the hole. DO NOT DO THAT. It’s against electrical codes everywhere. Any time you have a junction (two wires meeting) you need to have a box….otherwise you could have an electrical fire inside your walls. In layman’s terms…you will die and your fish will die and your things will be gone.
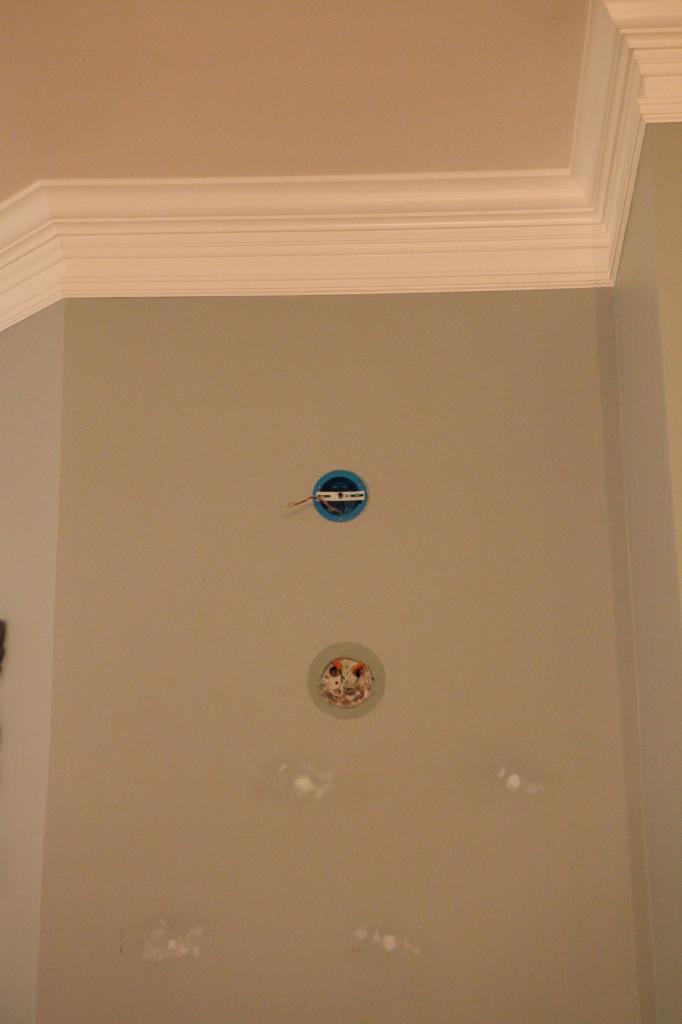
Jeremy reinstalled the light and the plate and I started painting the wall with Rustoleum’s chalkboard paint. It was some spare paint we had from our chalkboard table project. At first I was hesitant because I didn’t know if the color would look good with the wall paint….but it did….thank the Lord. The chalkboard paint was the color Moonstone and our wall color is Benjamin Moore’s Metropolitan.
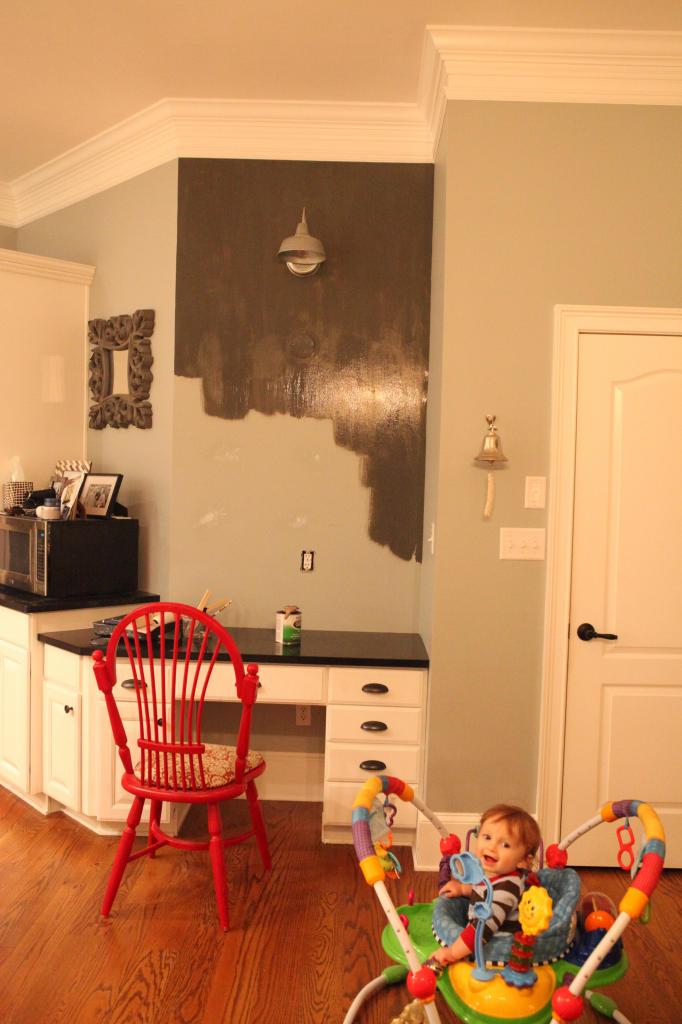
We built some chunky shelves and styled everything up and I think it looks amazing.
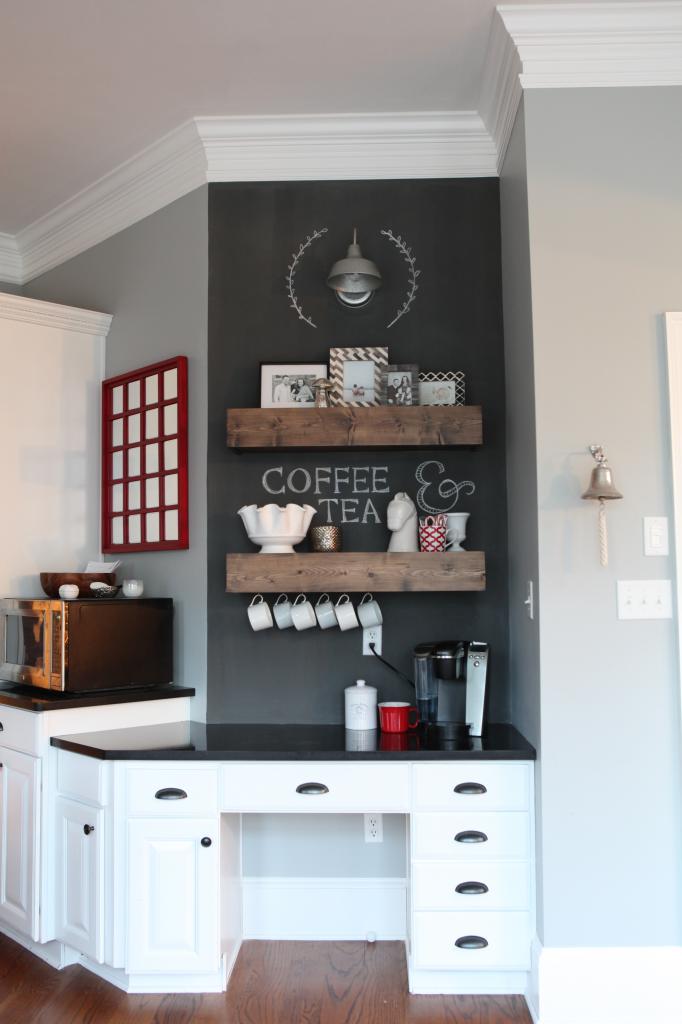
And see that top shelf? Behind the picture frame is the covered electrical box and you would never know it. Don’t judge me…I need a new family photo with LJ in it up there. Poor third child.
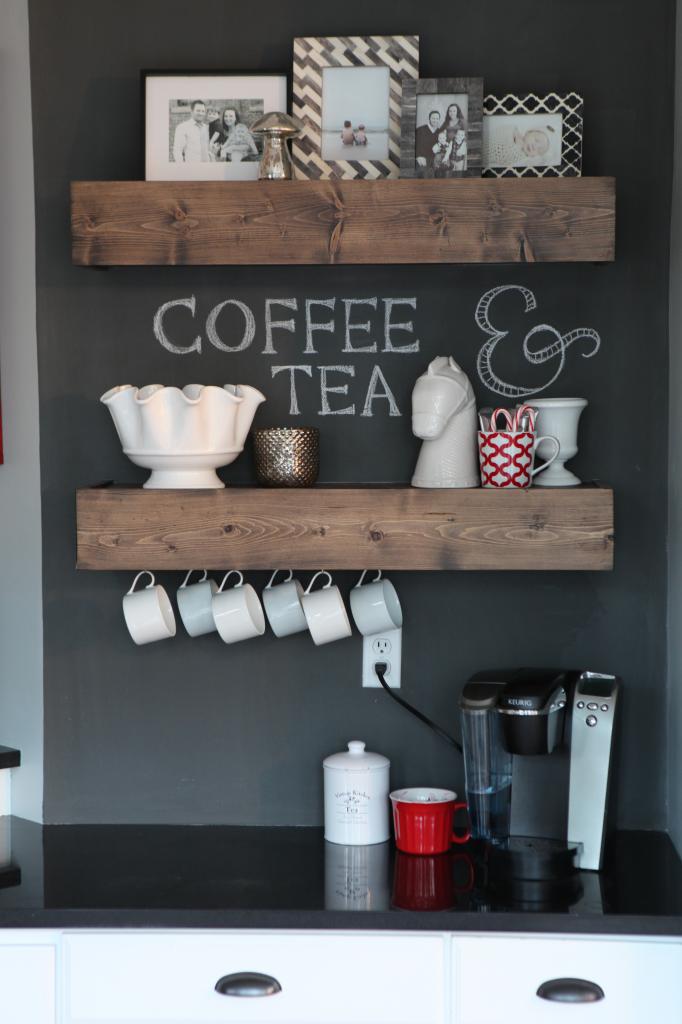
Overall, it totally suits our needs….and guests always love that they know where to get a cup of jo in the morning. Oh and you can see I brought the red grid mirror down and put that over the microwave. It’s so much better size wise for the space.
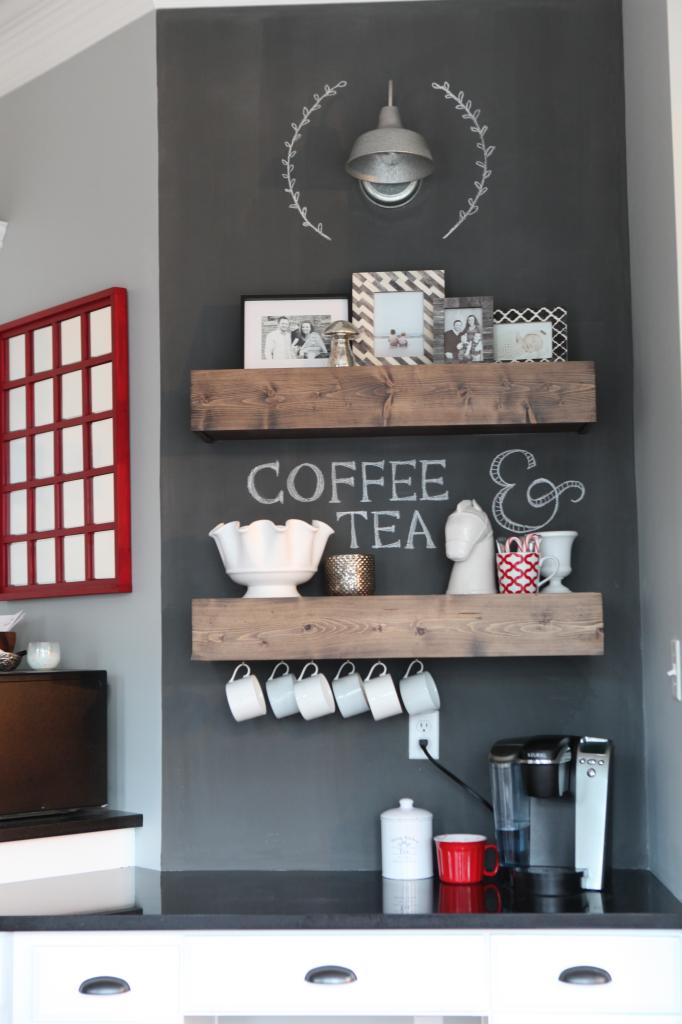
My schedule is a little wonky this week….our friends moved into the basement a little earlier than expected, LJ had double ear infections and bronchiolitis, Weston then got his immunizations and got sick and Will has pink eye. Hey fun times, I’m throwing the Bowers right at you! But seriously, I hope to get a photography post up this week and a tutorial on those coffee bar shelves. Stay tuned!
I love this! As always, your styling is on point. We’re about to start getting our basement in order and part of it will be a workspace for me. I’m thinking I need to carve out a little room for something like this. Because walking upstairs for a cup of coffee is asking way too much. First. World. Problem.
I have a similar set up in my kitchen for our coffee bar. I love the chalkboard paint and chunky shelves. I’m thinking a slight remodel to our coffee bar is necessary! Have you considered putting a fancy, yet functional mini trashcan where the chair used to sit? I love having a mini trash can close by so I don’t drip coffee / tea / whatever thru the kitchen while disposing the k-cups.
super cute! Looking forward to the shelf tutorial…
I, too, have to scoot my coffee maker and it drives me crazy! I’ve been staring at my kitchen trying to figure this out since coffee bars started popping up all over the blogosphere.
Thanks for the inspiration!
Looks fantastic, as usual! Quick question – did you (perfectly) freehand the words and designs by the light or use a stencil? I’m always amazed at what you manage to accomplish with your busy household. Love your blog – thanks for continuing to inspire with your projects!!
My best to you. – Tracy
I love it! It looks so good! I wish I could find an area in our house for a coffee bar! Can’t wait to see the shelf tutorial 😉
what a cute idea! love me some coffee, love the shelving with the hooks for cups!
Katie! You are my coffee bar hero. Love this!
I love it! In our first house as a married couple, we had a kitchen desks, too, but we turned ours into a wine bar. We build a wine rack into the space underneath. These days, with 2 little ones who don’t sleep as well as we’d like, I would definitely go for a coffee bar over a wine bar.
I never quite got the whole kitchen desk thing. I’m sure some people use them, but in most houses, it seems to be the most awkwardly placed workstation.
I LOVE how this little makeover turned out! Such a better use of space for your family and I aboslutely love the shelves you built. Have a great weeknd and I hope the kiddos feel better 🙂
Okay, this comment kinda makes me feel like a big fat jerk-face and I’m sorry. Really. I’ve never in my life left a suggestion on a blog – let alone THE Bower Power with Katie My Woman Crush Idol! This looks amazing ($1 going in Amazing Jar and hoping you get the reference)!! I love it!! I’m all for ditching what doesn’t work and making it useful and pretty!!
So, my humble suggestion is some shelves on the bottom where the chair would have gone. I think it would make it less desky and more intentionally coffe bar. Maybe a basket to hold K-cups on a shelf or something? I mean, that way they’re at kid level and the boys can toss them and watch them explode. Okay, maybe not K-cups.
Anyway, I hope you don’t take offense that I left a suggestion and you see me for the devoted groupie tgat I am. 🙂
That looks so good! I wish we had a spot for something like that in our house! 🙂
Looks fabulous Katie! I’m in love!!
If you have any tips for getting eye drops or ointment into your kids eyes to treat pink eye without having to pin them to the floor I would love to hear them!!
Those shelves are awesome, the chunkiness of them are great. I am convinced just moving a light will always bring problems. Moving light switches too. What should be a quick thing turns into problems, headaches and more work. Every time! I love the idea of a coffee bar. I hope your kiddos start to feel better. My youngest has a ear infection and he is one grumpy three year old. Stay strong!
Could you elaborate a little more on covering up the old light box? Our light box in our bathroom is covered in drywall, I know that it’s still in a box there, we didn’t remove the old box – but is that wrong? It’s hard to find more information on this – so appreciate any more info you can share. Thanks! BTW what a sweet coffee station 🙂 Couldn’t live without ours, although it’s not nearly as pretty as yours.
Elisa
Absolutely love this! Turned out great. Those shelves are just awesome! Can’t wait for the tutorial.
P.S Joanna and Chip are my heroes too! HA! Such a great show.
That looks amazing!
Not to be rude, but in the before photos, the mirror above the microwave was driving me crazy. I actually noticed the replacement mirror before really even looking at the new space. I love it! Soooo much better.
Have you tried one of these? You can still use it for your coffee bar, although would have helped also when it was in a cabinet. I have it, and I love it! Works well on our counter!
http://www.amazon.com/Handy-Caddy-Sliding-Counter-Tray/dp/B003LQZKIC
Kristy
That looks supa cute. Way better use of that space. Hope y’all get feeling better soon!
That looks great! One itty, bitty thing, why don’t you have your oh so super handy hubby move the electrical plug down and over so the keurig hides it? That is the first thing I noticed in the after photo…
Wow, that looks amazing!!! Hooray for re-purposing a space to do what you need it to… great job!
It looks so good! I’m pretty sure my brain let out an audible ‘sigh’ when I saw the photo of the completed space. It looks like that’s what it was made for! I know desks as command centers in kitchens are big and all, but they always seem weird to me… coffee station makes sense!
Totes adorbs! Haha.
I’m lovin it. But what I’m really lovin is that bell hanging on your wall to the right.
This is so cute! We put the little felt furniture pads underneath the appliances that stay out all of the time (like our stand mixer) to help them move smoothly and easily across the countertop.
I love this!
This may be my favorite project you’ve ever done! And that’s saying a lot considering I love your style! LOVE! Perfection!
Your coffee/tea bar is uber cute and I feel ya on the sick kids sister. My 8 month old had bronchiolitis earlier this year, and he just finished antibiotics for his double ear infection to only wake up the next day with pink eye and then wake up the day after that with a fever. Oh did I mention the epic diarrhea the antibiotics gave him?
Very nice! I hope the boys feel better soon.
Can you please share where the light in this space is from? Thanks!
This looks great! I love when a purpose-less space turns into a really useful one. I am curious if you considered converting the space where your legs would go when this space was a desk into shelving. Maybe you could use that for more storage.
i really like your update, love the shelves they look awesome. I have that same problem with my Keurig, I have to pull it out from under the cabinet to use it. Since I don’t have anywhere else to put it, I put a little tray under it and can slide it in and out really easy. I love when homes have a little coffee station area. It is really great for guests.
Love it! Maybe you could paint the electrical outlet cover with chalkboard paint as well? Then it wouldn’t be so stark against the wall (blending in more). Great use of space!
Looks awesome! I vote you paint the wall space under the desk the same color as the desk so it looks like one big piece down below!
Thanks for keeping it real with a photo of all your treasures in the before pics 😉 I love the transition! This makes much more sense to me than a desk in a kitchen. I never understood why that was a thing….
Love the idea of a coffee/tea bar!!! Now you have my brain whirling where I can do that. Thank you!!!
Katie, you never cease to amaze me. I LOVE this little coffee area. I don’t drink coffee but my husband does from time to time and a lot of my family loves it as well. This has given me some inspiration to go ahead with an idea I’ve had for a while for a little “coffee spot.”
LOVE! I wish I had room in my tiny little galley kitchen for a coffee and tea bar. I have a little square of counter space that works out fairly well but it’s not CUTE. 😉
Hope all the Bowers feel better soon!
I was just thinking of doing this with our kitchen desk! Right now it’s a landing strip of all our crap and it is in need of a specific purpose. Well done. Yours looks great!
Love it!
Katie, looks great! You just need to slide a drink cooler in the empty chair hole (chair-hole?) below. Perfect bev station!
I know this might be out of your budget, but is the area for the chair beneath the desk big enough for a small fridge? You could slide one in and frame it out so that no one will know it was ever a desk! You could put cream in there and maybe even wine!
Love it!!! One question though… How do you get your chalk writing so darn perfect??? I have a chalkboard wall at our house and it is so not that pretty!
I thought of that too but I gotta admit, I was nervous that the chalkboard paint wouldn’t show right on the outlet. Maybe I’ll do a test run on a random one.
xo – kb
I try to draft it with lightly writing my letters and then I have to erase about a million times. Finally when I get it right, I darken it up. Trust me…I’m not that good.
xo – kb
That’s sort of what we were thinking…or adding a door for the ultimate hiding spot 🙂
xo – kb
Here you go.
xo – kb
Haha! No way…we were thinking that some time we should do something down there but right now it seems we can only tackle non-construction projects in here because we have so many other projects going on.
xo – kb
I know this sounds weird but I have them lay their heads on my lap and I have a tissue that they get to control…they like having that. And then I give them my phone to watch a monster truck video. Since their hands are occupied with the video and the tissue, they can’t stop me from doing the drops. And I treated them with breastmilk drops (sounds gross but works).
xo – kb
Just freehand. But lots of erasing 🙂
xo – kb
I wish but that would be another drywall project 🙁
xo kb
First of all, I love the new coffee station! Secondly, I just saw your commercial during Parenthood on Hulu! Awesome! That was a nice surprise!
LOVE THIS! Looks great!
I really think you need to do a little skirt between the cabinets. I made one for a similar area–it took about 10 minutes.. You can store your C-Cup boxes under there. It looks amazing. What a great transformation. Love it.
This is a genius use of the space. A stool that can slip in underneath would finish it off perfectly. You can then prop there with your coffee if needed. Great job.
I think a big basket would look great down there.
Great project. Love the result!
Love this!
I have always used breastmilk for pink eye too and it works like a charm! I even gave some to my MIL once to treat her when she got it. 😀
Looks amazing!! Do you keep your kcups in the drawer below the counter?
Love the laurel leaves you drew around the light fixture! I may have to try some chalkboard paint somewhere in our house.
Btw- thank you so much for recommending that show FIXER UPPER. We don’t have cable, but I now stream it on Amazon ($9.99 per season) and LOVE IT SO MUCH. I think we should get together sometime so that I have someone fun to watch it with (and eat pretzels with).
p.s. You and Jeremy also remind me very much of Chip and Joanna. 😉
Looking forward to your tutorial on the chunky shelves…they really rock the wall!
I love this. I’m so glad you’re still blogging. Can I just say Thankyou! I love how your DIYs are affordable, attainabke, and smart. I love the chalkboard paint and chunky shelves over that (I’ve never seen those two things together!). I love how you drew around the light bc I thought it was too small or not enough impact for the space, but the drawing really enlarges it and is cute. And it’s just chalk. Bravo! And I love how you used a frame to cover up the box. Genius my friend!
I love it! It looks so good. I have been trying to incorporate, well actually re-do my coffee area, and this is so inspiring. I have tile all the way up the wall in that area so I can’t do the chalkboard but I will have to figure something out.
That wavy edged bowl has them! Each thing up there has a specific purpose for the coffee and tea 🙂
xo kb
I absolutely love the coffee corner. What a great use of space. I could see a big basket of toys in that knee hole or shelves with baskets of whatever… THANK YOU FOR YOUR CONTINUED INSPIRATION. Sorry didn’t mean to yell that but then again…”
That coffee bar is the perfect answer to the space. The chalkboard paint, the message written, the coffee cups, the red mirror- all make it pop. I have been praying for your boys, and you too. I know it’s a big adjustment for your daily dynamic to change with the family moving in- no matter how good-hearted you are. God will be teaching you along the way, for sure. … I have an easy suggestion for the space underneath the coffee bar. A large red box or some kind of cool red storage container for Will’s school work. That way it still has the function that you originally wanted for the space! And it wouldn’t break the bank!
May God provide abundant blessings during this time. I heard a sermon in the new year that every day we should look for three gifts. Some days they are too numerous to count. Other days when there are struggles, you search a little more deeply. Some are God- filled, some are a little more worldly. But every day since I heard this, I have shared my gifts with God. Of course, you need to find six gifts, because every day your boys will count for the first three!
Love your coffee bar!! It looks so great! You make me want a coffee bar and I don’t even drink coffee 🙂
I love it!! I would like to hear more about your books for Will’s artwork! My kiddos’ artwork keeps piling up..I need a better system!
love the new coffee bar!! looks like you had Joanna herself come and do it!!! only those of us who follow you know the truth!!!
Such a creative idea, it turned out beautifully!
http://www.mintnotion.com
I lurve it! I am just working on converting a small dresser on wheels into a fun little coffee cart. I’ve got the perfect spot to park it in my kitchen, but can wheel it out to our dining room or living room and serve my guests coffee and dessert a la carte! Plus, hello, built in storage (three drawers) for all my coffee and tea stuff = freed up cupboard space for other junk! Whoot! Your coffee bar turned out great, love the chunky shelves 🙂
~Jen
Good grief lady! Can’t believe you got anything posted at all with all that going on! Hope the kids are better soon!
This update to the desk area looks fantastic! I would love to do something like this when we redo our kitchen.
That looks seriously amazing! I love the shelves and the chalkboard art.
Love it! I can’t wait for the tutorial.
Great idea and very nicely done on the chalk art! Will you do a post on the shelves? I love how they seem to have a little lip at the edge.
Looks beautiful- I especially love the shelves!
I’ll send healing vibes and prayers- my 7 month old has bronchiolitis (1.5 weeks later and the cough is still going strong!)- It’s hard enough with one sick child, I can’t imagine 3. Poor babies 🙁
That is super cute! I have a similar desk area built into the kitchen and it’s not really functional because we have an office. Right now, it’s our landing strip for mail but I don’t like having my mail out in the open when we have guests over. The desktop is useful for parties because it can hold overflow drinks, supplies or food. After seeing your setup, I might have to consider moving our Keurig and K cups holder over there.
Tomorrow hopefully!
xo kb
I love it!
But I’m just wondering….why did you need the chalkboard paint? Why not just paint onto the wall, or even paint a sign that says tea & coffee?
This is purely a ‘I’m a nosey person just being curious question’ and not a ‘you should have done it differently question’
Good luck with the kids x
Oh, and I’m curious about what you plan on doing in the chair space at the bottom- cause it needs something 😉
I liked the idea of chalkboard in this space because I can change it up…like snowflakes for Christmas, hearts for valentines day, etc. I guess there are always a million different ways to do the exact same space but I chose this because I loved the inspiration and I had all the materials on hand!
xo – kb
Nothing right now…there are a lot different ideas in these comments though!
xo – kb
I love it, Katie!
We have a built-in cubby with a counter top in our kitchen and it is ALWAYS collecting junk. I’ve been trying to convince my husband to let me turn it into a coffee/wine bar…we shall see 🙂
So I had an idea…if you’re not going to put a chair back under the counter, you could always do a cute little (red!) curtain/tension rod action under there to hide a trash can for your k-cups or a 36 pack of toilet paper 😉
Or not! Sorry, I’m annoying like that sometimes…
Love it. Consider me inspired 🙂
I painted an entire basement wall with chalk board paint this past weekend. The directions say to wait a week before writing on it. Did you? Did you “prime it” before writing by rubbing chalk all over it? I am in waiting and it’s killing me! Also, where did you get that large pocket watch clock in the before photos? I love it and need one just like it to complete my mantle.
Yes. You absolutely have to wait. Don’t ruin it! Our chalkboard paint was done before Christmas and we waited till after New Years to season it. And the clock is from Hobby Lobby – ages ago.
xo – kb
Love this so damn much. We just redid our kitchen and we didn’t really think through where we would put the coffee pot. It’s fine where it ended up but I’m totally jealous of your dedicated area and and the opportunity to use chalkboard paint here for fun holiday whimsy!!!!
Ooooh, ok – new idea. (Not that you need any ideas 😉 ) I like Anne C’s idea (above) with the shelves and baskets. You could easily drill holes for some shelf pins and paint some nice thick plywood to match your cabinets for one or two shelves. Top it off with some espresso colored baskets to echo your chunky wood shelves and you’ve got some sleek & stylish storage!
Sorry if these suggestions are annoying…These are the kinds of ideas I love to toss around with my friends and sisters! Also I think I’m living vicariously through your awesome house projects 😉 Please don’t be offended!
I love the end look, especially if it is more functional. We have a couple cover up spots like you did with the electric. I like to call them genius moments for the short term.
Wow! That looks amazing! And your “before” is my house all.day.long. Amirite? Well done!
I love, love, love this coffee nook, and I am not ashamed to say I plan on making mine just like your’s. lol
Could you please tell me if you used a stencil and chalk to design, or decal’s? I have horrible handwriting skills.
Thank you.
Janice
I just free handed it with chalk.
xo – kb
Oh my gosh! I just watched that episode of Fixer Upper where Joanna did the coffee bar and I went to Pinterest, typed “Coffee Nook” and yours was the first photo that caught my eye. How weird is that? What type of wood did you make your chunky gorgeous shelves from? Stain? And how do you fix something like that to the wall? I’m just beyond a novice DIY-er, I can tile, just painted my kitchen cabinets white and need to make a cute corner for coffee, etc. Thank you!
Here is all the info on the coffee bar! Thanks for the compliments…you totally made my day!
xo – kb
where did you get those chunky shelves??
We made them. They are similar to our bathroom shelves. Here is the post.
xo – kb
Love the chalkboard wall! I am redoing my kitchen and was wondering what material your countertops are? You have the look I am going for with shiny black countertop and white cabinets. Also I plan on doing a whole accent wall in chalkboard!!
They are black granite with a small amount of silvery flecks. I wish I knew the name but sadly they were here when we moved in.
xo – kb
Love the distressed vintage look of the coffee and tea shelves! I get a nostalgic feel when I look at that picture. It’s old world elegant with a modern twist.
Have you ever done a shelving project with wooden wine crates? They can be distressed with a similar walnut finish like the Coffee and Tea shelves, but have the added bonus of a wine-themed accent.
If your looking for original wine boxes and crates for a future shelving project visit Winepine.
What kind of stain did you use on the shelves! I love it! Such a great transformation and what a beautiful thing to wake up to for your morning coffee!
It’s listed in this post. Thanks!
xo – kb
Just adorable. …I would love this and my man could so do this! Thanks for the idea
I’m scrolling through the comments for this exact question! The shelves are awesome! Right down to the hooks for coffee mugs! I would love to put these above my coffee maker! Do you have a post anywhere on your site on these shelves?? 🙂
Yes I do! Here is the post.
xo – kb
So so cute! I love it! Where did you get that white ruffle bowl? Thanks!
Pier 1. Isn’t it cute?!
xo – kb
Hi Katie!
Was wondering if you ever encountered bubbles when using chalkboard paint? I’m trying to do a chalkboard wall in our playroom and each time a coat dries, I end up with tiny bubbles. I’ve tried sanding with 220 but no luck. I’m using one of those white foam rollers…I’m wondering if that is to blame…
Any insight is so greatly appreciated!!
I have not had bubbles…what happens when you apply the second coat?
xo – kb
Those darn bubbles come back…very strange, I think I’m going to try a different type of roller and see what happens
Yeah that is what I would probably do too. I think that if you use a low nap roller (vs a foam version), that might be your best bet.
xo – kb
What did you use for hooks for the mugs?
Small cup hooks. They are available at most home improvement stores and just require a little wrist action to get it in!
xo – kb
Clever use of the space… I love the way our homes evolve! I have had a full chalkboard wall in my kitchen and love too. It has been creative and not so much.. easily cleaned and blank for new genius. One thing I would change out is the white electric outlet.. I switched mine to black so it doesn’t jump out on the chalkboard wall.