Well, actually that should be singular.
As in…it’s the pit.
But we don’t judge around here….not for spelin or gramerr;[!
or cheesy jokes.
Moving on. We showed you yesterday how we planned for our fire pit. It is the first big step in our backyard. Others…like a future pool will require a bit more money so we will need a few more years to sock away the cash for that. But just like inside…our outside is an evolution of years of projects…not just one big push.
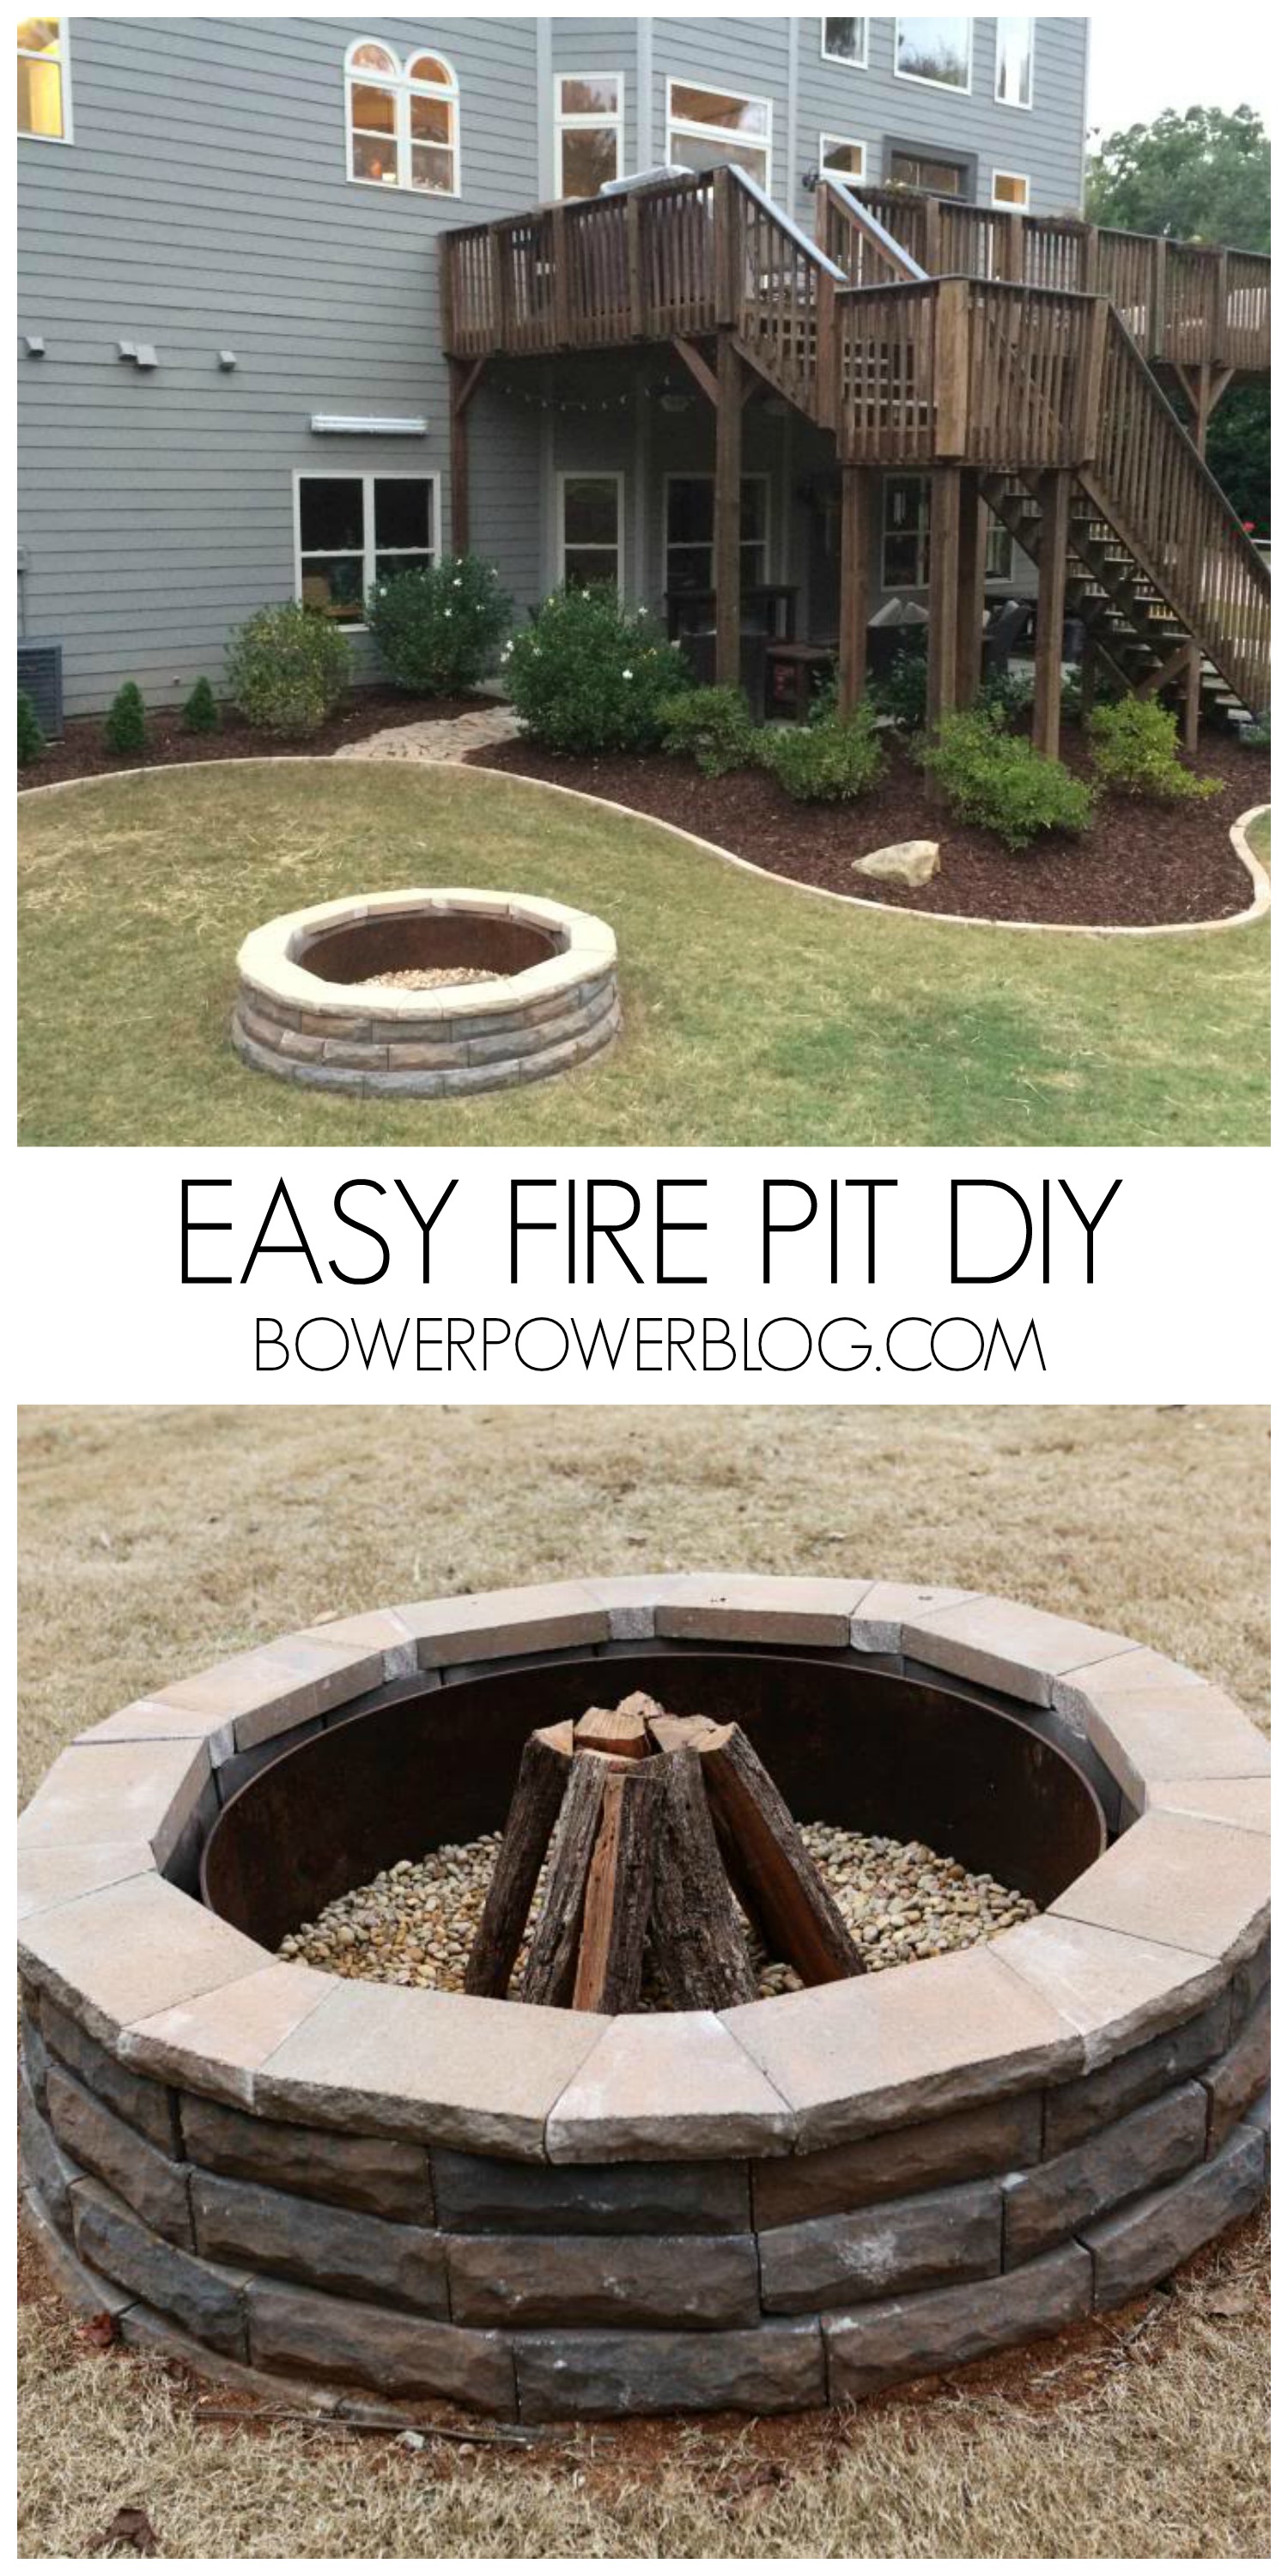
Just as a reminder, here’s where we started with the outside of our house…

and the area that we wanted to put the fire pit was on the side between the deck stairs and the retaining wall..

We had installed a decorative fence as a barrier for Will. We didn’t want him to tumble over the retaining wall…you know…cause we like his brains on the inside of his head.

Here’s the view….ekkk.

So Jeremy’s dad gave us this big metal ring…it’s serious business.
We could have done what Pastor Dad did and have the ring be the only thing containing our fire…but after much deliberation, we decided that it would just be way too dangerous for our growing family. If the fire gets too close to the ring, it could heat it up and we just didn’t want to risk Will or Weston (or my future baby girl….get on that Jeremy!) to burn their little fingers if they touched it.

So we decided to purchase a bunch of materials that would help protect the little ones and also make the pit look a little less…like…well…the pits.
We needed at least 68 of the Allen + Roth retaining wall blocks, 20 of the cap blocks, 8 bags of drainage gravel, 6 bags of decorative rock, two tubes of construction outdoor adhesive and a whole lotta patience.

According to our plan, we were gonna put the pit about 18-20 feet from the house but before we committed to the exact location, we put some retaining blocks down around the ring and lived with it for about two weeks. We wanted to be sure that it was in the right spot. We also took that time to decide how tall we wanted it. I wanted it as tall as possible…so that the kids wouldn’t fall in accidentally. Jeremy thought that if it was too tall, it looked like a well.

After the trial time period was over, we decided that yes…it would be fine in that spot…and Jeremy would get his lower pit (after he proved to me that my leggy toddler was not gonna be able to lean over and fall in easily). And yes, that meant we asked Will to lean over the wall several hundred times and tried to push him in. It was in the name of safety 🙂

So after we moved the blocks, we started digging. This is about when we had our first fatality. The pick axe broke.

Fire pit dug…

We found a little granite pocket. That’s really common around here…large rocks. Remember at our first house? That entire retaining wall in the front yard was completely made of rocks we found in that yard. Crazypants.

A few slings of a sledgehammer usually breaks up the rock enough to pull out large chunks and chip away enough for a level surface.

Even though I was past due with Weston, I also got in on the action. I love hard work like this when I’m due…it’s a confidence booster…like my body may not be able to go into labor but it is able to lift large amounts of Georgia clay. Plus, it gives me a chance to sing “everyday I’m shovelin'”….which let’s admit, is easily adaptable when you do give birth to “everyday I’m shoven him”…

Second fatality of this project…the wheel on the trailer….boom.

After a lot of raking, shoveling, more raking and more shoveling, we did the stomp.

We didn’t have a tamper tool…so we improvised by using a board and a sledgehammer. You wanna make sure the ground is even and compact so that it doesn’t collapse under your blocks.

Then came time for drainage rocks…

This is really important not just for water…but to ensure that any hot coals don’t catch onto something beneath the fire ring and spread in dry grass.

Jer did a big ring around the edges and then filled in the middle with more fill dirt.

More stomp…

Then came time for the exact location of the blocks. Jer rolled the ring back into the center just to be sure that it would be centered.

Since the blocks overlap a little on the back, it’s really important to start your first row back farther than you want your overall circle.

Once all the blocks are in, AND THIS IS THE MOST IMPORTANT PART, it’s vital that you check the levelness of the entire circle. It needs to be level from block to block but also from side to opposite side….all the way around. For our particular spot, that means that one side of the first circle of blocks would be almost completely buried and the other side be three inches up.

A little more fill dirt, a little more rocks, a little more exhausted looks from Jer…

And we were ALMOST done with the first level. We finally got to the point where we could use the decorative river pebbles. Jeremy picked these out because he liked the look better than gravel. I had no preference…I think both could be cool.

Then he just filled in the center with the stones…

fire ring back in…

and more testing to make sure that the top of the stacked retaining walls blocks would be higher than the ring…

Finally it was time to break out the glue. We went with Loctite Landscape construction adhesive…which is made specifically for blocks (like ours) for outside (like ours).

You want to be generous with the glue but make a zig zag. Chevron was hot with construction guys way before bloggers got a hold of it 🙂

And then when placing your next row, it’s really important to not match the seams.


When you get to the end of the second row, the chances are that the last block will need to be cut to fit. We’ll get to that in a minute…

Build up little by little. I would do about four blocks at a time so that your glue doesn’t dry…

And you can see how close our seams got…just as long as they are staggered slightly, it will look fine.

For the final row, we put on a cap piece. The blocks were almost six inches tall whereas these were almost two.

Now here’s how we cut the blocks. We used our regular ole circular saw but Jeremy equipped it with a diamond blade. Yes…a girl’s best friend 🙂

We set up the first cap block and then equally spaced the other cap blocks around the circle…allowing for spaces between for our cut pieces. Those cut pieces were laid on top of the cap blocks and we used a pencil to mark the cut lines.


Oh and did I mention, Weston was born. Yay!

The cut pieces were pushed into place and everything fit nice and tight before we did any necessary trimming. The trimming was just to clean things up.

It was really easy to do with a straight edge and a pencil. Again, you want to go really slow and make sure things are pushed all the way together to get the best line.


After you cut your little trim off, then you just glue everything down and put some scraps on top to weigh it down.

From the sides, it looks pretty fine…like a glass of Jeremy 🙂

I’ve said it before and I’ll say it again…
bow-chica-bow-er 🙂

And there she blows (after my lumberjack cut some wood)….

We’ve given her a spin on numerous occasions already and I have to admit…she’s hot 🙂
And I also had to admit this but Jeremy was right…one more level of blocks and Will would not be able to roast marshmallows. In the future, we might actually build a top to go right over the pit area so that it can be used like a table for times we want to sit around and NOT roast weenies.
Now that this post is over, I’m gonna need a nap.
Want to see more outdoor projects! Check out the giant outdoor table we built and the firewood rack that holds everything we need for a camp fire!
****UPDATE: Lots of folks were interested in the cost of the materials. The cost of the blocks, caps, glue, gravel and stone came to about $260
Update : Looking for more info on something you see in our house? We have a Shop the Bower House page with paint colors and links to accessories, furniture and decor!

this looks amazing!! i wish we had a backyard — i’d love to do something similar!!
Wow, that’s awesome. Your post makes it sound so easy but I’m sure it was a TON of hard work. Great job!
Looks great! I like the capstones, we didn’t do any of those. You may run into one fairly annoying problem…putting the gravel between the ring and the stones caused us serious headaches. The ring expands when hot, pushing out the gravel…into your pretty perfect stones …and then they’re what we now call “gap toothed.” This is what ours did and we’re so sad. We used construction adhesive as well. No more pretty perfect ring makes us sad in the face. If you can remove it, I would. If not, best of luck and I hope it doesn’t happen to you!
Growing up I have many fond memories of grilling and roasting marshmallows over a fire pit – I think they are the perfect addition! You guys will get tons of use out of this over the years, and it really looks great!
Even more than your beautiful new fire pit, I love your wonderful sense of humor and fantastic writing style. You could write about grass growing and it would still be enjoyable to read! Thanks for another great post!
~Abby =)
Looks great!! Will Jeremy come build one for us in Minnesota??
Also, I noticed Will’s Strider bike – how does he/you like it? We gave our son one for his 2nd Birthday and he was riding a bike without training wheels at 3.5 years! Crazy!!
Love this! Would you mind giving the total cost of all materials please? Thanks!
bow-chica-bow-er…BEST LINE EVER…ha…I die. {and the firepit is pretty amazing as well!}
XO
~ J
So envious of you! So many good memories in the making of time spent around the fire! I love that the boys are right there with you both as you work….they will learn so much from you and be great workers themselves in no time! It looks great!
Wow! This turned out to be so amazing! Sitting around the fire is so relaxing on a cool summer evening!
Ooh, I love sittin’ around a fire! Good job you guys! And you all pregnant… I wasn’t slingin’ a sledge hammer, but I did go sledding down a huge snow-covered hill when I was due with my little girl- and I went into labor the next day! Yee Haw!
We’ve lit ours up several times already and have had no problem. We’ve only had small fires though…maybe it’s when the fire gets close enough to the metal ring to make it expand?
xo – kb
Will’s obsessed with it. We gave it to him because Jer’s an avid mountain biker and loves the idea of taking his boys with him one day.
xo – kb
I also wanted to say, I can really appreciate the time and effort you put into all of your projects. You guys always have such attention to detail and don’t seem to rush things just to get a quick blog post in. There is always a real sense of quality. I commend you guys for that!
Winter is just about to hit me here so I’m planning a fire pit…on a simpler scale than yours though. I live in fear/joy that my hoarder neighbours fence/overgrowth will light up. Oh to toast marshmellows over a dividing fence fire…!
Gurrrrl! This is awesome! DH loves backyard fires (and contained fireworks), but we are now in a very wooded part of NJ that “frowns” upon outdoor fires. One hilarious example: One day a neighbor decided to build a small fire to get rid of some rotten wood, and firetrucks from THREE townships showed up, plus a bulldozer! No fires in this household! Plus, is there anything you did not do while Weston was biding his time? Chop wood for the fire? You rock!!
I’m kinda lovin’ how your man does yard work in a dress shirt…..lol. I bet you could just sit there all day and watch him create masterpieces. 🙂 Now I gotta go put my man to work. I think a new fire pit will do just the trick.. 🙂
Wow! That is a lot of work! But the result is definitely worth it. It looks GREAT!!!
Man, I wish I could install a fire pit. Stupid laws and regulations…
Looks awesome! Can we get an “after” picture from far away? I’d love to see what the whole back of the house looks like with the fire pit in there. Great idea for that space! And I really like your idea of making a sketch template so you can see several placement ideas (from the planning post). I am totally going to do that to figure out some landscaping puzzles of my own.
This may be a silly question, but I’ve always been told off from using river rocks around fires due because they might explode. Did you have to check if these guys were safe to use around a firepit or is that not a worry with decorative rocks as opposed to rocks you actually find in a river?
You guys did a great job!
It’s beautiful! Jeremy sure looked exhausted, haha! I bet it will get a ton of use this summer. You guys definitely take the time to do things right. I love that you were shoveling at nine months pregnant. DIY posessed!
You all impress the junk outta me….that fire pit looks amazing!
We are planning to build a fire pit in our backyard but were planning to just leave dirt as opposed to putting gravel down. How is the gravel working when you try to remove the ashes?
About how would would you say it cost from beginning to end? My husband and I have been thinking about building something similar. I hope ours turns out as good as yours!
Katie
I would be so curious for a general break down of what the materials would cost. I want to send a link to my hubby to inspire him but I know his is going to ask me how much this will cost us. 🙂
I love the progression of what Will is doing while you guys are working!
You guys were smart to cut the angled pieces from square capstones. I know it’s a lot more work and Jeremy sure looked exhausted, but you saved so much money. They sell the interlocking capstones cut in the same way, but you’ll pay twice as much or more to have them pre-cut. Plus, when you do it yourself, you can custom cut them to fit any size fire pit. I love the idea of cutting a tabletop to cover it, but word to the wise: Make sure the top is the exact size as the fire pit top. Speaking from experience, if you leave overhang, someone sometime is going to assume that it’s attached, try to sit on it and send everything flying. Just curious, though, after lighting a few fires, can you even still see the decorative stone in the fire pit? Does it make it more difficult to clean out the ashes?
It looks like your backyard is coming along nicely.
Having projects that are a “work in progress” always gives you someting to do on the weekends. 🙂
http://happinessiscreating.com/
Holy Moly your house looks GIANT from the back!! Have I mentioned how super jealous I am of your huge house and huge yard!! swooon.
I love this so hard. Making notes and bookmarking this for when we move into our house… pretty sure it’s going to need a firepit! I’m super excited!!
It looks great! You make it look so easy! My back yard is in need of a serious update (take a look at the pics on my latest blog post) and I’m definitely considering doing a fire pit now! 🙂
Yes…we can…but that’s probably because our fires aren’t very big. And we haven’t cleaned out the ashes.
xo – kb
He’s a nut.
xo – kb
We haven’t removed the ashes yet…so I don’t know.
xo – kb
Hmmm…never heard that. I’ve heard that certain lava rocks (?) can explode but never with a river rock. I’ll have to look into it.
xo – kb
Oh my guarsh. I love me that button down. It’s my favowit 🙂
xo – kb
Haha…Jeremy let me try but I stink at it 🙂
xo – kb
Aww thanks Karla. That’s really sweet.
xo – kb
In a few years when we’ve saved up the cashola to re-do our deck & add a pergola & fire-pit, can we hire the Bower Crew? ; ) This looks great! I’m totes jealous!!!
Not counting the metal ring and the grate or the tools it took…just the materials, it was right around $260.
xo – kb
Just the materials cost right about $260.
xo – kb
It’s just about $260 for everything but the metal ring and the grate 🙂
xo – kb
I’ll have to try to do that!
xo – kb
Where did you guys get the ring? We have looked but can’t seem to find a ring as tall as yours – or maybe I am overestimating the size.
It was made by a friend so I have no idea where you can get one. Sorry. I’m no help.
xo – kb
oh em gee….i swear, you crack me up! i’ve been reading along for a while, but had to come out to comment because of this…
“bow-chica-bow-er”
hahahaaaa! love that!
sam 🙂
Looks great! We’re going to make ours this summer, is there a reason you need the metal ring?
Also, what kind of wrap is that, I love the stripes!
I definitely think you could do this project without it…but your stones would get ashy and black from the fire if it was large. We had it already so it was used. And my wrap is Solly baby…it’s so comfy!
xo – kb
Wow, that fire pit looks great! I wish we had the space in our yard for that!
WHERE DID YOU BUY THE RING?
Thank you for sharing this awsome outdoors fire place
WOW! That was a lot of work -and it looks FABULOUS! Congrats on your healthy baby too! 🙂
We built a fire pit this summer, you can see photos and how-to on my blog:
http://julieloveshome.wordpress.com/2013/09/11/how-to-build-your-very-own-stone-fire-pit/
Thanks!
julie
very cool love it 🙂
Can you tell me the size of the ring? We are in the process of building one and cant find dimensions. Thanks
Ours is 45″ in diameter. Hope that helps!
xo – kb
I love the quilt in the background of the bags of the stones! The fireplace is great too.
Fire pit looks great!! And your house and yard look so good. Congrats on your new addition what a beautiful looking family!!!! Me and fiancé plan to do one this summer 🙂
We have had a few fire pits over the years and we have used a section of metal culvert pipe, you can get any diameter from 2 feet to 12 feet. We have also used the rim from a tractor and semi trailer. With the rims you may have to cut out the center with a set of torches. And make sure you also take the tire off of the rim before burning it too. I know that seems like a no brainer, but we know someone…
This is a great blog and i want to visit this every day of the week. When visiting blogs, i always look for a very nice content like yours”
Fire rings (galvanized, corrugated steel, various diameters and heights) have been available at Tractor Supply Centers here in western Michigan.
Today, we picked our spot (we’ve had our ring for six months already), removed the sod and topsoil from an area 6″ bigger than our 30″ ring, looking forward to initiating our new pit tonight. At 12″, we hit hardpan, sparing us from tamping our base, etc., so we were ready to add some fill-sand, set the ring, and then build our fire. About that time, my wife found your blog, which put everything on hold ’til we check out the use of blocks, river rock, drainage and heat transfer issues. So back to planning . . . .
Well, I hope it works out. I know that we have had our fire pit for some time now and it is still one of our favorite projects to date and hasn’t caused us any problem yet.
xo – kb
Great tutorial! Thanks for posting in such detail, will make it easier to boss (instruct) my husband around.
That was one of the best blog posts I’ve read in ages. It was written with humor, sufficient steps, great photos, and tells one everything she needs to know. That was great and thank you for taking time to compose it! Those photos of the pit and your family are terrific.
does the cost of your materials include the metal ring? Where can I get a metal ring like that? Lowe’s? Thanks for posting this. I’m using it as my template for my backyard fall project. Really glad to have found this on Pinterest and followed the link here.
No. The ring was a gift from my father-in-law and we didn’t buy it. He got it at a metal company in Chattanooga I believe.
xo – kb
You did a really very nice job.
The best instructions EVER of how to build a fire pit. Great step by step details. I never comment on the day projects, but after seeing yours I have to credit where credit is due. Great DIY! I hope you are still enjoying the fire pit. Round of applause!
I love your fire pit! I have been wanting to build one almost exactly like yours. I am having a hard time finding a reasonably priced 48″ metal ring like yours. Where did you get the metal ring and how much did it cost?
Pretty fire pit!
While researching fire pits I’ve read some advice against/stories about decorative rock usage and rocks exploding from heat. Have you had trouble with this? I hope this does not happen…
We haven’t. We have had about three dozen fires and not a single issue with that but I know that it has to do with the type of rock.
xo – kb
the bricks need to have a small space in the 2nd row so the heat wont build up on the rocks and the ring
Good tip Patricia.
xo – kb
Ha! I whish I had a husband that like to do this kinds of things. But he is all about books. You can have all
Where do I find one of those rings?
That’s really nice. Where did you get your metal fire ring from? It’s a nice big size. We would love to do this but don’t know where to buy that?
Great tutorial. Thanks for taking the time and effort to post it. I also live in Ga. (Lawrenceville) and have trouble with digging any hole more than a few inches deep. So much granite and clay!
I’m fortunate that I have several acres and can just start a big ole brush fire when I want, but I would like have a similar pit near the house for winter evenings.
I’m laughing at the comments by people who are unable to have them where they live.
A new subdivision went up a few years ago that adjoins my property and a couple from ‘up north’ complained to the fire dept. about one of my fires. They told the fire dept. that they didn’t think it was good for the environment and should be illegal. The dept. came out and subsequently told me (and them) that as long as I’m 100 feet from their property line that it’s perfectly legal (which I already already knew). So I measured exactly 100 feet from the line and built my next fire even closer to them (only did it once). Mean…I know, but they needed a better reason than that to get my sympathy. Health issues, OK…whining, not OK.
I loved watching all the pics and all the hard work ya’ll did to put this together…im loving it and wanting to make one.
Love all the details and pics! How hard is it to clean out?? Do you end up shoveling all the stones out from the bottom?? And is it hard to get a shovel in there?
Thanks!
Lisa
We just burn till it’s done and then leave the coals in it. We haven’t had to shovel anything out and since there is no trees around (fire hazard!), there aren’t any leaves or debris that get in there.
xo – kb
You’re funny. I liked this post. Now let’s see if my non-handy hubs can do this … 😐
What was the ring from or off??
I want to update our fire pit, yours looks wonderful! Just need the ring…
My father in law got it from Acme Industrial Piping in Chattanooga. Hope this helps!
xo – kb
We got ours from my father-in-law. He got it from Acme Industrial Piping in Chattanooga.
xo – kb
Ours was a gift…it’s originally from Acme Industrial Piping in Chattanooga
xo – kb
I don’t know how much it cost because it was a gift…but it’s from Acme Industrial Piping in Chattanooga.
xo – kb
Thank you very much for the detailed pictures guys. Great job! I followed along and mine came out great. Thanks again!
I’d love to see pics! Email me at [email protected] or tag me on instagram – @bowerpowerblog
xo – kb
Thanks for sharing! I really enjoyed how you explained the process with bits of personal experiences of your family life. You really did a great job by including plenty of photos. Normally;, I dont read everything but you definitely captured my attention. And you have a great looking family. I hope to be able to follow more of your projects as you have a way of making the project fun instead if daunting.
I found this on Pinterest. Thank you for the share. I’m building a house and want a fire pit. This is great!
I love your wrap! What is it?!
It’s from Solly Baby…it’s the best 🙂
xo – kb
thanks for your efforts in posting such s brilliantly detailed account of your diy fire pit. Off to try one for ourselves xxxx many many thx again!
very funny and informative we are going to do this but instead of a metal ring we are going to use a truck rim
Hi was wondering how hard it is to clean out the ask with the rock/pebbles? Thanks
In general we don’t. Is that normal to clean out the ash? We just let ours burn until its basically nothing.
xo – kb
wanted to say that this was a great tutorial but that I’ve been told you shouldn’t use river rock in fire pits because it can explode. Just wanted to let you know.
That’s what others have said but we have had no problems. I heard someone explain why one time but I don’t remember the reason now.
xo – kb
Looks great! What is the size of the ring that you used… 36 inches??
Thanks!!
Be careful with that if you plan to cook over the firepit – truck rims have chromium in the steel which is toxic when inhaled. We were going to do that until we found that out!
Thanks for that tip!
xo – kb
thank you for the details you provided. very nice result.
can you tell me the height of your fire ring ?
thanks
The fire ring itself is 12 inches in height and 35 inches in diameter.
The fire ring itself is 12 inches in height and 35 inches in diameter. Hope this helps!
xo -kb
The best fire pit blog I have ever seen. Way to go!!!
Thank you!
xo – kb
Your assistants,Jeremy and Will, are wonderful,! Your pics,and detailed steps let me know that everything is possible if you’re willing to put your back ( or someone else’s ) Into it. About to do a kitchen and house Reno,(phase 1) then a deck and Master suite addition( phase 2). After all is done, I’ll be doing landscaping ( phase 3) that’s where your tutorial will come in. Your yard came out really nice. Hope I’ll be as successful as you. Wish me luck
Wow! You got a major list there! Good luck with the kitchen!!!
xo – kb
I’ve spent the afternoon browsing through fire pit guides and I can honestly say yours is the most comprehensive!
Great job, love the high quality photos too.
Scotty
Looking forward to making mine this summer ready for the winter. I’m from the north east of England, a town called ashington and I work on a building site building houses and lots of the items needed are available free, apart from the main ring so this of course is where I will be visiting a scrap yard. Won’t be better than yours but will have a good try, thankyou for the idea
Great fire pit! This is on our list as a fall project. Can I ask where you got the Cap stone pieces?
Thanks
All of the supplies were from Lowes.
xo kb
Thank you for this post …Very helpful!!! You really did a great job laying evey thing out step by step with very helpful tips along the way! And… Very funny!! So enjoyed reading this (and laughed at your humor!) !!!! Everything looks beautiful. I’m researching for my daughter, they have a 2 year old and are planning another soon, so I especially appreciated your helpful thoughts about fire safety and little ones !!!! Plan on checking out your other posts just cause ! Again, Thank you!
Thank you for this post …Very Helpful !!!!!! (And very funny …literally laughed out loud 🙂 I’m researching for my daughter, as they have a 2 year old and plan on another soon, the fire safety tips were greatly appreciated. Your writing style is PERFECT and more importantly, Very Thoughtful… not only step by step, but you’ve got a true teacher’s touch. The helpfull tips/hints most people would ask about, or start the job and wish they had, were included. Being very visual myself, you truly did a great job documenting this lesson. Again, Thank you! (I plan on checking out your other posts just cause 😉
This is definitely my next DIY project, I’ve got fire pits now I’ve bought but this is outstanding
Great job, and thanks for the step-by-step photos. This is going to be very helpful. I love doing these kinds of projects. All the additional information from other bloggers is helpful as well. Lots of ideas. Got to check out your other DIY’s