Photoshopping is such a useful tool and at times it can be incredibly overwhelming. It turns us photoshoppers into Tarzan. Confused. Alone. Powerful. It can make you beat your chest and feel like swinging from the trees. Loin cloth optional.
So each week I bring you a new tutorial to teach you a little more about this powerful tool. Today’s tutorial is to help you remove blemishes and to also disguise unsightly background items. But first, the things to note….I use Photoshop CS4…not all photoshop is created equal. This method is one of MANY easy ways to accomplish this task. Feel free to share additional relevant tips in the comments section! Let’s get started.

This is my original photo. Look at that little auburned hair baby Will. Sweet cheeks. With crumbs under his lips. And this is what we are doing to it….minor, yes…but at least you won’t gain calories while kissing him 🙂

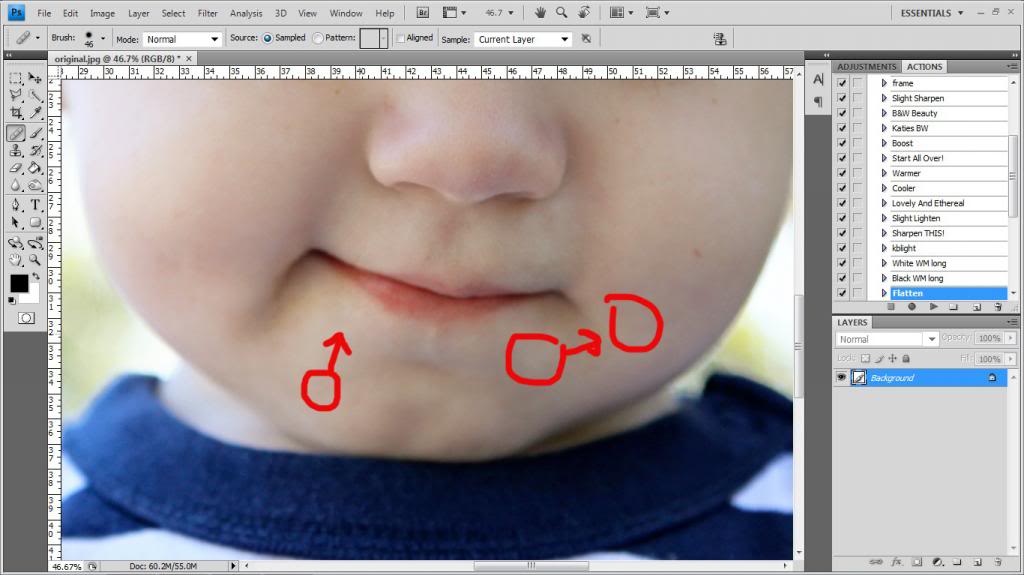
Okay…so first you wanna open your image in photoshop and zoom in on your area. Will had some little crumbs indicated by the red arrows. This also works well if you have a dirty lens (circled in white) or if you have other blemishes, scars or acne that you want to remove.

Select the Healing Brush Tool. I like mine to be slightly bigger than my blemish and at 0% hardness.

Press the ALT button and click on the area that will be your “bandaid”. Your “bandaid” will need to be an area that is similar in texture and hue and darkness. Note that the “bandaid” won’t be like a perfect cut and paste of that area…but more of an inspiration for Photoshop to mask the blemish. As you can see below, I used different areas to cover the blemishes.

Here is what it looks like if I ALT and left click in a darker area and then try to bandaid a lighter area. Doesn’t work quite right.

Zoom back out and your image should be blemish free!

It’s subtle and probably only noticable if you print things like a large canvas or need that ‘more perfect’ photo. Granted…this is not to say that every photo needs to be crumb free…or perfect…and I’m not making any statement about your acne….maybe you love it and want to be a spokes person for ProActive one day. This tutorial is not for you.


Okay…now let’s do a different method for removing items in the background of an image…like an unsightly telephone pole or random mailbox. Here’s the original…of my little munchkin doing a very typical Will activity…

First thing you wanna do is open your image and zoom in. My goal is to remove the pole and the mailbox but make it look completely natural. This is way easier if your photo is at a lower aperature. When the lens is wide open, the background is more blurry…making cloning out items easier.

So in the sidebar you want to select the Clone Stamp Tool. I like to adjust my opacity to 40% or lower…I’d rather it look more natural and the lower opacity helps things blend. Okay…now I always start with my lighter color. So I ALT+Left Click on the lightest highlight area…in this case, I am trying to rebuild the trees that were covered with the pole…so I select another area of trees (circled in red).

Then I start with my midtones and finally shadows…filling in the areas that look best.

Then comes the sky….I just clone the sky and remove the top of the pole.

After you clone out everything completely, you can continue on with the rest of your editing. I did a little cropping and sharpening to come up with my final image…

Side by side before and after…


Pretty easy techniques for you to try with your own blemishes or telephone poles or whatever! I especially like to use this technique for stray pimples, rogue nipples, and oreo cookie crumbs.
Happy Photoshopping!
p.s. we have one more photoshop tutorial left!
Don’t say that I don’t want them to ever end!
I love these tutorials. Thank you so much! I totally wouldn’t complain if you decided to do more in the future 🙂
These tutorials are fantastic! Clear and easy to follow. I’m sure they’re time consuming, but Please keep them in your weekly rotation- I’ve learned more about photoshop here than many other attempts. Thanks so much!!!
My secret weapon! I love clearing up that one monster zit the decideds to pop up right before anything major. Now if I could just teach all of my friends to do a customary PS job before tagging me in photos 🙂
Agreed, it would be lovely if you decided to continue these. You make things so simple and easy to follow!
Great tips! Thanks for this series. You make it look easy.
Ha ha, rogue nipples! On month 7 of breastfeeding over here, so yeah…we’ve got the rogue nipples. Would also work well for random piles of junk that always seem to sneak their way into the background of cute kid pictures. Hmmm…why would I pick up that clutter when I could just photoshop it out of the picture later!
Great tutorial! You make Photoshop seem a lot less intimidating – thanks!
Yay! Now I can go Photoshop all the random creepy stranger photo bombs (and their rogue nipples) out of my beloved pictures! Guess I know what I’m doing this morning 🙂
I love these! I use photoshop too, but do the zit-cover-up-age (and under eye circle cover ups) a little differently using the clone stamp and turning the opacity down a little to make it look more natural. It fun to see how other people use the different tools, because I really have no clue how to use some of them!
I also would hate it if you did a bunch more!!
Love the Photoshop tutorials!! Thank you! (Wouldn’t hurt my feelings if you continued on with them!)
I just wanted to thank you for posting these tutorials and making it clearly illustrated so that someone like me who knows nothing about computers can follow along. It is nice to have the tool, but it is nicer to know what to do with it. Thank you for sharing some Photoshop tricks.
I think these tutorials have been so helpful…especially since they have given me the courage to try photoshop!
On another note, are you ever going to update about the birth story for Weston? I’m dying to find out the rest of the story!
It’s soon!
xo – kb
These tutorials are the best! You explain everything so well that you’ve convinced me I need photoshop over the less useful freeware I’ve been using. 😀 Thanks!
I love the photo of your dad gazing at Weston–you can feel his love it brings me to tears each time. Congratulations to you all.
niceee, very useful
Thanks! Just used this tutorial – very easy and helpful.
You are a rock star. I’ve been reading you since you did that tiny little bathroom I think two years ago? You guys are still awesome innovative and cool. Oh and you crack me up. I love that you are funny. Totally love it. Thank you.