
Hey it’s Tuesday! And you know what that means….photoshop tutorials!
Today’s tutorial is gonna teach ya a very quick and easy way to fix your photo’s white balance. White balancing is crucial for decent photos. Most of you probably shoot with a point and shoot or a DLSR that has auto white balance. And that works. But do you ever download your pictures only to find that they look like a color has been washed all over it? that the whites aren’t really white? and the skin tones look either like zombies or like JLo after a spray tan. Hello Sunny D.
Well, this tutorial is to teach you one little way to fix those color casts…making your whites more white and your colors more accurate. Obviously this is not the only way to white balance in post processing but this is an easy and quick way that can be effective if you are in a pinch. Things to note….I use Photoshop CS4…not all photoshop is created equal. Also, the white balance can be affected by your computer screen and your own personal taste…so each person may adjust things differently. Let’s get started.


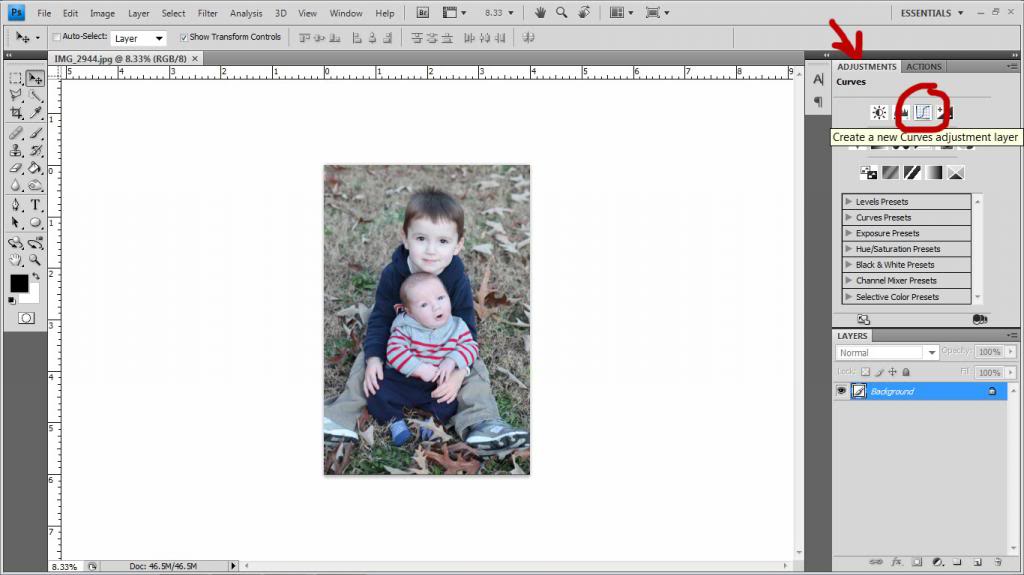
I had taken a photo of Will holding Weston in the yard back in December and it was looking a little on the cool side. Will tends to have auburnish hair and the leaves and grass behind the boys were my first clues that this picture was too blue and needed a little warming up. First you wanna open your photo in photoshop and go to adjustments (labeled with red arrow) and open up a new Curves adjustment layer (circled in red). You can do the same thing by going to Layer/New Adjustment Layer/Curves in the menu bar.
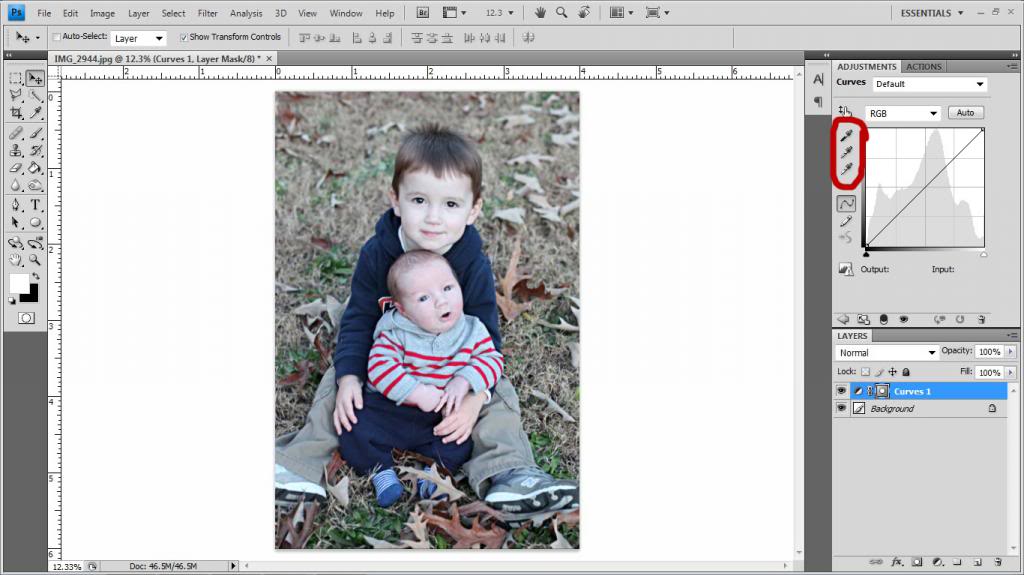
When your Curves window opens up, you will see three little droppers on the side of your curves graph. I circled them in red. The top one is for black, the middle for gray and the bottom for white.
Select one of the droppers by clicking on it and now you must select that corresponding color in your photo. So for example, I picked gray (I found it’s most effective for white balancing) and then I clicked on the grayest part of Will’s shoe. Instantly you should see your photo change color casts and your graph should reflect new color curves. Sometimes you may have to click around that same area before finding your favorite white balance.
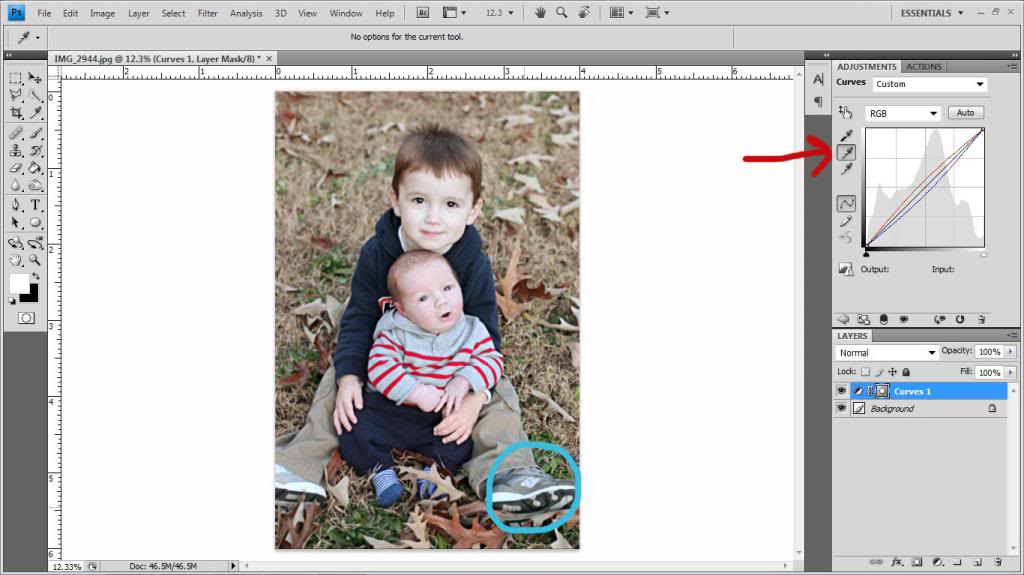
Flatten your photo and you will have a brand new much more accurate photo.


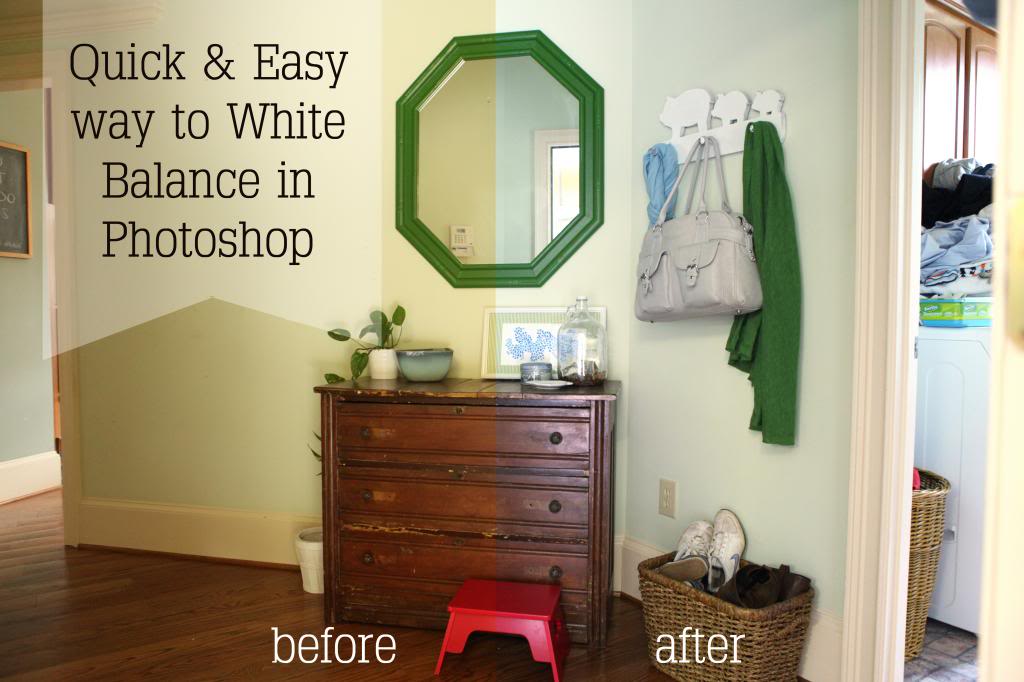
Now I showed you how this works for portraits and for a color cast that is too cold….but what about those annoying yellow photos?! Yeah…I see these on blogs alot….ahem…like on mine. The colors of the interior will be WAY too warm goldeny and the picture doesn’t really represent how it looks. Well, let’s take care of that too.
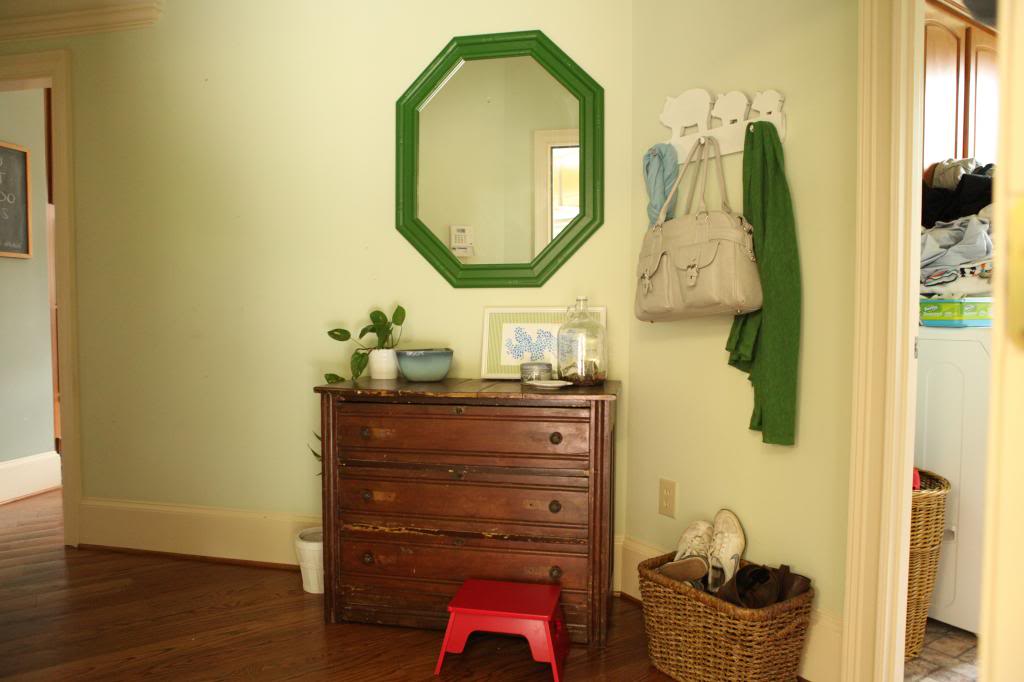
We are gonna make that yellow photo and make it much cooler. and bluer too 🙂
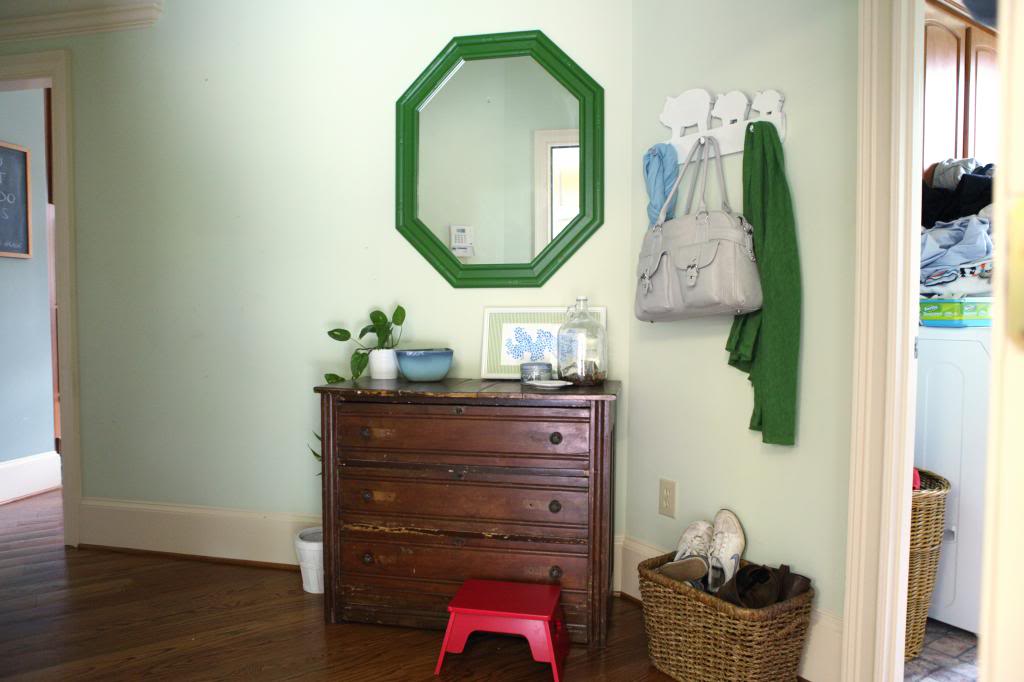
So the steps are the same…click on Adjustments then new Curves adjustment layer or go to Layer/New Adjustment Layer/Curves. For this one I am again gonna select gray and click on my purse handle which is gray (circled in red).
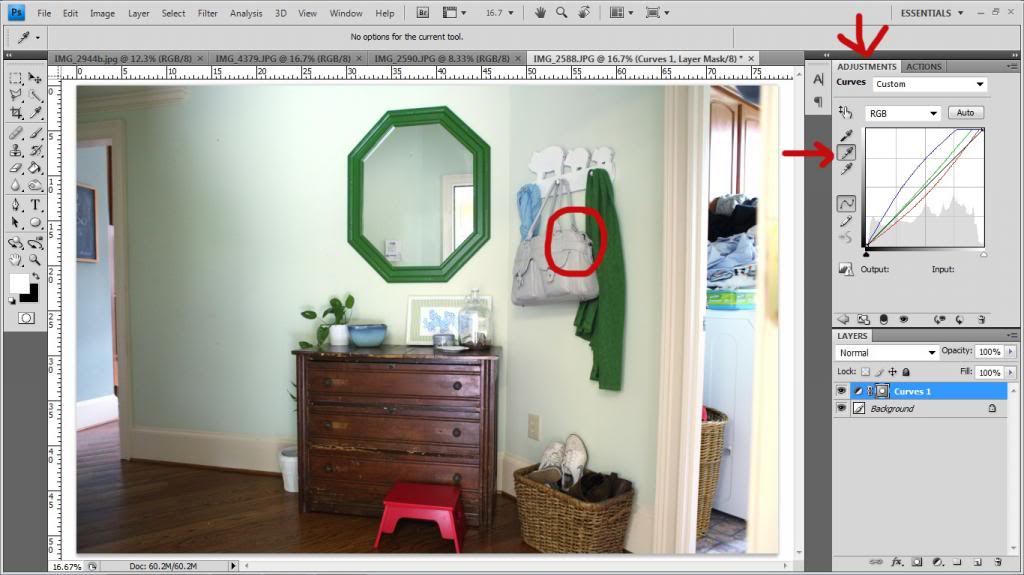
But the problem I have is that it turned my photo too cool now. So instead of reclicking around, I decide to adjust the opacity of that curves layer. It looks much more accurate if I took the opacity of my new layer down to 87%.
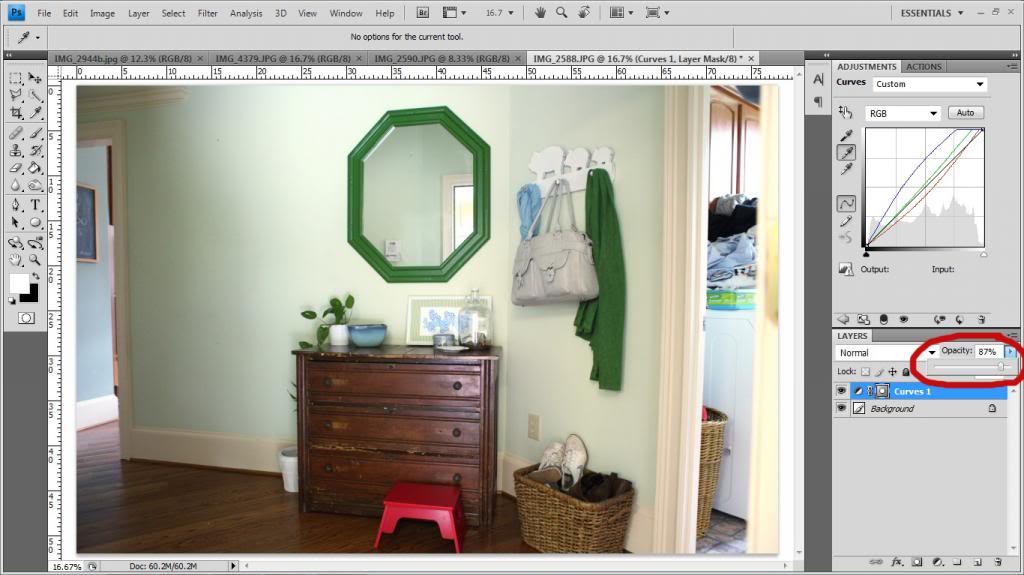
Then I just click my Flatten action and my new interior photo is ready to go.
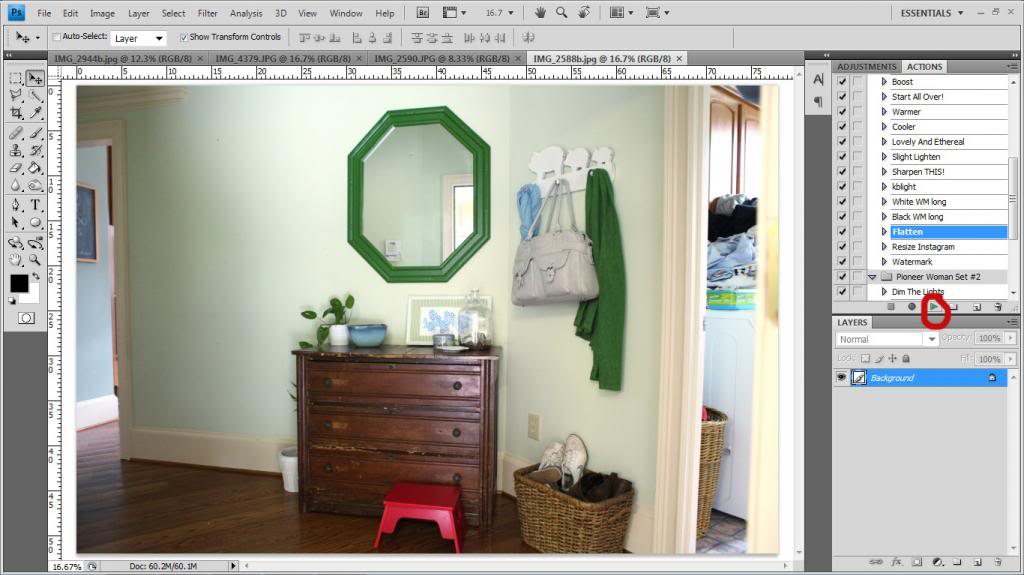
See the difference?


So that is just one quick and easy way to white balance in photoshop. Of course, this does not adjust other people’s eyes in real life…just photos…so if you are all Oompa Loompa in reality…well, Staten Island is waiting for you.
p.s. Obviously not everyone in Staten Island is orange. Just 90% of them. Snooki out.
This is seriously life-changing and much needed – thank you!
This is great and all but we really need part three of the baby story! 🙂
love these girl. keep ’em comin!
Awesome! Thanks for the tip!
Wow, what a difference that makes! Thats for the tute!
http://happinessiscreating.com/
I would have never thought gray would be best, I always try to find something white! White balancing makes me crazy (and I don’t have a fancy enough camera to do it manually) so sometimes I even put something white in the corner of my picture to crop out later!
Great tutorial, I downloaded a thirty day trial of LR and I also tried PS previously. I wanted to pull my hair out! I spent hours trying to figure them out. I think its so difficult! I ‘ll try again someday, but for now I’ll just keep reading your tutorials.
Great post! I’m a PS newbie and am LOVING your tutorials!
I’m totally loving these photoshop tutorials!! So helpful. Love your blog!
Yeah – a gray card is actually what photographers use! It doesn’t always work because sometimes a picture doesn’t have a gray item in it…so it’s definitely good to keep up on how to do it with white too 🙂
xo – kb
I have never fixed my white balance this way. Thanks. I use a different editing program called the GIMP and can not find this option yet but I will keep looking 🙂
THANK YOU THANK YOU THANK YOU!!!!
I seriously can’t thank you enough for this tutorial!!!!
I ALWAYS have yellow photos (or super blue thanks to a very alrge and in charge fish tank) and I always just used the Edit>Image Tone and so on and they never came out true to life.
You are a life saver, and I LOVEEEE these posts.
Awesome tutorial, spray tans and all! Great series here Katie! Learning so much.
Did you learn these tricks one by one over time or did you pickup a book?
Tuesdays are my new favorite day of the week! I am a yearbook adviser for a local high school and have been unsuccessfully fiddling around with Photoshop CS4 for 2 years. This past year I feel like I am beginning to see the light thanks to your tutorials!
I’m a graphic designer and I use photoshop EVERY day. And, I would consider myself as an advanced user. However, your tutorials are teaching me those things that I knew were possible, but just not quite sure how to do! Thank you, from one Katie to another!
I’ve never done it this way before. Thanks for the new tip!
One by one…I’ve actually never read a book about photography or photoshop…just a lot of googling 🙂
xo – kb
This is awesome! I’ve been using the “warmer, cooler, lighten it up, dim the lights, etc”, actions from PW forever but these seem make the colors look a lot more accurate.
Thanks for the info!
I don’t want to sound like a total idiot or anything, but why do you flatten your pictures after an edit? I am VERY new to my DSLR (ok, I’ve had it for over a year, but I’m getting more into actually taking pictures) and I just bought PS Elements 11, so I’m really curious. I had flattened something once and didn’t see a difference, but maybe I’m not looking for the right thing?
If you don’t flatten your image then you have to save it as a photoshop file vs a jpeg 🙂
xo – kb
Hi, off topic, but where do you find such good boys clothes that are cute but not expensive.(cause I assume you are thrifty!) It is so limited out there!
Cute mirror!
Thanks so much for sharing! I usually change the color levels until I find what feels right but this method seems like it takes out some of the trial and error.
Hi Katie!
Long time reader here! I can’t remember if you’ve ever addressed this, but I am wondering what you use to back up all of your photos? Do you just use an external drive or iCloud or?? I am looking for something that does this automatically and not sure which one to go with….
Thanks in advance for any advice!
Thanks for this! All the photos I take at night come with the nice spray tan look. I can’t wait to try it out.
This is so helpful! I’ve been doing a dozen steps and eyeballing it – this will be so much faster. Thanks!
I use an external drive and a backup system called Carbonite.
xo – kb
I shop all over…but alot of the staples come from Walmart or Childrens Place outlet or thrift stores. I like baby Gap but they are RIDICULOUSly priced at times.
xo – kb
Oh my gosh, this is SO SO SO helpful!!! I LOVE it, thank you so much!!!
So if I save it as a Jpeg that automatically flattens it, right?
thank you!!
thank you thank you thank you for this!! I’m new to photoshop and LOVE tutorials like this!
thank you, kbower! another helpful photoshop tutorial! i believe you can also get to curves with command + m.
How did I not know about this trick before?!? THANKS! 🙂
You seriously ROCK! I just got a DSLR camera a few weeks back and I am on a steep learning curve with photoshop. All these go to tricks are very helpful, so thank you!
omg. i just tried this. it’s life. changing.
Thanks for explaining! Really appreciate it!
Love your blog and these tutorials!!!
Good tip! I’ll have to remember that!
xo – kb
I think it saves it as a copy…but I could be wrong 🙂
xo – kb
Thanks for the tutorial – I gave it a go this week and the photo looked infinitely better!
YAY! So glad it worked!
xo – kb
Katie Bower you are a goddess! I’m so serious this tutorial has changed my life! I’m still learning to edit my photos better and have always struggled with editing my artificial light photos because of white balance. After reading your tutorial I gave it a go with a set of special birthday photos that I took in my dining room which has CRAPPY light and they now look SOOOO good! Have I told you already that you are amazing?! 🙂 I shared a link to your tutorial on my blog today as part of what I’m loving this week. I would love for you to come by and check it out sometime. Thanks for always being such an amazing inspiration!
http://jroxdesigns.wordpress.com/2013/03/01/lunch-with-my-favorite-bloggers-best-of-blog-land-february/
Amber
So glad!
xo – kb
So, I read this post back when it first came up and thank goodness I remembered it. I’ve been learning to use my new DSLR (I went from a Canon 35mm to a Nikon DSLR… crazy learning curve). I of course had it attached to my hand during my honeymoon in Olympic National Park, WA. Too bad I’m not used to setting all of my white balance, etc. functions yet. This post has completely saved all of my photos from the first day of hiking… can you say LIFESAVER! Thank you so much for all of the photography and processing tutorials they are so easy to follow and SO helpful!
P.S. Congrats on the new baby!