
Yay! It’s Tuesday and we all know that means that it’s time for another Photoshop Tutorial. Don’t worry. This time it will have nothing to do with fun-bags. Unless you wanna watermark your photos with boobs. In that case, more power to ya for your creative use of branding.
This tutorial will walk you through the simple way to use photoshop to add a watermark to your photos and how to create an action so that you can quickly and easily apply that watermark to all your photos with a click of the finger. Things to note….I use Photoshop CS4…not all photoshop is created equal. I did make the watermark completely visible….if you want to adjust the opacity of your watermark, so be it…but for the purposes of this tutorial, I did not. Let’s get started.
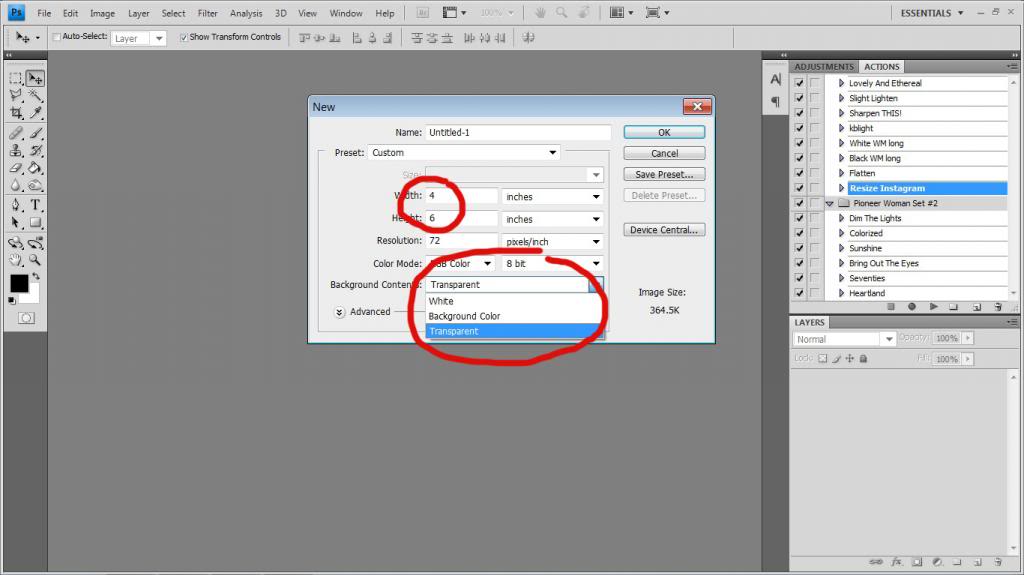
First thing you want to do is open a custom new page and make it with a transparent background. It helps to make it the size of your normal photos (e.g. a 4×6).
The checkered background is transparent (success!) and then you want to type out your watermark word. I typed my url in black in the bottom corner.
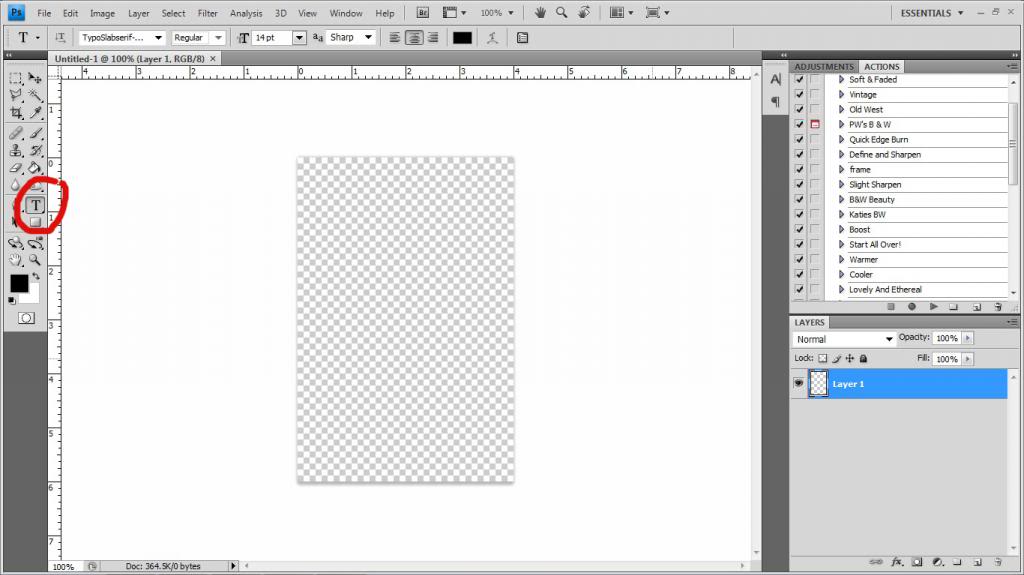
Then I drew a giant thumbs up. Apparently I thrive off encouragement.
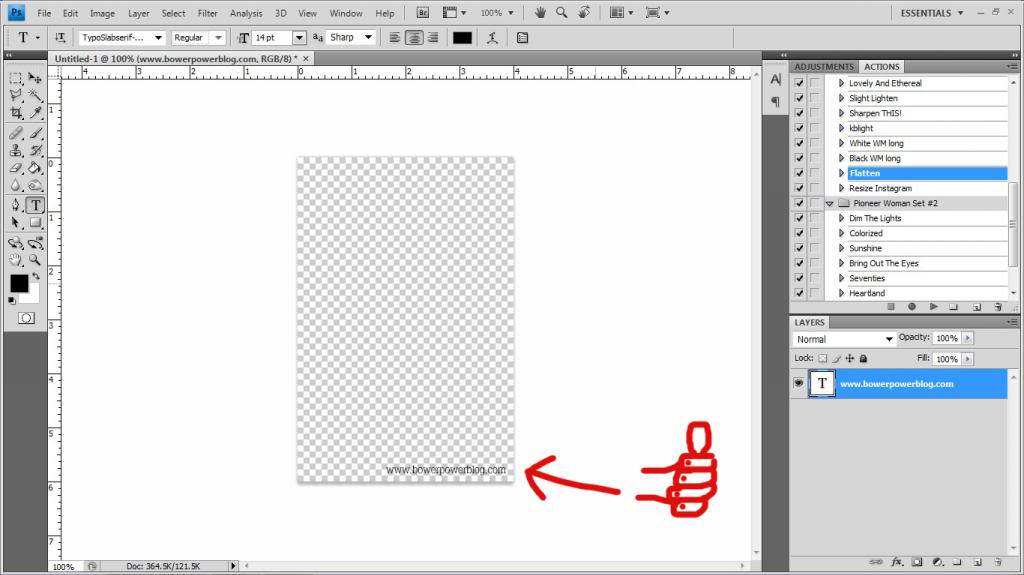
You can adjust the size, font, color, OPACITY!!!, etc of your watermark then it’s time to save it.
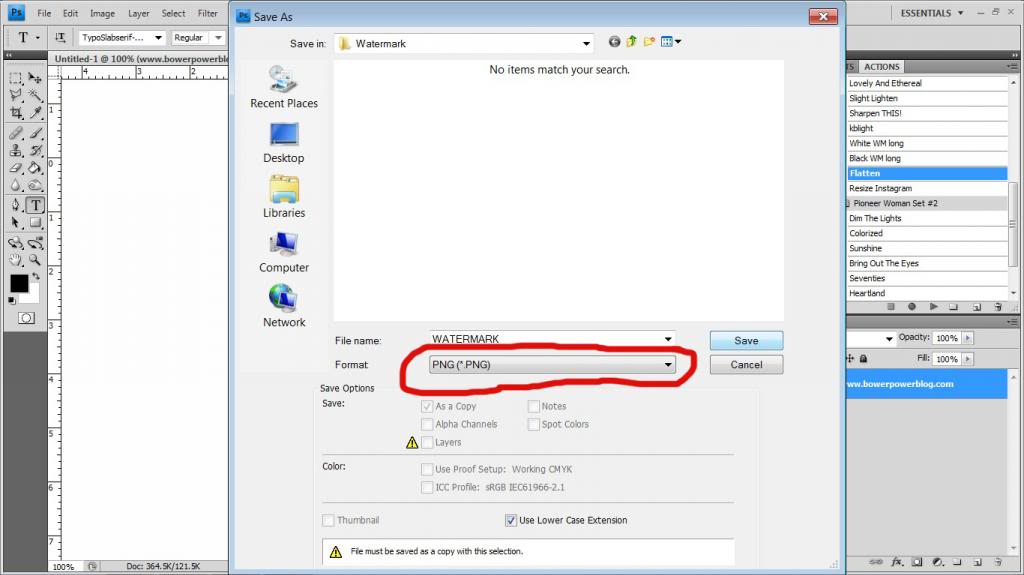
Click File/Save As and a window should appear…save it wherever you can remember (you’ll be getting it later!) as a PNG file. This is really important so I’ll say it twice. SAVE AS A PNG FILE.
Click Save and now your screen should look like this….one transparent background image with your watermark word and the file name should be ‘filename.png’.
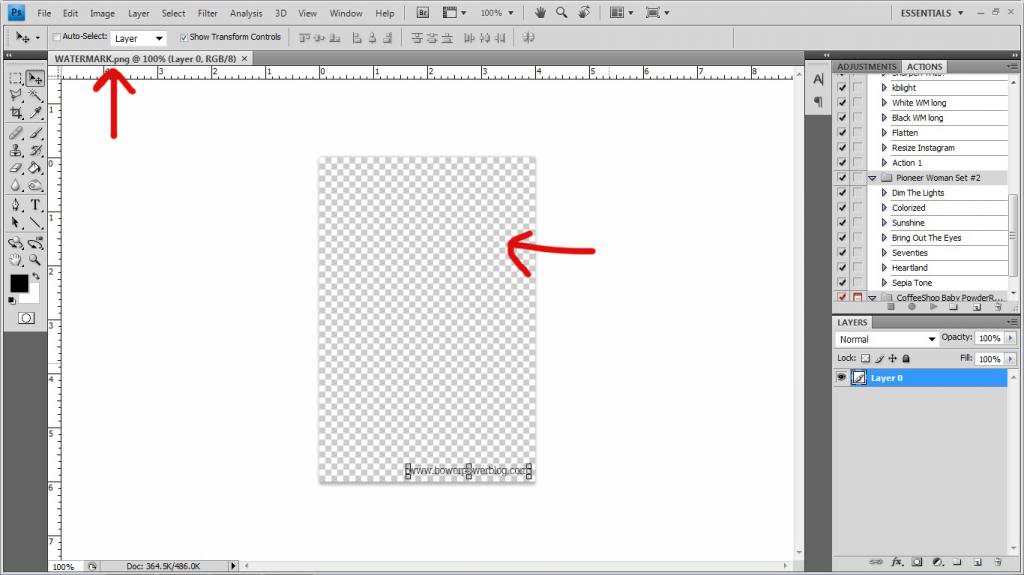
Now that we have our watermark, let’s create our action that will make it easy to apply to numerous photos.
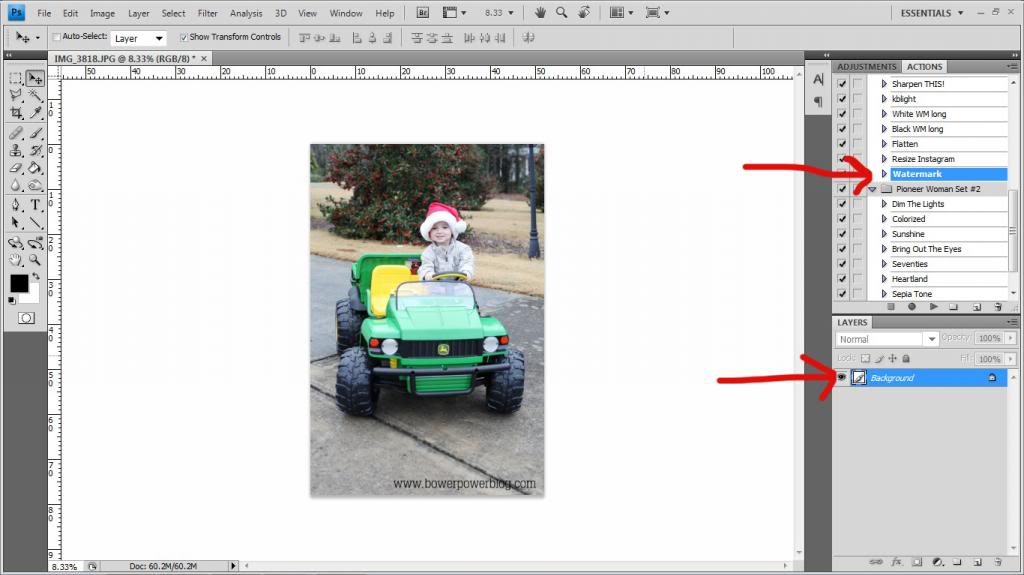
First open a completely different photo. I opened this one of Will driving his John Deere that he got for Christmas.
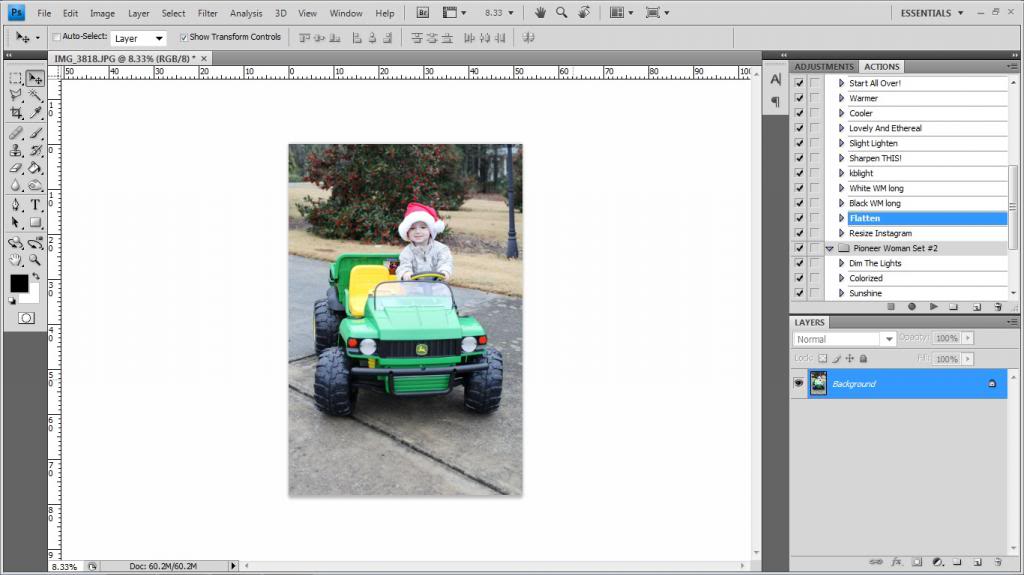
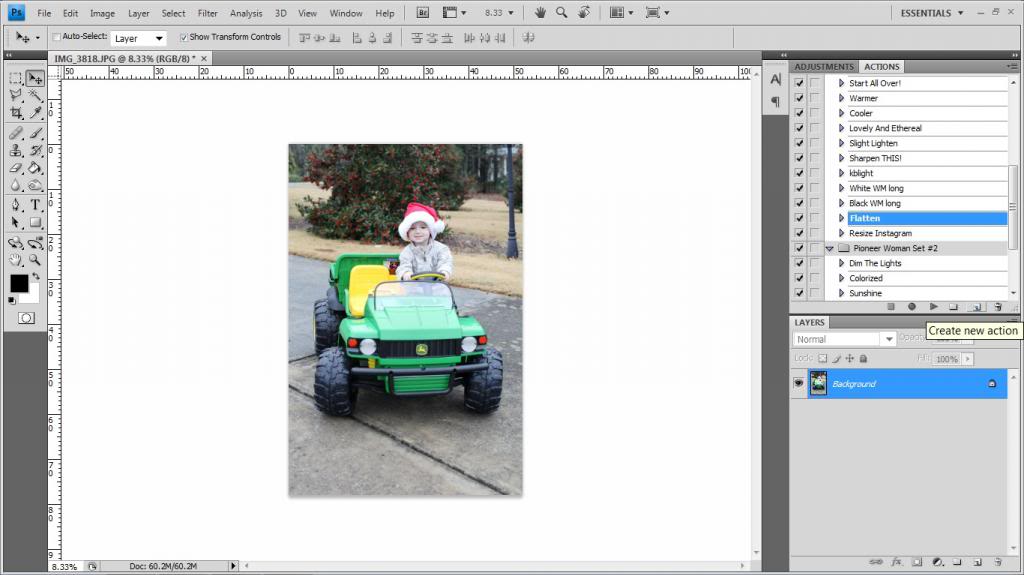
Now you want to go over to below the existing Actions and click the square with a square in it…(the little pop up box will say Create new action).
Label this new action WATERMARK. Click Record with all your might.
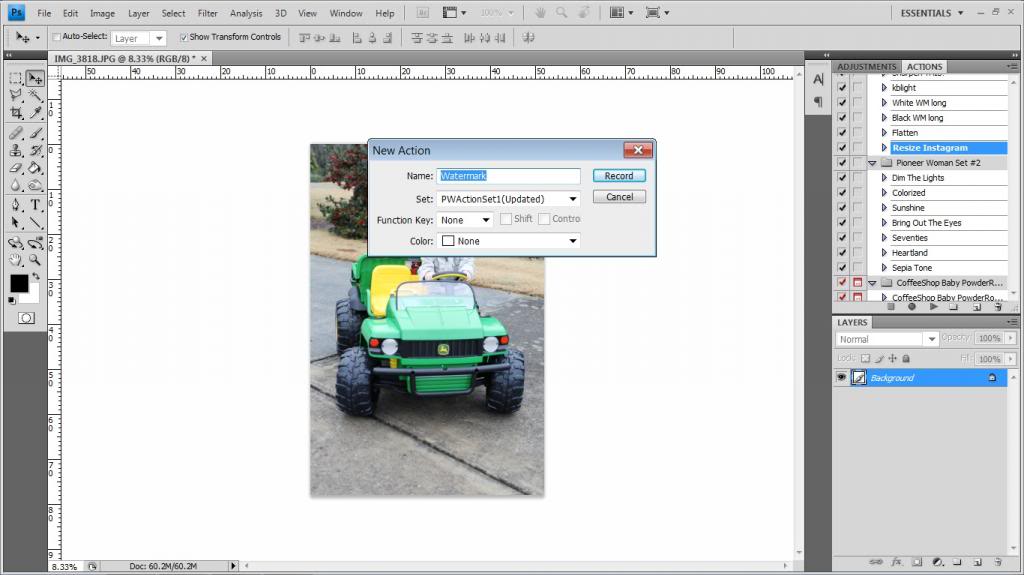
Now the red record button should be on (see it there circled in red? that’s on!)
And now every single thing you do will be recorded on that action and duplicated in the future.
Click File/Place.
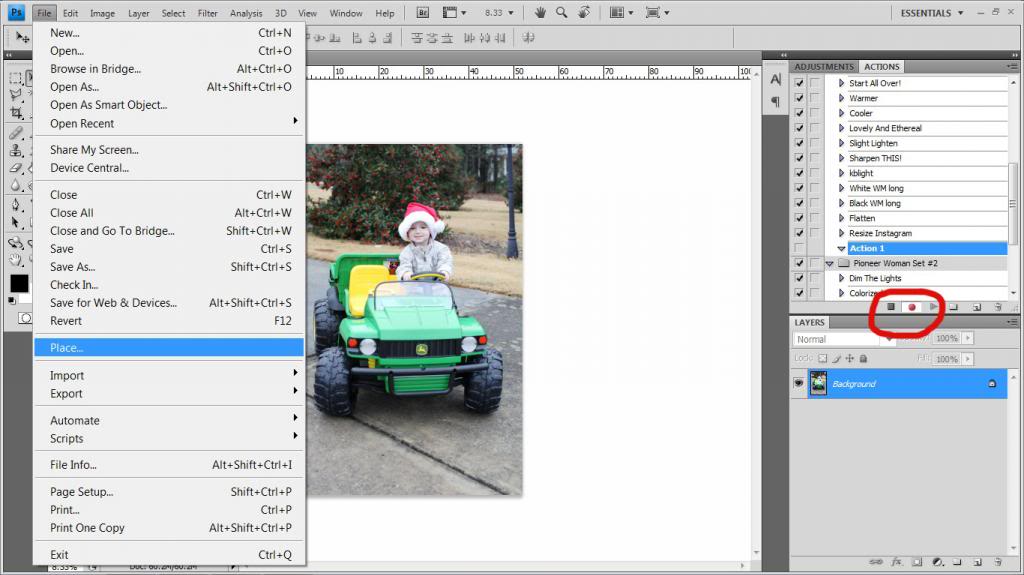
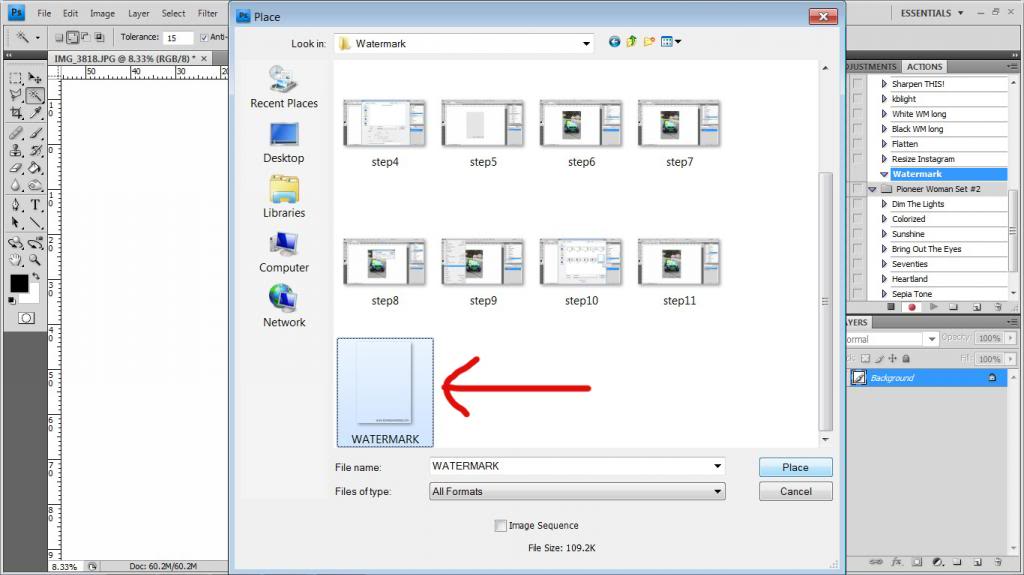
Now we are gonna place our PNG file back on top of the photo of Will…remember where it is? Click it and hit place.
By dragging the corners, you can make the PNG watermark fit the existing file. Now click the little check mark to keep that transformation.
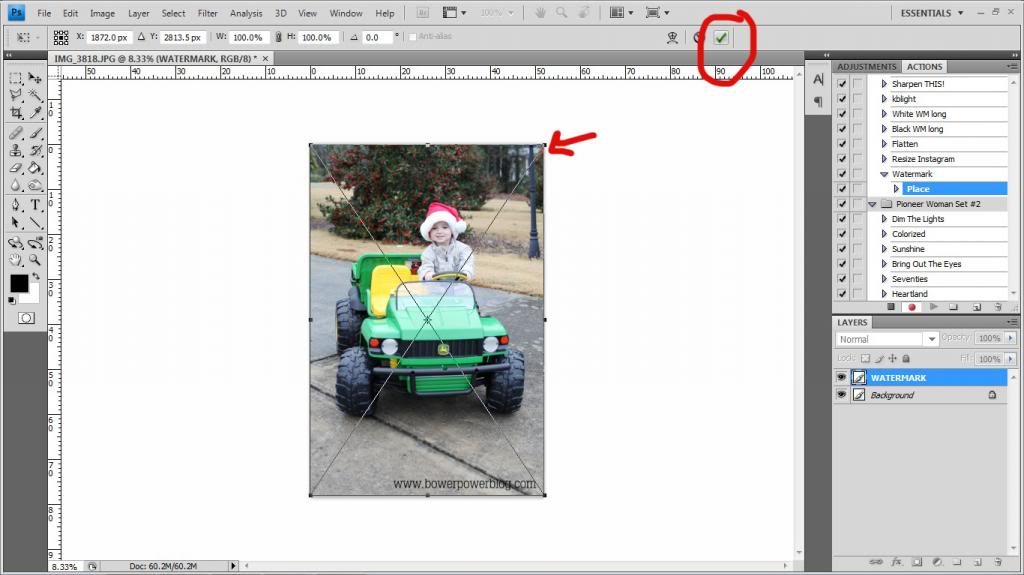
Now click STOP RECORDING. It’s the first little square on the actions toolbar.

Now your watermark is on your photo. Again…you can make the words go across the middle, top or bottom and you can make it as opaque as you like. It’s like eyeshadow…everybody likes it different…so do your thang.
Your watermark action should say Place and Transform under it.
Now it is time to flatten the pic. If you do no cropping ever and you want to always flatten right away – you can make this part of your action by clicking it before you stop recording. Otherwise, we will flatten after the fact.
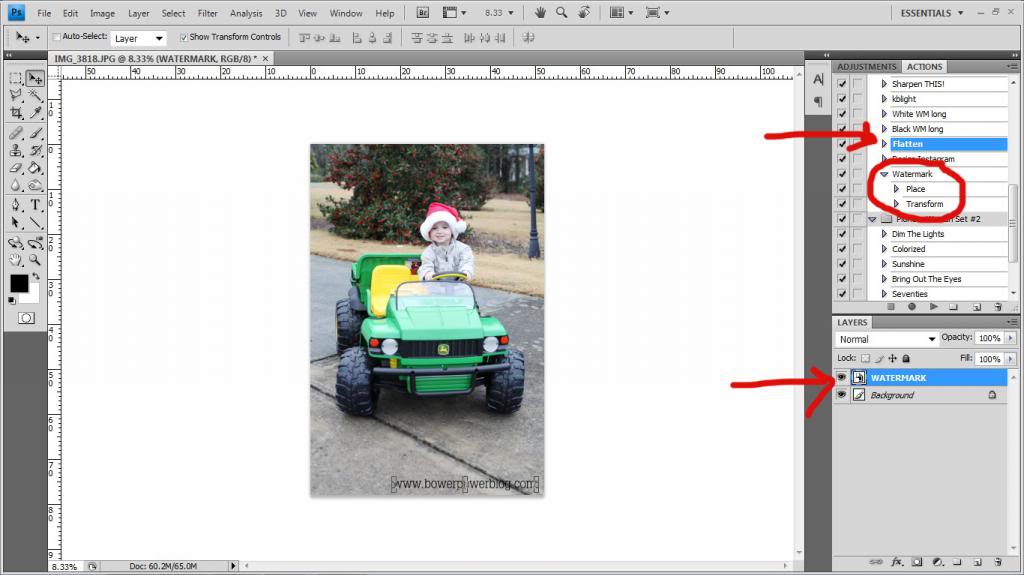
After you click flatten your photo is officially watermarked.
Now time to test it. Here is a cropped image of the cutest boys on the planet earth. It’s a fact. I had scientists look into it.
SOooo open your next image and highlight your watermark action. Now click the Play button to apply the watermark to your new photo.
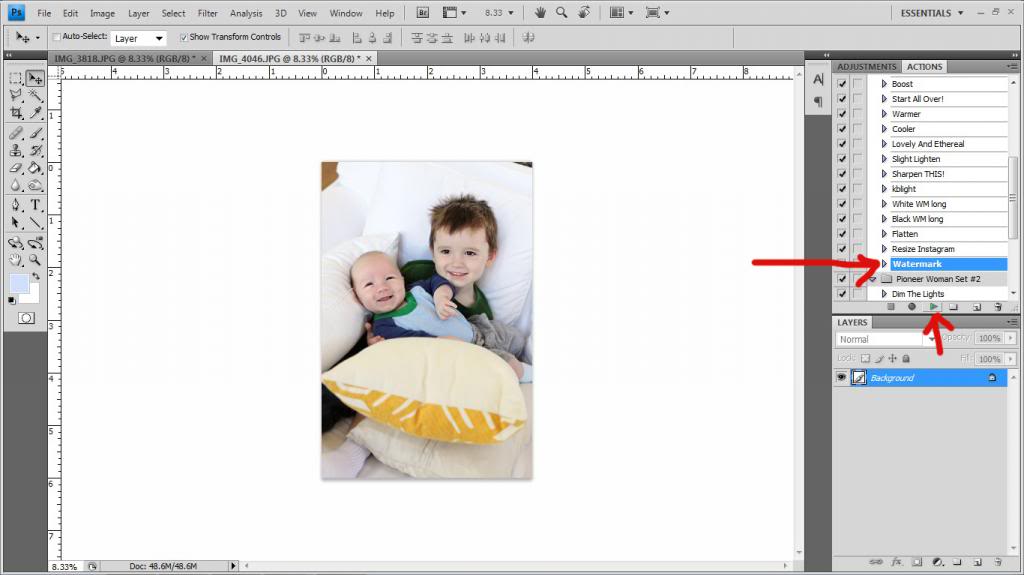
Now see? The cropped image doesn’t automatically resize (that’s a different tutorial – not for now!) so you can resize it manually for your photo.
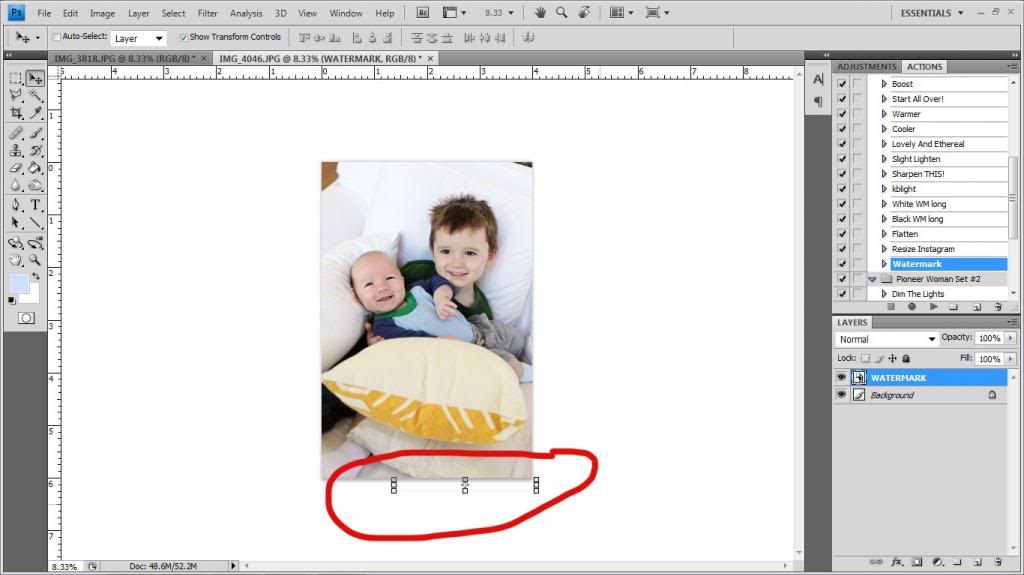
Grab a corner and drag it to fit the new photo then click the check mark.
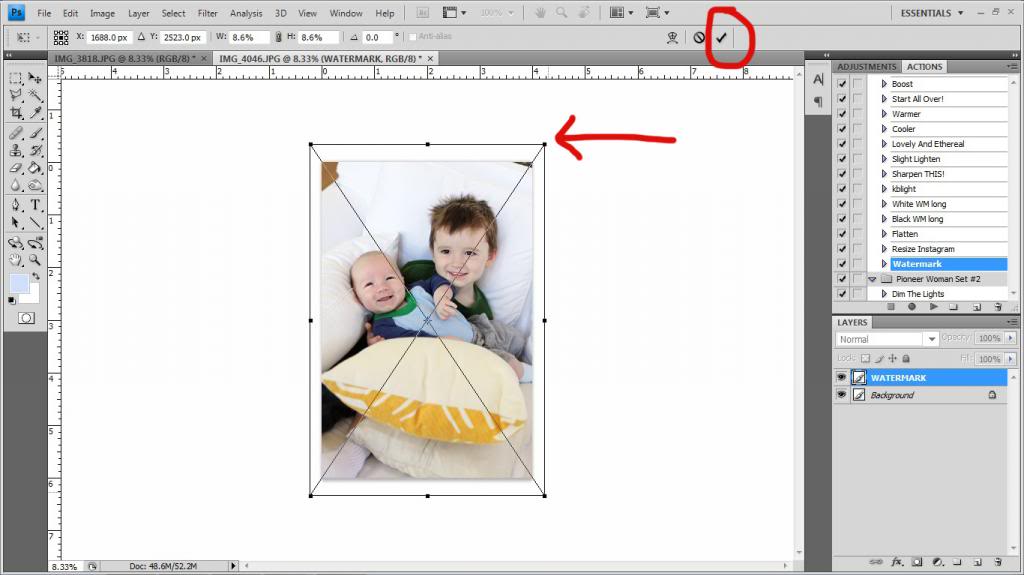
Your new transformed PNG watermark file should fit and now the URL shows in the bottom corner.
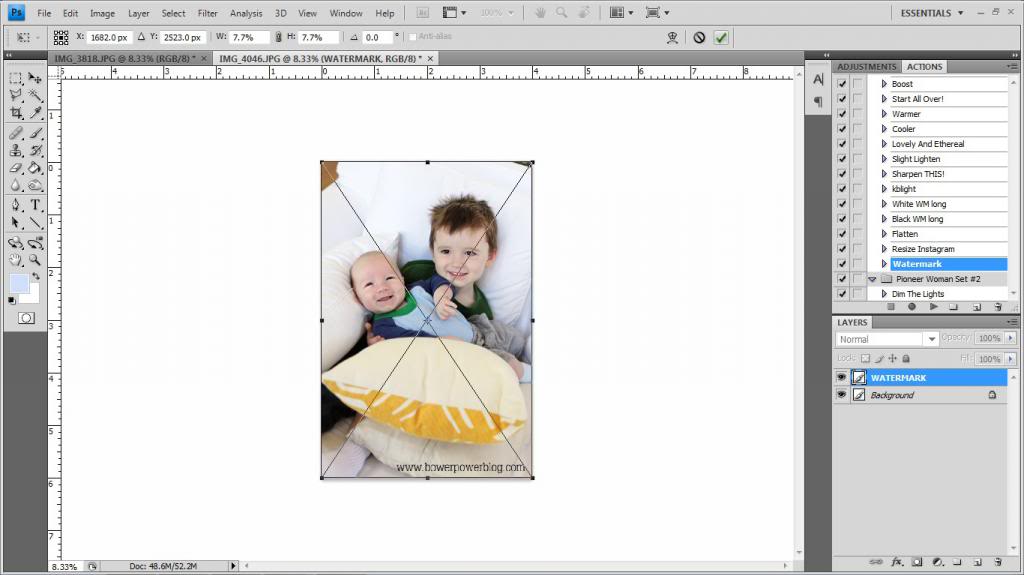
Click Flatten and Play Selection and your new pic will boast your watermark proudly.
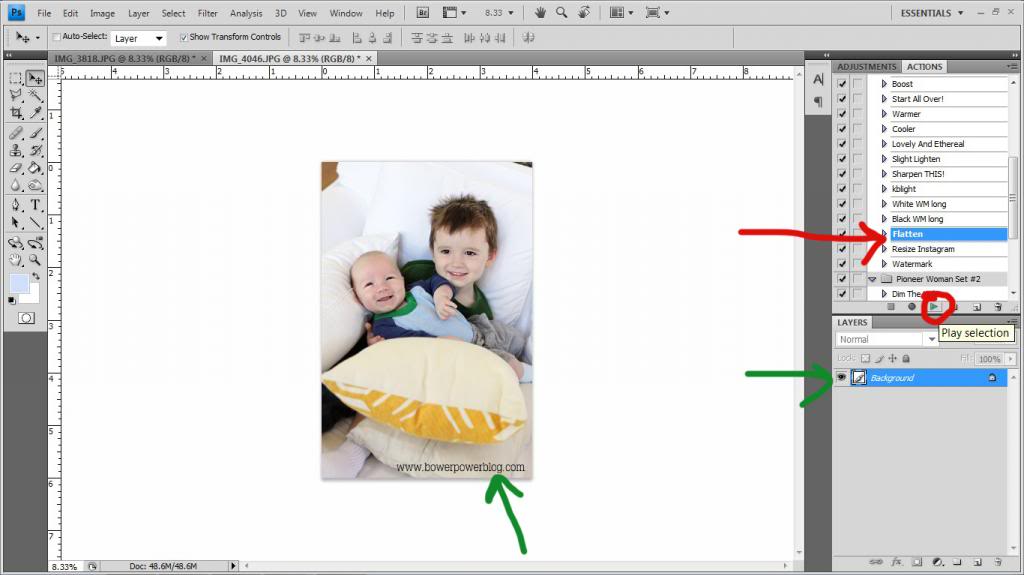
So that’s it! You officially have a watermarked photo ready for use and an action so that you can apply it to all your other photos! Happy photoshopping!
Thank you Thank you Thank you! I was looking for an easy to follow tutorial. Either I am dumb or they are too smart, but I can never understand photoshop tutorials. You made it super easy for me! I look forward to more tutorials!
XOXO,
Erica
Great tips. I know a lot of bloggers watermark every photo on their blog. I’m too lazy for that business. Want to steal a photo of my messy garage? Go for it! Maybe I’ll watermark some here and there just for fun…because I can.
I’m loving the Photoshop tuts. You make it easy to understand, not too wordy but always funny. I heart you Katie B!
Thanks Katie! This is really helpful! And that pic of your boys is absolutely adorable!!!
Thank you for the great advice! Love the picture of your boys, amazing how they are both smiling in the same direction! I am yet to master that particular photography skill 😉
Thank you soooo much for this post! The watermark button in Lightroom is kinda frustrating. This will be a lot easier to customize. Love these photoshop tutes!
Katie – I love you and your blog (you are a daily must-read!!)
I wanted to tell you there’s an even easier way to watermark your photos…I make my logo into a brush. Type your text (in black) or pull up your logo as a png on a transparent background. Make sure the layer is selected, then go to Edit and choose Define Brush Preset. Name your brush and it’s saved in your brushes for good. Then I can choose my opacity, use the brackets keys as the shortcut to make it larger or smaller, choose my color (depending on the picture), etc. It’s so fast and simple…
I’m all about working faster and smarter, and actions are my most favorite way to accomplish that. Have you looked into MCP Actions? They have a set called Fusion that is unbelievable. I use it on every single photo I’ve ever taken, and the layers within the completed action are so easy to customize. It’s pricey, but I have found it’s worth every penny.
Thanks for the joy you bring us every day! I know you always want more time with your boys, so if this saves you any time in your post-processing, it will make me happy!
I think your Photoshop tutorials are brilliant, thank you!
wow, thank you sooo much!! great tipps.. an very easy to follow and understand, just what i was looking for!! 🙂
Good post. We started watermarking our blog photos a couple months ago. We do them in batches. I’ll resize all the photos using a batch process and then watermark them all. It’s loads easier than resizing and watermarking each photo individually. Makes the photos much smaller and faster loading on the site and the watermarks are nice ways to get some content protection and can boost your blog name recognition.
This is so helpful! I’ll have to run home after work and try it out on my fotos. Cheers!
citizenfrederick.com
Love these tutorials!!! I learn more from them than from the Photoshop tutorials. Great job! Oh, and that really is the sweetest picture of your two boys.
Hey Katie,
You should really look into getting BlogStomp: http://blogstomponline.com/
It’s an app that allows you to easily resize, add borders and watermarks to your photos in batches. Saves a TON of time and totally worth it. Especially for the bloggers world 🙂
Awesome, I never knew you could make an action for that!!! Thanks for the tips!!!!
LOVE the tutorials! Keep them coming! After spending a ridiculous amount of money to have Photoshop for my personal use I am embarrassed to say I can’t do much beyond use the free actions I’ve downloaded.
So excited for this! Thank you! I’ve been lazy about adding watermarks to my Etsy shop pictures and now that I know how easy it is, I can get started!
I needed this. Thanks for sharing!
http://happinessiscreating.com/
Awesome!! I’ve always wondered how to make actions!! Please keep these tutorials coming!
Thanks Katie. I saw this post come up last night and thought I would give it a try and it was super easy. I ended up making two actions for different photo sizes I use frequently since it was so easy.
Great! I am so glad that it worked well! Actions make my life so much easier 🙂
xo – kb
Very cool. I actually batch edit most of my photos so I don’t apply all of these actions individually so I know how much of a time saver it is!
xo – kb
That’s how I edit too. Batch editing is so much easier and faster 🙂 Gotta save those minutes!
xo – kb
That is actually the first way I learned too! I really wanted to share how to make an action in this post and the watermarking was just a bonus but I am glad you spelled this out because some folks might prefer to watermark this way 🙂 THANK YOU!
xo – kb
Love this series!! Just got photoshop and I’m trying to learn how to use the darn thing!! I’ll keep coming back for more helpful hints. Thank you!!
I seriously love this new segment Katie! Thank you for posting these, and keep them coming!
This is fantastic! Going to really simplify things for me!
Do you ever use Photoshop Elements? I need a tutorial for that one too!!
Yes! It is very similar…I believe you can do this same thing in that one 🙂
xo – kb
THANK YOU!!!!
So many tutorials online are bad and this one was so straight forward! Sometimes after things like this I wonder- how am I not smart enough to figure out things on my own?!
Love your other tutorials as well- thank you! 🙂
I have a question about this…. (usually use PSE9 but have access to CS6 now). I hate the batch process options in PSE9 for placement on the watermark. I don’t like it dead center (hits people in the eyeballs if they are centered composition) but I want it to hit just below the middle of the image (not bottom left or right) and I LOVE batch processing! Could you create an action that would resize your image, change it to a png, and add the layer you show in this tutorial (I’d place the text in the center just below where the face would be)? I don’t know anything about PS at all but would love to be able to utilize it, especially for this (since you can’t create actions in PSE).
I’m sure that it’s possible to create an action like you describe. I don’t know who could be the best fit for making this for you but I’m sure that a photoshop forum could help you!
xo – kb
THANK YOU!! such a great tutorial! I appreciate it…and all your humor!
great tutorial. thank you
Hi Katie ! Thanks for these guidelines, very useful information you share on this blog ! Can you suggest what is the best place on an image to put a watermark? I am really confused about that. I have food photos mostly for food recipes. Thanks in advance
Hi Natalia – that is a great question! I have heard different things. I recommend that you place it somewhere that it won’t obscure the photo but it won’t be cropped easily. Usually that is a corner but is not too small.
xo – kb