This method takes thirty seconds. And as long as you have photoshop, you can make a regular white sheet backdrop look like a studio photoshoot.
First let’s show you what we are doing here. Our aim is to get a photo like this one:

He’s so cute. I love those big ole eyes. But that’s not really the point. The point here is to get a photo that looks like it has the white background (like in a studio) without actually being in a studio or having an expensive backdrop. I do this by using a white sheet and Photoshop. Like I’ve said before, I use the CS4 version of photoshop but this method is pretty much the same even if you have only Elements. So here is the step by step method I use to get the white background.
First you want to set up your subject on your sheet. I drape my white twin sized sheet over my deck railing and then down in front of Will. I usually take photos outside and in the shade, so it is a good idea to wait till the sun isn’t directly on your giraffe.
Here is my SOOC shot (straight-out-of-camera shot):
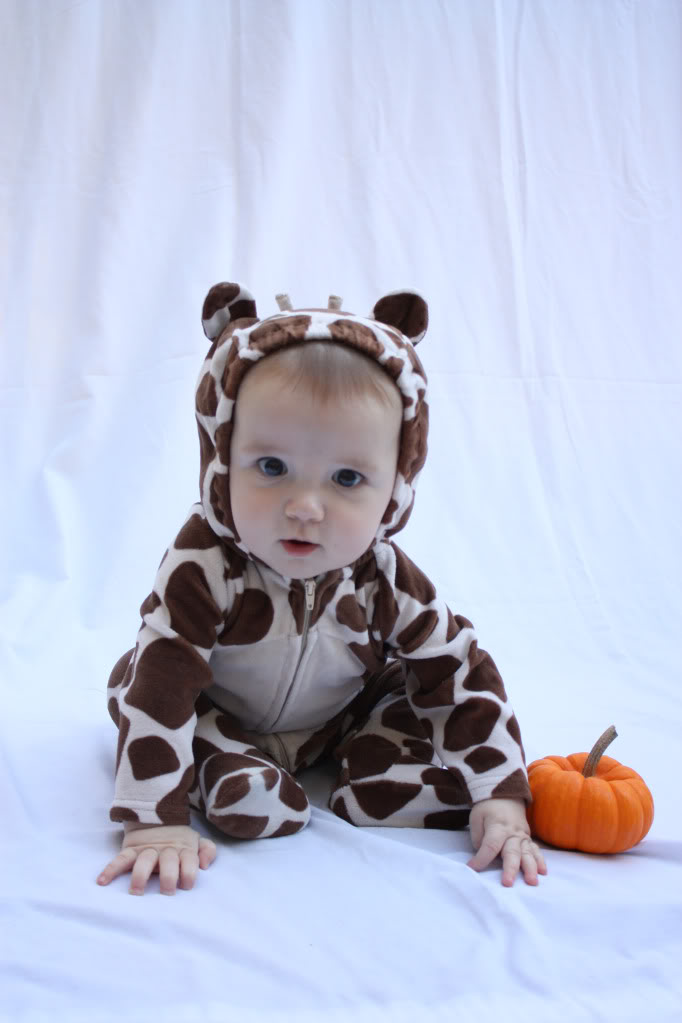
Pretty SHABBY. Not really exposed the best but I had a limited amount of time…only about the length of Baby Einstein’s Mozart video to wardrobe change and shoot a cranky baby five different times. And you can definitely tell that the sheet is in the background…not even an ironed sheet…just a regular ole wrinkled sheet…straight outta the linen closet.
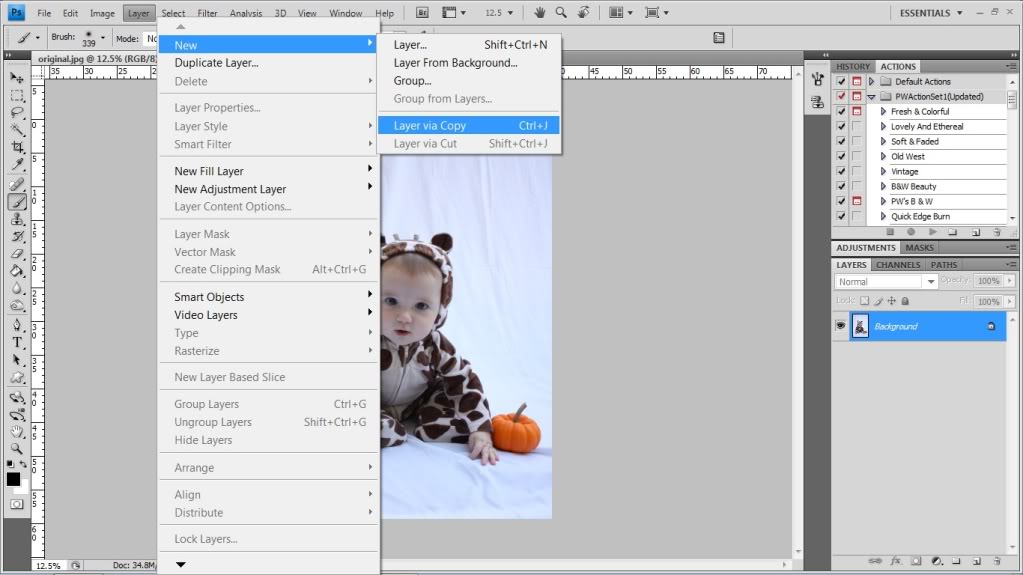
So the first thing I did after downloading it was to open it in Photoshop. Then I went to Layer/New/Layer via Copy.
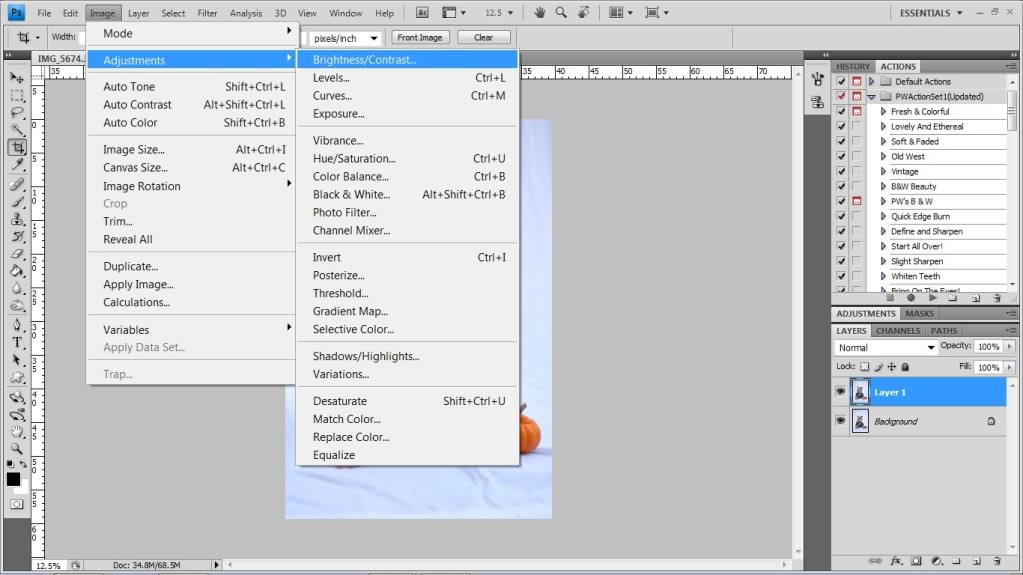
After my new layer is opened up, (make sure LAYER 1 is highlighted, not BACKGROUND) I went to Image/Adjustments/Brightness Contrast.
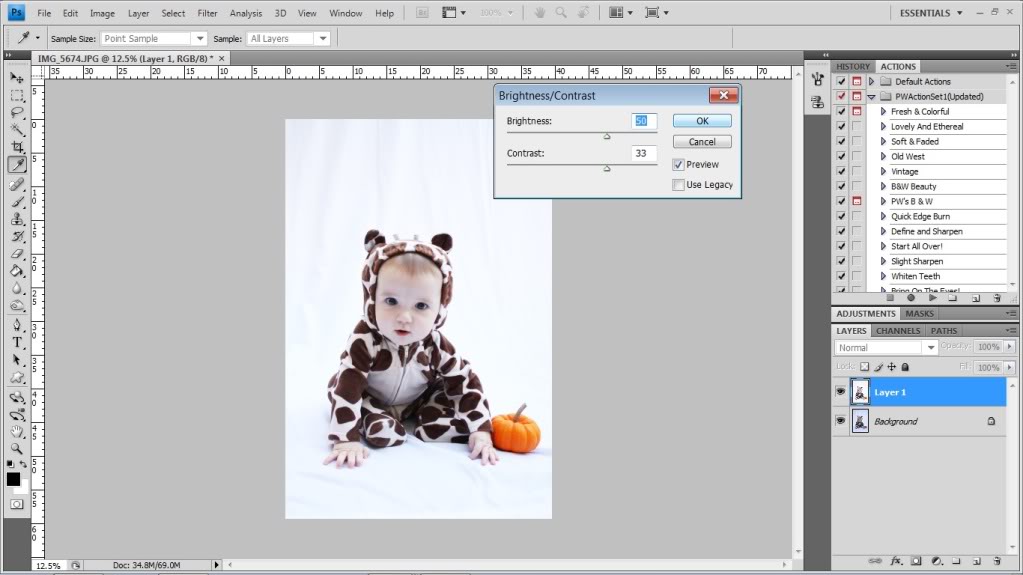
When the little Brightness/Contrast window opens, you are gonna adjust the settings by sliding the little nobbies to the right until the background looks pretty white around your subject. Don’t worry about washing out your main attraction…that doesn’t matter right now. You are focused on getting that background clean looking. Click ok when your sheet is looking more like a backdrop.
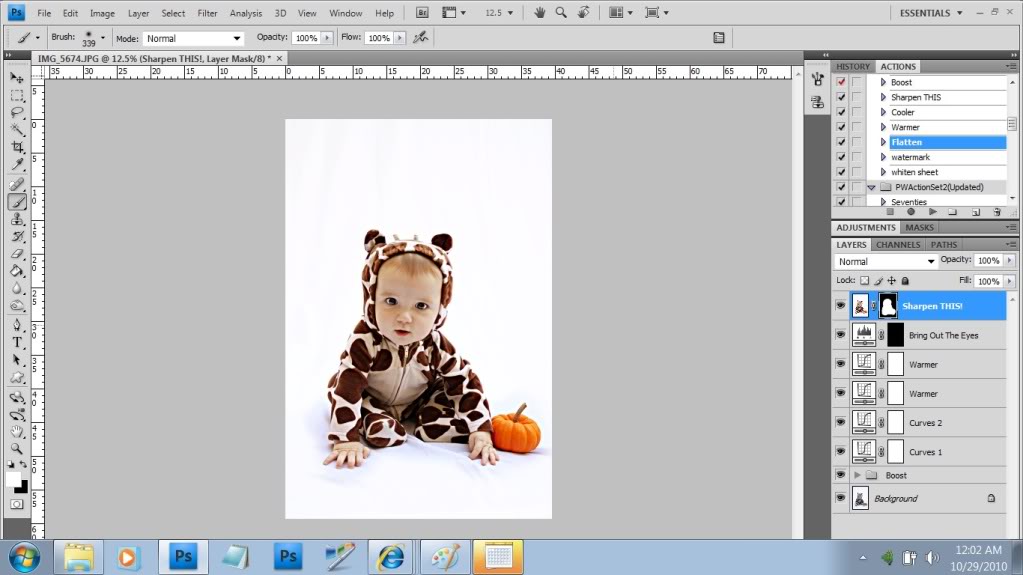
After your photo is adjusted, it should look something like this one below. Again…make sure your LAYER 1 is still highlighted. So now take your little mouse arrow and go down to the bottom right hand corner and click on the little dark grey box with the white circle on it. You just created a layer mask.
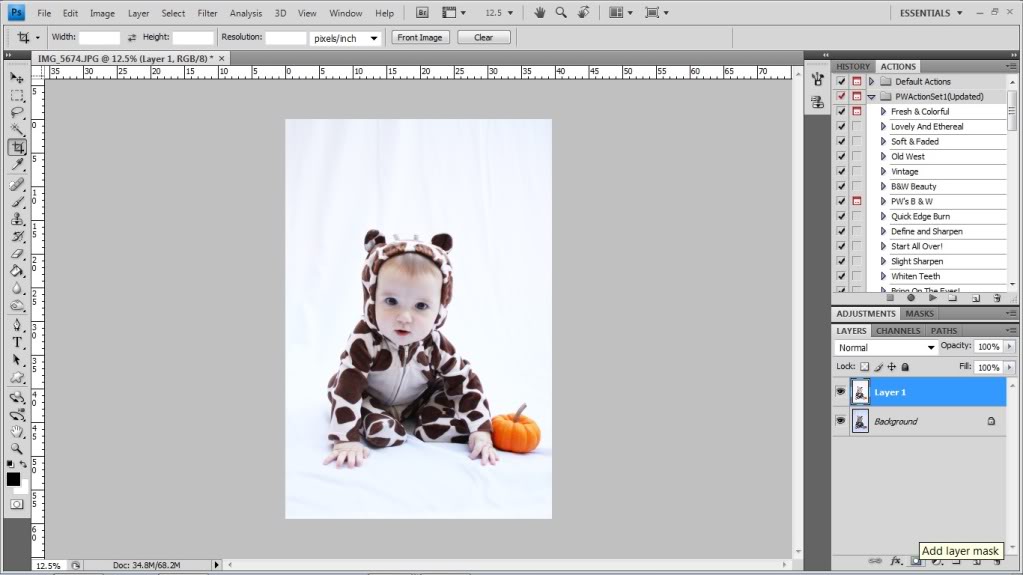
Now with that layer mask, you are going to select the paintbrush and the color BLACK.
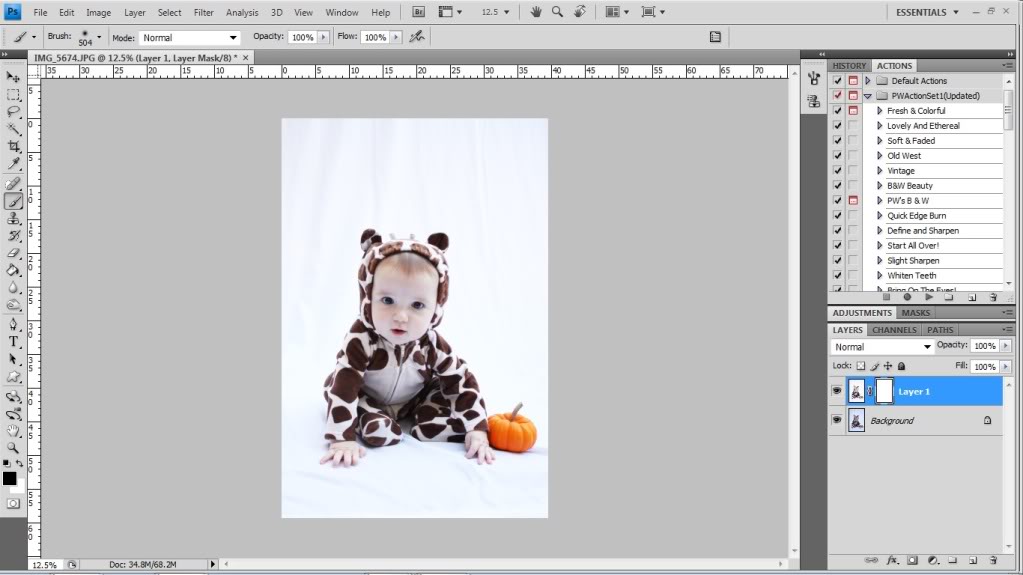
Now color in with black where you want it to be NOT washed out. Basically, you are ERASING the bright white. I like to have a little shadow right around my subject…that way it doesn’t look like I traced him and cut him out and pasted him on a white background. See below how I left a little sheet and shadow evident around the pumpkin and Will’s hands?
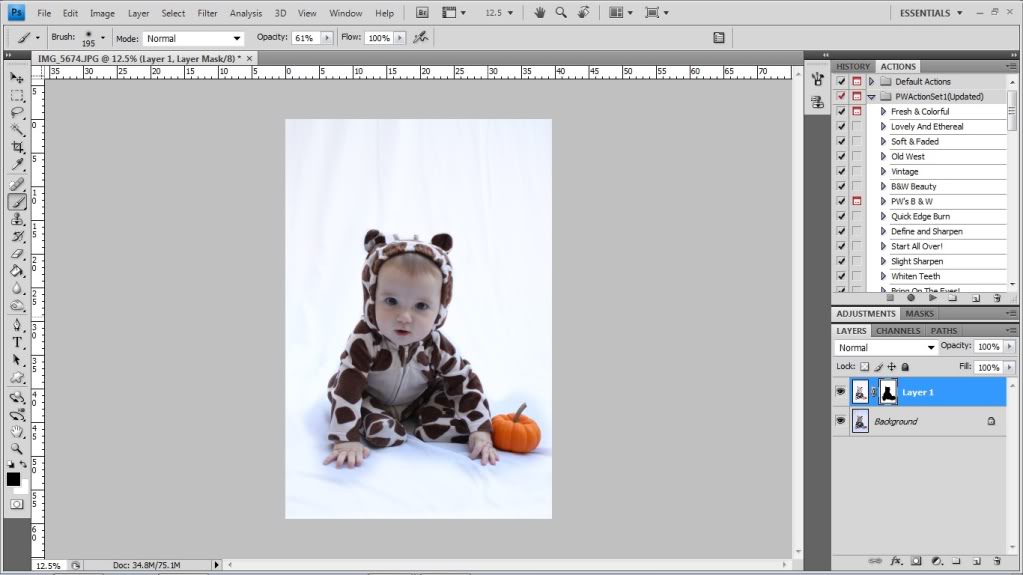
Now flatten all layers of your image.
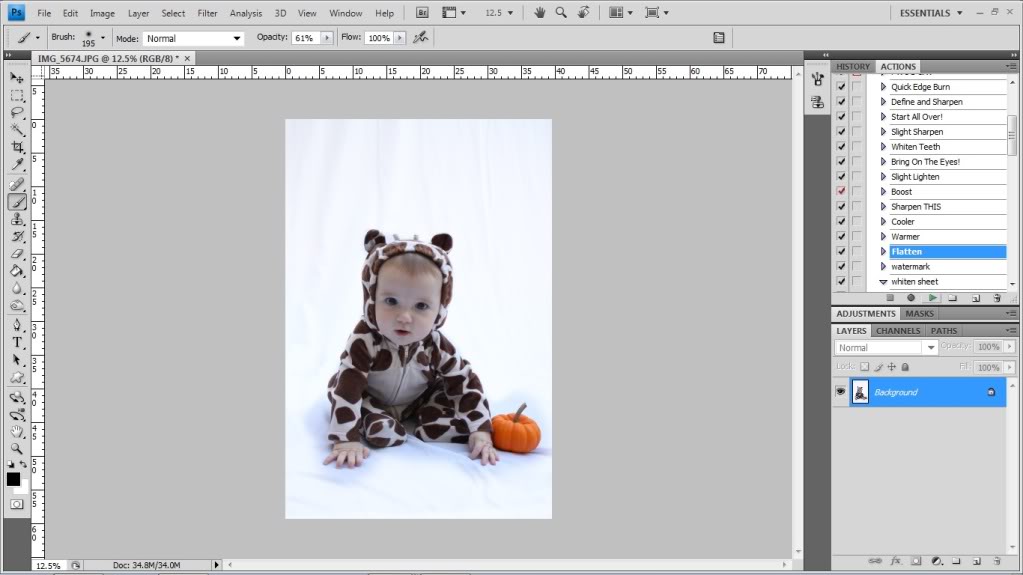
Okay…now that this is done, you can do your regular editing. With this one I lightened the entire image twice, warmed it up, brought out his eyes (here’s a tutorial on how to do that), and sharpened the little booger. These are all Pioneer Woman actions that are available for free on her blog (here is the link to download set 1).
And there we have it…one fully edited image that only took thirty seconds. Here is the before and after:


Now if you really want to get crazy, you could always erase the little blue sheet marks up above his head. But I wasn’t that picky. But if you are, just go for it. Now go grab a white sheet (and if you are like me, avoid the avalanche in your linen closet), and your camera and get to those ‘studio shots’. You might want to practice on an inanimate object first. Unless you have Baby Einstein…in that case, shoot away!
Let me know if you have any questions in the comments and I will do my best to answer them in the next couple days, ok? Or if you are a photoshopper and know the answer, feel free to help out a sistah or brotha in trouble 🙂
Now that I see the before and after, I can see the sheet in the after version. Before, I couldn’t even tell.
So would you ever think about setting up a professional type studio, with professional lighting and professional backdrops, or would you just stick with Photoshop?
Thanks for sharing this fabulous technique! Your little guy is the cutest model ever!
I love the photography tutorials. I would really like to start editing my photos more. Obviously it can make a huge difference! I’ve read that Photoshop Elements is good for beginners. Would you recommend Elements or do you think getting better version is a better investment? I know you’re not expert on all things Photoshop but thought you might have some insight 🙂
Thanks for the Photoshop tips. I use Aperture and it seems like it would be easier the way you do it. The Baby Einstein comment made me laugh, I do that too! I think I need to play it on my iPhone and hold it above my camera, so it looks like he is looking at the camera. I have so many pictures of my son smiling and looking away from the camera!
I also love the photography tutorials! I have elements 8…I will definitely be trying this whole white background thing someday!
Thanks for sharing!
I am a Photoshopper (hello, dork, right here!). Regarding Elements – I used Elements before I got the full blown Photoshop and it definitely can do some editing, nothing to scoff at. However, I’d probably drop down just a *little* extra cash and get Lightroom. It’s a organization AND editing software, and the edits you can do are pretty comprehensive. It also has some cool presets light Creamtone and Hypersaturation.
I tried this with a picture of my little one. For some reason I can’t erase after I created the layer mask…boo! I’ll keep trying. Thanks for the Photoshop tips. Obviously I need them! : )
Great tutorial!! I use elements 8 & love it, but there are a lot of tutorials and actions for Photoshop that I’d love to check out. I think lightroom is my next step until I’m a little bit better photographer 😉
Cute! Something a lot of semi pros do is use a sheet of plexi glass to avoid wrinkles on the ground. You can get it pretty cheap. Although you probably could have closed down on the aperature and pulled him away a bit, and you wouldn’t even see the wrinkles.
Hey Katie!
This is WAY off topic, but just wanted you to know I have seen those green pillows in your living room on TV twice already! They are the lime green ones with the white “tree branch and leaves” running vertical on the sides…
Seen them on Big Bang Theory in Penny’s apartment and on an “Income Property” makeover on HGTV!! How cool is that!! Are they IKEA pillows? I may have to pick some of those up being they are so popular!
Awesome! Do you know if you can do this in Lightroom, too? I just got Lightroom and I have no idea how to use it! 🙂
I just found your blog recently, I’ll admit, I was one of those “crashers’ who visited from YHL (they’re awesome!!) but I’ve totally fallen in love with your blog- you make me laugh every post, thanks so much!
I love your cheap/DIY projects- its always best to get creative on the cheap
They are Ikea pillows Amanda! And that is very cool that I own ‘famous’ pillows. Who woulda thunk that such a simple little guy would make it as a star!
xo – kb
Thank you for posting this! I have been a reluctant Photoshop owner for a year now and I am finally getting around to using it (I mean…just now…like this morning!). I am hoping to take and edit my own family photo for our Christmas cards this year…and this tutorial combined with the Pioneer Woman actions are so helpful 🙂
Hi Katie, it’s been so long since I have stopped by your blog! I wanted to say hello and wish you and your adorable son a Happy Halloween!!!!!
Karen
Awesome! Thanks soooo much for sharing!!!!! I have an old Elements version and cannot wait to upgrade (soon!!!!). I am Photoshop illiterate, and I love when you post tips! Keep them coming please!!!
Jennette
Katie,
Dude, are you a Photoshop affiliate of some sort? Or if an Amazon affiliate, you should post the affiliate link because I am seriously going to buy Photoshop because of this post and the “Bring out the Eyes” post. hah. No seriously… post the link and I’ll buy it and give you credit for the referral. 😉 seriously
Loved the tutorial!! Would love to see more of these photoshop tutorials on the blog. 🙂
That’s a good idea Beth…not because I wanna make money (although that would be nice) but because then I wouldn’t have to keep emailing people the link to different products! You so smart.
xo – kb
thanks! I was frustrated with seamless paper because of their width limitations and cost, so I went and bought some fabric (also not cheap, but at least reusable) and was annoyed with the wrinkles. I found this blog post and bam, solved my wrinkle problem!!! thanks for the advice
yay! I’ll have to follow your blog and learn with you!
Ok, i have a “greenscreen” with no extra lighting so everytime i use that to take pics i just get a Halo outline around the subject. If i just stick to a white sheet will there be any halo around the object or can i easily take pictures with a white sheet and add my own background in if i wanted to later?
The point of a greenscreen is to be able to quickly and easily identify the background in photo editing and replace it with something else, right? Like you can easily select all the green and then erase it to drop in another background…something along those lines. A white sheet is more for the ‘studio’ effect….where you will be substituting a white piece of fabric for a giant roll of white thick studio paper that they use and can cost an arm and a leg. I don’t think the two are interchangeable…but that is just me…
xo – kb
Katie,
Just used your technique (way better than what I had previously done to make a white background) on some V-day pictures of my little boy. Just wanted to throw a suggestion out there. I used Curves instead of the Brightness control – seemed to have more control over how blown out the background got. I am definitely not a Photoshop expert but just passing along what I’ve learned! 🙂 Thanks for the tutorials!
Ok, this is AGES late (I’ve just finally gotten around to trying this out) so I know the chances of you seeing this are slight, but… like someone else said, I can’t “erase” the mask layer. When I use the paint brush with black it actually paints BLACK over their faces. 🙁 If you happen to get this and know what I’m doing wrong I’d love to finish my pics! Thanks!
Julie, on the layer sidebar, after you add the mask layer there should be two little side-by-side boxes with what looks like a paper clip in between. Make sure the right hand box is highlighted when you paint or erase. You are actually ‘blacking’ out the mask layer thumbnail (vs. the layer thumbnail which will paint black on the faces).
Hope this helps!
xo – kb
Hi! I’ve grabbed my cute nephew and I’ve taken lots of photos of him sitting in front of a white sheet, and now I am up to editing them! Except I am just wondering if there is a trick to painting around the edges of his body when doing the layer mask black? I have zoomed in and tried different size brushes, but it still comes out noticeably rough. I would really love it to be smooth around his outline, like your one 🙂 If anyone could help me out I would really appreciate it! I’m only a photoshop beginner…
Try adjusting your opacity when painting the layers…it helps blend things!
xo – kb
Thank you!! Now I might have it done in time for his 1st birthday tomorrow…!
p.s that was the quickest response ever! 🙂
Hi, I came across your blog while looking to purchase a white backdrop. I downloaded the free trial of Elements. I was able to follow your instructions up to the “flatten layers.” I could not find it. I am needing a white background because I own an online clothing boutique, and I have to take pictures of some of my items on a mannequin. I like for it to look professional even though I am not a professional photographer. With you being a photographer, do you have any suggestions for me when taking my pictures. Sometimes my images look short and wide..is it the camera I am using? Sometimes they just do not look the same as professional. Thanks!
Email me a pic and I will take a look!
xo – kb
I know this question isnt really about this method but i thought you might know what im doing wrong, I just take pictures of my kids, so its just a hobby but my youngest has blonde hair but in all of his pictures his hair looks red. Is there a setting on the camera causeing ti or is it lighting?
Your camera could be doing it – or your lighting…there are a lot of variables. It might be helpful to just photoshop the red out of his hair 🙂
xo – kb
Hi. I’m trying to create white backgrounds for two different type of photos. One is our vectorized logo. The other are regular photos of stuff, without being on a sheet. Do you know if Lightroom or Elements would do either of those things? And be easy enough for a complete beginner at editing photos? Thanks and loved the blog!
Hi,
How did you remove the little blue sheet marks?
Thanks
Sometimes if there still are sheet marks after lightening, you can clone them out or just make a new copy layer, go to your hue/saturation adjustment, and adjust only the blue for more brightness and less saturation…then make sure to click ‘add layer mask’ and paint the parts black that you don’t want adjusted.
Good luck!
xo – kb
im only 14 and i have this nice pic with me sitting on the amp im trying to make it my album photo but i dont know how to fix it may you please do it for me i know you dont do things like this for free im just asking if you cant i understand and im just wondering i to it by a white wall would it still work thanks
Possibly! You could always try to edit it with a free program online!
Good luck!
xo – kb
Hi Katie,
I used to be good with Photoshop, and since I have not used in 5 or so years, I have kinda lost my touch.
I purchased a lot of backdrop equipment to take photos of my lovely 10month old daughter, and have pictures of her in front of a white backdrop from her Christening.
I have tried and tried using your methods, and unfortunately its not step-by-step enough, plus the actions I have tried, are not applying.
Do you take jobs on? I have one picture of my daughter that I would love to be made brighter, whiter and brilliant.
Can I email you direct and you give me a cost on doing this for me?
Regards,
Sonya
I love this tutorial. Thanks so much.
Excellent tip! I’m sure even professionals do a bit of Photoshop work to make a totally white background.
Thank you so much for this tip! I’m going to use this on certain shots after taking my sister’s senior pictures this weekend! Much appreciated! 🙂
Hi, I too am trying to paint the black on, but its actually colouring in my picture. I am using PS CS5 and cant seem to find the button u explained earlier. Are you able to help?
Thanks!
Look in your little layers box in the sidebar. You wanna make sure the tiny square is clicked – not anything else so that you can paint on the adjustment.
xo – kb
Thank you so much! I have just started using this awesome technique and finally my work is going to look professional and awesome! I love how simple it is!! Thank u for sharing!!
This is going to be really annoying because it’s been asked by a couple people already! I don’t see the tiny square with a paper clip like icon in the layers box. Im pretty familiar with PS and have CS4, but I must be blind….can you dumb it down even more for me please? 🙂
Ok, Im a dork and was clicking quick mask not layer mask! Oopsies!
Hi,
I am so happy I found your tutorial. I have a jewelry business, and take lots of pictures. My pictures tend to have a dingy gray background. I was following along with the steps you have written here, but I am stuck. I got past the brightness/contrast step, and now I am stuck on the step where I am supposed to put the little mouse arrow in the bottom right hand corner. I have a couple of arrows, and neither one of them gives me a dark gray box with a little white circle in it. It’s just an arrow. I am not sure what to do. This is the first time I have attempted photoshop. I usually use picassa.
Thanks so much for your help.
Amanda
Put your mouse over the ‘add layer mask’ that is in the bottom of the sidebar box…
xo – kb
Hey, every time i’ve had a problem with adapting my environment for photos your site has popped up and helped. Just wanted you to know i think your awesome and keep up the good work 🙂
i want to learn.how to make white backround of photo.please help .
Don’t laugh- I used this trick to photograph my own baby (our dog) for a recent blog post! The pictures turned out really wall! Check it out here: http://www.freshcoatofpaint.ca/2013/02/what-we-have-learned-from-feeding-our.html
I linked back to you for the tutorial. 🙂
Awesome! I can’t wait to check it out 🙂
xo – kb
hii:)
look amazing .
of i want to do that with a black Backdrop? how can i do that ?
i want to by model:) and i want”studio” photo..
but i am 16 🙂 i dont have o lot of money
of you can halp my that will so nice of you 🙂
tnx
I’m sure you could do the same with a black sheet 🙂
xo – kb
tnx for the fast answer
just black sheet?
all the ather step are the same?
the layer mask .still pick black color?
yup! All the other things should still be the same. Adjustments will need to be made but as you learn photoshop, it will come.
xo -k b
hii .. me again:)
i take same photos of me.. with white fabric
but i don’t konw if the photos or good.. or whet i can do with photoshop i buy photoshop but i dont realy konw whet to do with the photos.. can i ask for huge favor?:))
can i show you 1-2 photos i take (by e-mail or facebook)
and you can tell my whet i can do to it so it wil look professional.. like the photos you make :)..or you can do 1 photos and tell me whet you did?
i will by so grateful .. i realy need professional looking photos..i buy white fabric and camera.. but i still don’t look that professional 🙁
of you have the time and you can halp my that will by amazing:)
I’m sorry. I can’t take on any commissioned photoshop tasks right now but there are lots of folks out there that are great at it and are able to spend the time on it! Maybe go on facebook and ask if anyone can help you.
xo – kb
I featured this great post on a compilation post I wrote about resources for cheap photography hacks. Thanks!
http://katiebennettphotography.weebly.com/1/post/2013/11/objects-on-white-for-less.html
Love your blog. Thanks for the info. I am always looking for background ideas. You have now created a backdrop monster, I can’t wait to hunt for different things.
As the background is kind of plain here and as the edge of the image is not the complex one, so its okay to choose the photo editing app like SanpSeed. But if the image was not simple enough then it would not give better result! In such cases Photoshop is the best tool to remove background.
Thanks for your excellent post. I want to learn.how to make white background of a photo.
Thanks for good white photo backdrop Tutorial with us sharing. It’s really helpful for me.
Your white photo backdrop tutorial is cool. Your kids model is also cutest 🙂
Awesome tutorial about white photo background making. Thank you